Introduction
Is your garage door refusing to open or close smoothly, leaving you stranded in your driveway? You are not alone; thousands of homeowners face this frustrating issue when the internal mechanism of their opener fails. Understanding how to address the Screw Drive Carriage Pull For Genie Garage Door Opener issues can save you hundreds of dollars in service calls and restore peace of mind to your daily routine.
In this guide, we will break down exactly what goes wrong, why it happens, and how you can fix it yourself with confidence. Whether you are a seasoned DIYer or a complete beginner, we will walk you through every step with clarity and precision.
What Is the Screw Drive Carriage?
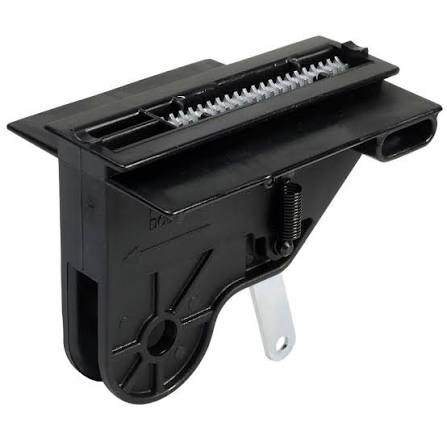
Before diving into the repair, it is crucial to understand the component at fault. The carriage is the moving part that travels along the long metal screw (the drive shaft) inside your Genie opener. It connects to your garage door via the arm assembly.
When you press the remote button, the motor turns the screw. The carriage rides along this screw, pulling or pushing the door open and closed. Over time, friction, lack of lubrication, or wear can cause the carriage to bind, slip, or fail to pull effectively.
Why Genie Screw Drives Are Unique
Unlike chain-drive or belt-drive models, Genie screw-drive openers use a threaded steel rod. This design is known for its durability and low maintenance requirements. However, when issues arise, they often stem from the interaction between the carriage nut and the screw threads.
According to industry standards, proper lubrication is the single most important factor in extending the life of these components. Without it, metal-on-metal friction creates heat and wear, leading to the “carriage pull” failure we are discussing.
Common Signs of Carriage Failure
How do you know if your problem is specifically related to the carriage pull mechanism? Look for these telltale signs:
- The Motor Runs, But the Door Doesn’t Move: You hear the hum of the motor, but the carriage stays stationary.
- Grinding or Screeching Noises: A high-pitched sound indicates metal grinding against metal due to dry threads.
- Jerky Movement: The door starts and stops abruptly instead of moving smoothly.
- Visible Wear on the Screw: If you inspect the drive screw, you might see flat spots or excessive rust where the carriage usually sits.
If you notice any of these symptoms, immediate attention is required to prevent further damage to the motor or the door springs.
Tools You Will Need
Safety and preparation are key to a successful repair. Gather the following tools before you begin:
- Stepladder: To safely reach the opener unit.
- Socket Set or Wrenches: Typically 7/16″ or 1/2″ for mounting bolts.
- Lithium-Based Grease: Crucial. Do not use WD-40 or standard oil. Genie specifically recommends lithium grease for screw drives.
- Clean Rags: To wipe away old, dirty grease.
- Screwdrivers: Both flathead and Phillips head.
- Replacement Carriage Assembly (if needed): Ensure it matches your specific Genie model number.
Safety Warning: Always disconnect the power to the garage door opener before performing any maintenance. Additionally, ensure the door is fully closed and secured to prevent accidental falling.
Step-by-Step: Fixing the Screw Drive Carriage Pull
Follow these detailed steps to resolve the issue. We will focus on cleaning, lubricating, and potentially replacing the carriage.
Step 1: Disconnect Power and Secure the Door
Unplug the opener from the electrical outlet. If your unit is hardwired, turn off the circuit breaker. Manually close the garage door completely. This ensures that there is no tension on the carriage while you work.
Step 2: Inspect the Drive Screw
Climb your ladder and locate the long threaded rod running the length of the opener rail. Look for debris, rust, or dried-out grease. If the screw is heavily corroded, it may need replacement, but often, a thorough cleaning is sufficient.
Step 3: Remove the Old Grease
Using your clean rags, wipe down the entire length of the screw. Remove all the old, blackened grease. This step is vital because new grease will not adhere properly to a dirty surface, and trapped grit can accelerate wear.
Step 4: Check the Carriage Nut
Examine the plastic or nylon nut inside the carriage assembly. In many Genie models, this nut is designed to wear out before the metal screw does. If the threads inside the nut are stripped or cracked, the carriage will slip.
- If the nut is intact: Proceed to lubrication.
- If the nut is damaged: You must replace the carriage assembly. Refer to your owner’s manual for the specific part number.
Step 5: Apply Lithium Grease
Apply a generous amount of lithium-based grease to the screw threads. Focus on the area where the carriage travels. Rotate the screw manually (if possible) or move the carriage back and forth to distribute the grease evenly.
For more technical details on garage door mechanics, you can refer to general engineering principles found on Wikipedia.
Step 6: Reassemble and Test
Reattach any covers you removed. Plug the opener back in. Stand clear of the door and press the wall button. Observe the carriage movement. It should glide smoothly without noise.
| Action | Expected Result |
|---|---|
| Motor Activates | Carriage moves immediately |
| Door Movement | Smooth, consistent speed |
| Sound Level | Quiet hum, no grinding |
Troubleshooting Persistent Issues
What if the problem persists after cleaning and lubricating? Here are a few advanced checks:
Misaligned Rail
If the rail is bent or misaligned, the carriage may bind at specific points. Use a level to check the alignment of the rail. Adjust the mounting brackets if necessary to ensure a straight path.
Worn Motor Gears
Sometimes, the issue isn’t the carriage but the gears inside the motor head that turn the screw. If the motor runs but the screw doesn’t turn, the internal gears may be stripped. This requires a more complex repair or motor replacement.
Limit Settings
Incorrect travel limits can cause the carriage to stop prematurely. Consult your Genie manual to reset the open and close limits. This ensures the carriage travels the full distance required to open and close the door completely.
When to Call a Professional
While many carriage issues are DIY-friendly, some situations require expert assistance:
- Broken Springs: Never attempt to repair garage door springs yourself. They are under extreme tension and can cause severe injury.
- Electrical Issues: If you suspect wiring problems or circuit board failures.
- Structural Damage: If the rail or motor housing is cracked or broken.
Investing in professional help for these complex issues ensures your safety and the longevity of your system.
FAQ Section
Q1: How often should I lubricate my Genie screw drive?
A: Genie recommends lubricating the screw drive once a year. However, if you live in an area with extreme temperatures or high humidity, you may need to do it every six months. Regular maintenance prevents the carriage from binding.
Q2: Can I use WD-40 on my Genie screw drive?
A: No. WD-40 is a solvent, not a lubricant. It will strip away existing grease and leave the metal unprotected, leading to increased friction and faster wear. Always use a lithium-based grease specifically designed for garage door openers.
Q3: My carriage makes a clicking sound. What does this mean?
A: A clicking sound often indicates that the carriage nut is slipping over the threads. This usually means the nut is worn out and needs replacement. Continuing to use it can damage the screw itself.
Q4: How do I know which replacement carriage to buy?
A: Check the model number of your Genie opener, usually located on the back panel of the motor unit. Use this number to find the compatible parts list on the Genie website or consult with a local dealer. Common models include the ProMax and Excelerator series.
Q5: Is it better to replace the whole opener or just the carriage?
A: If your opener is less than 10 years old, replacing the carriage and lubricating the screw is cost-effective. However, if the unit is older and has other issues, such as frequent sensor failures or motor struggles, replacing the entire opener might be a better long-term investment.
Q6: Why does my door reverse before hitting the floor?
A: This is often a limit setting issue, not necessarily a carriage problem. Adjust the close limit knob on the motor unit slightly to allow the door to travel further. Ensure nothing is obstructing the safety eyes at the bottom of the door tracks.
Conclusion
Fixing the Screw Drive Carriage Pull For Genie Garage Door Opener is a manageable task for most homeowners. By understanding the mechanics, using the right lubricants, and performing regular maintenance, you can extend the life of your opener significantly.
Remember, the key to success is patience and attention to detail. Don’t rush the cleaning process, and always prioritize safety. A well-maintained garage door not only operates smoothly but also enhances the security and curb appeal of your home.
If you found this guide helpful, please share it with your neighbors or on social media. Helping others solve their garage door woes builds a stronger, more self-reliant community. Happy fixing!
Leave a Reply