It is incredibly frustrating when you finally secure your home for the night, only to find it wide open again. If you are thinking, “my garage door keeps opening after I close it,” you are not alone, and we are here to help you solve this annoying issue quickly.
Why Does My Garage Door Keep Opening After I Close It?
Before we grab our tools, let us understand the root cause. Modern garage doors are equipped with mandatory safety mechanisms. If the system detects even a slight resistance or an obstruction, it will automatically reverse to prevent injury or damage.
To understand the mechanics behind this, you can read more about the evolution of the garage door opener on Wikipedia, which details how modern safety reversals were mandated in the 1990s.
When your door refuses to stay shut, it is almost always due to one of four common culprits. Let us break them down so you can diagnose the exact problem.
1. Are Your Safety Sensors Misaligned or Dirty?
The most frequent cause of a reversing garage door is the photo-eye safety sensors. These are the small black units located near the floor on both sides of the door track. They shoot an invisible infrared beam across the door’s path.
If this beam is broken, blocked, or misaligned, the door thinks a car, pet, or child is in the way. Consequently, it will close, hit the floor, and immediately bounce back up.
How to check and fix this:
- Inspect the LED lights: Look at the sensors. One should have a steady green light (the sender), and the other should have a steady amber or red light (the receiver).
- Check for blinking: If the receiver light is blinking or completely off, the sensors are misaligned.
- Clean the lenses: Gently wipe the sensor lenses with a clean microfiber cloth to remove dust, spider webs, or condensation.
- Realign the eyes: Loosen the wing nut on the blinking sensor, gently adjust it until the LED glows solidly, and tighten it back up.
According to a study by the International Door Association (IDA), nearly 70% of residential garage door malfunctions stem from misaligned safety sensors or dirty lenses.
2. Is the Travel Limit Switch Incorrectly Set?
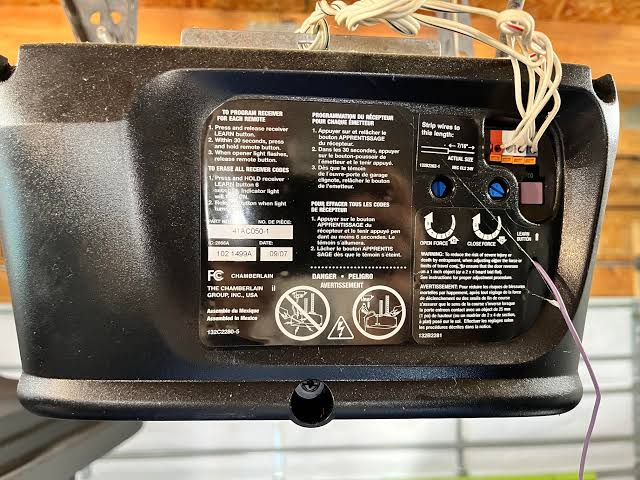
The travel limit switch tells the motor exactly how far to move the door down before it considers the door “closed.” If this setting is slightly off, the door will hit the floor before the motor realizes it has reached the bottom. The motor interprets this premature contact as hitting a solid obstacle, triggering an automatic reverse.
Step-by-step guide to adjusting the limit switch:
- Locate the limit adjustment screws on the back or side of the motor unit. They are usually labeled “Up,” “Down,” “Open,” or “Close.”
- Identify the “Down” or “Close” limit screw.
- Use a standard flathead screwdriver to turn the screw.
- Turn it exactly 1/4 inch (or one-quarter turn) counterclockwise to increase the down travel distance.
- Press the wall button to test the door.
- If it still reverses, repeat the process in 1/4 inch increments until the door closes completely and the rubber seal compresses slightly against the floor.
3. Are There Track Obstructions or Roller Issues?
If your door tracks are dirty, bent, or if the rollers are worn out, the door experiences excessive friction. The motor’s force-monitoring system detects this extra drag and assumes the door is crushing an object.
- Inspect the tracks: Look for dents or gaps. Use a rubber mallet to gently tap minor dents back into shape.
- Clean the tracks: Wipe the inside of the metal tracks with a damp rag to remove hardened grease and debris.
- Lubricate properly: Spray a silicone-based lubricant or white lithium grease on the rollers and hinges. Never use standard WD-40, as it attracts more dirt and dries out the moving parts.
4. Is the Wall Button Shorted or Sticking?
Sometimes the issue is not the door itself, but the control mechanism. If the wall button is physically stuck, or if the wires behind it are fraying and touching each other, it can send a continuous “open” signal to the motor.
Press the button a few times to ensure it clicks smoothly. If it feels mushy or sticky, you may need to unscrew the console from the wall, check for loose wires, and potentially replace the button.
DIY Fixes vs. Calling a Professional
Not every issue requires a service call. Here is a quick comparison table to help you decide whether to tackle the problem yourself or hire an expert.
| Issue Type | DIY Difficulty | Estimated Cost | When to Call a Pro |
|---|---|---|---|
| Dirty/Misaligned Sensors | Very Easy | $0 (DIY) | If replacing the sensor units entirely. |
| Limit Switch Adjustment | Easy | $0 (DIY) | If the motor unit is making grinding noises. |
| Track Cleaning/Lubrication | Easy | $10 – $15 | If the metal tracks are severely bent. |
| Broken Torsion Springs | Dangerous | $150 – $300 | Always call a pro. High-tension springs can cause severe injury. |
| Snapped Cables | Dangerous | $150 – $250 | Always call a pro. Cables are under extreme tension. |
Pro Tip: If your door is making loud popping sounds or the cables look frayed, stop immediately. These are signs of broken springs or cables, which are extremely dangerous to fix without professional training.
Frequently Asked Questions (FAQ)
Can extreme weather cause my garage door to reverse?
Yes, absolutely. Extreme temperature fluctuations can cause the metal tracks to expand or contract, slightly altering the door’s alignment. Additionally, cold weather can make the lubricants in the motor thick and sluggish, increasing resistance. If this happens in winter, thoroughly clean the tracks and apply a cold-weather-safe silicone lubricant.
How much does it cost to fix a reversing garage door?
If the issue is simple, like realigning sensors or adjusting the limit switch, it will cost you $0 if done yourself. If you hire a professional technician to diagnose and fix a sensor or limit issue, expect to pay a standard service fee ranging from $100 to $175, depending on your local market rates.
Is it safe to force my garage door to stay closed?
No, it is highly unsafe. Some homeowners try to hold the wall button down until the door closes, or use the manual lock to force it shut. This completely bypasses the auto-reverse safety features mandated by federal law. If the door reverses while someone or a pet is underneath, it can cause fatal crushing injuries. Always fix the root cause.
How often should I maintain my garage door sensors?
You should perform a quick visual inspection and wipe down the sensor lenses every 3 to 6 months. Additionally, test the auto-reverse safety feature monthly by placing a 2×4 piece of wood on the ground under the door. When the door touches the wood, it should immediately reverse.
Conclusion
Dealing with a garage door that refuses to stay closed is a hassle, but it is rarely a catastrophic failure. By systematically checking your safety sensors, adjusting the travel limits, and keeping your tracks clean, you can restore your door’s functionality in under an hour. Not only does this save you money on repair bills, but it also ensures your home remains secure against the elements and intruders.
Found this guide helpful? Do not keep it to yourself! Share this article on Facebook, Twitter, or Pinterest to help a friend or neighbor secure their home today!
Leave a Reply