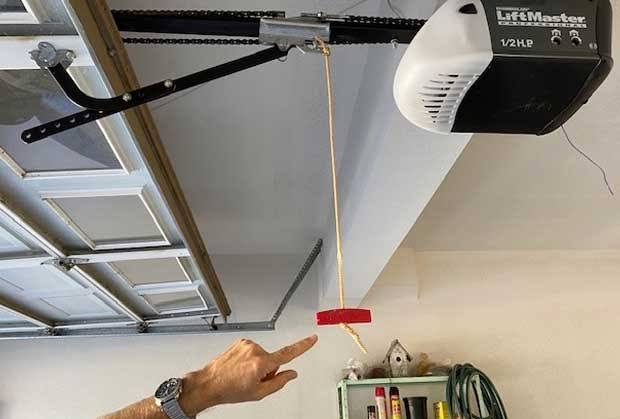
Have you ever pulled the emergency release cord on your garage door opener, only to realize you have no idea how to reconnect it? You’re not alone—this common scenario leaves many homeowners stranded with a door that won’t respond to their remote or wall button. Learning how to re-engage garage door after manually opening is a crucial skill that can save you time, money, and unnecessary stress when your automatic system seems broken.
Understanding Why Your Garage Door Won’t Reconnect
Before diving into the solution, it’s important to understand what happens when you pull the manual release cord. This red rope (usually hanging from the trolley assembly) disengages the door from the motorized opener, allowing you to open and close it by hand during power outages or emergencies.
According to the International Door Association, over 60% of service calls related to “broken” garage door openers are actually simple re-engagement issues that homeowners can fix themselves. The mechanism isn’t broken—it’s just disconnected.
When the trolley (the part that moves along the rail) separates from the door’s carriage, the opener motor runs but doesn’t move the door. Reconnecting them requires aligning these components properly and ensuring the locking mechanism clicks back into place.
Step-by-Step Guide: How to Re-Engage Your Garage Door
Step 1: Ensure Safety First
Before attempting any repairs, prioritize safety:
- Close the garage door completely by hand if it’s open
- Disconnect power to the garage door opener by unplugging it or switching off the circuit breaker
- Clear the area of people, pets, and obstacles
- Wear protective gloves to prevent pinched fingers
Never attempt to re-engage the door while it’s partially open or while the opener is powered on.
Step 2: Locate the Emergency Release Cord
The emergency release cord is typically a red rope with a handle hanging from the trolley assembly on the opener rail. It’s usually positioned near the center of your garage ceiling.
If you can’t find it:
- Look for a rope hanging from the metal track above your door
- Check near the motor unit itself
- Consult your owner’s manual for specific location details
Step 3: Pull the Release Handle Toward the Door
Here’s where most people make mistakes. To re-engage:
- Stand directly under the trolley assembly
- Pull the red release handle firmly toward the garage door (not down or away from it)
- Listen for an audible click—this indicates the trolley has reconnected to the carriage
- Watch the lever mechanism—it should snap back into the locked position
The direction matters significantly. Pulling toward the door engages the mechanism; pulling away from it keeps it disconnected.
Step 4: Verify the Connection
After pulling the handle:
- Visually inspect the trolley and carriage—they should be physically connected
- Check the lever position—it should be in the “locked” or “engaged” position
- Gently tug on the door to ensure it’s secured to the opener
If the lever doesn’t lock back into place, the alignment may be off. Proceed to Step 5.
Step 5: Manually Align the Trolley (If Needed)
Sometimes the trolley and carriage don’t align perfectly. Here’s how to fix it:
- Keep the door fully closed
- Locate the manual adjustment knob or lever on the trolley (varies by brand)
- Slide the trolley along the rail until it lines up with the door carriage
- Pull the release handle again toward the door
- Confirm the click and locked position
For Chamberlain and LiftMaster models, you may need to push a small tab while sliding the trolley. Genie openers often have a different mechanism—consult your specific model’s manual.
Step 6: Test the System
Once re-engaged:
- Restore power to the garage door opener
- Press the wall button to test operation
- Use your remote to verify wireless functionality
- Observe the door movement—it should open and close smoothly
If the door operates jerkily or makes unusual noises, the alignment may still be incorrect. Repeat Steps 3-5.
Common Problems and Troubleshooting Tips
| Problem | Possible Cause | Solution |
|---|---|---|
| No clicking sound when pulling handle | Misaligned trolley | Manually slide trolley to align with carriage |
| Door won’t move with opener | Lever not fully locked | Pull release handle more firmly toward door |
| Opener runs but door doesn’t move | Still disconnected | Repeat re-engagement process; check for obstructions |
| Remote doesn’t work after re-engagement | Power issue or reprogramming needed | Check batteries; reprogram remote if necessary |
Issue: The Release Handle Won’t Lock Back
This is one of the most frustrating problems. If the lever refuses to lock:
- Check for debris in the mechanism—clean with compressed air
- Inspect for bent parts—the lever or trolley may be damaged
- Ensure proper tension on the springs—imbalanced doors cause alignment issues
- Lubricate moving parts with silicone-based lubricant (not WD-40)
For more detailed information about garage door mechanisms and safety standards, visit Wikipedia’s article on garage door openers.
Issue: Door Opens Unevenly After Re-Engagement
Uneven movement suggests:
- Spring tension imbalance—contact a professional technician
- Track misalignment—inspect rails for bends or loose brackets
- Worn rollers—replace if cracked or flattened
Warning: Garage door springs are under extreme tension. Never attempt to adjust them yourself—this task requires specialized tools and training.
Preventing Future Disconnection Issues
To minimize accidental disconnections:
Regular Maintenance Checklist:
- Inspect the release mechanism monthly
- Lubricate the trolley and rail quarterly
- Test the auto-reverse safety feature monthly
- Tighten loose bolts and brackets annually
- Keep the area around the release cord clear
Best Practices:
- Teach family members when (and when not) to use the emergency release
- Install a cover or guard over the release handle to prevent accidental pulls
- Schedule professional maintenance every 1-2 years
- Replace worn components promptly
When to Call a Professional
While re-engaging your garage door is typically a DIY-friendly task, contact a licensed technician if:
- The door still doesn’t operate after multiple re-engagement attempts
- You notice broken cables, springs, or rollers
- The opener makes grinding or screeching noises
- The door falls rapidly when closing
- You’re uncomfortable working at heights or with mechanical systems
According to Consumer Reports, professional garage door service typically costs between $150-$350, which is far less than replacing an entire opener system unnecessarily.
FAQ Section
Q: Can I re-engage my garage door while it’s open?
A: No, always ensure the door is fully closed before attempting to re-engage. Working with an open door creates safety hazards and makes proper alignment nearly impossible. Close the door manually first, then follow the re-engagement steps.
Q: Why does my garage door keep disconnecting on its own?
A: Frequent disconnections usually indicate worn components, improper installation, or vibration issues. Check if the release lever is loose, the trolley is worn, or excessive vibration from the motor is causing it to pop out. A professional inspection can identify the root cause.
Q: Is it safe to pull the emergency release cord regularly?
A: The emergency release is designed for occasional use during power outages or emergencies. Regular pulling can wear out the mechanism and lead to premature failure. Use it only when necessary, and always re-engage properly afterward.
Q: My garage door opener light blinks after re-engagement. What does this mean?
A: Blinking lights typically indicate an error code or safety sensor issue. Check that nothing is blocking the photo-eye sensors near the floor, ensure the door is fully closed, and consult your manual for specific blink patterns. If problems persist, the opener may need reprogramming or professional service.
Q: How often should I test my garage door’s safety features?
A: Test the auto-reverse feature monthly by placing a 2×4 board on the ground where the door closes. The door should reverse immediately upon contact. Also test the photo-eye sensors monthly by waving an object in front of them while the door closes—the door should stop and reverse.
Q: Can weather affect my garage door’s ability to re-engage?
A: Yes, extreme temperatures can cause metal components to expand or contract, affecting alignment. Cold weather may make plastic parts brittle, while heat can cause warping. Regular lubrication and maintenance help mitigate weather-related issues.
Conclusion
Learning how to re-engage garage door after manually opening empowers you to handle one of the most common household frustrations without calling a technician. By following the six-step process outlined above—ensuring safety, locating the release cord, pulling toward the door, verifying connection, aligning if needed, and testing—you can restore functionality in minutes.
Remember, prevention is key. Regular maintenance, proper usage of the emergency release, and prompt attention to warning signs will keep your garage door operating smoothly for years to come.
Did this guide help you fix your garage door? Share it with friends and family on social media who might benefit from knowing how to re-engage their garage door opener. Bookmark this page for future reference, and don’t hesitate to leave a comment below with your experience or additional questions!
Leave a Reply