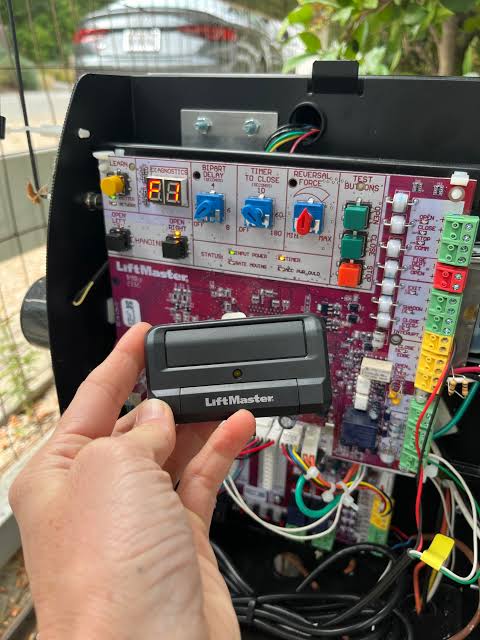
Dealing with a stubborn garage remote can be incredibly frustrating, especially when you are locked out in the cold or rushing to work. If you want to know how to program a Liftmaster Security 2.0 garage door opener, you are in the exact right place. Let’s get your system synced quickly so you can get back inside safely!
Understanding How To Program A Liftmaster Security 2.0 Garage Door Opener
Before diving into the setup, it is important to understand the technology you are working with. LiftMaster’s Security+ 2.0 technology uses dual-band radio frequencies and rolling-code encryption. This means every time you press your remote, it generates a brand-new code from over 100 billion possibilities, effectively stopping thieves from using “code grabbers” to access your home.
According to the International Door Association, over 70% of modern US homes have upgraded to rolling-code encrypted garage openers to prevent unauthorized entry. Because of this advanced encryption, the pairing process is slightly different than older models. For more background on the mechanics and history of these systems, you can read about the standard garage door opener on Wikipedia.
Security+ 2.0: Pros vs. Cons
| Feature | Pros (Advantages) | Cons (Limitations) |
|---|---|---|
| Security | Virtually impossible for hackers to clone your signal. | Requires specific Security+ 2.0 compatible remotes. |
| Range | Operates reliably up to 1,500 feet away. | Signal can be blocked by heavy metal interference. |
| Compatibility | Syncs easily with MyQ smart home accessories. | Not backward compatible with pre-2011 standard remotes. |
Tools You Will Need Before Starting
To ensure a smooth programming process, gather these simple items. Preparing ahead saves you from climbing up and down a ladder multiple times.
- A sturdy stepladder: To safely reach the motor unit on your ceiling.
- Fresh batteries: Ensure your remote has a brand-new 3V CR2032 battery. Weak batteries are the #1 cause of programming failure.
- Your remote or keypad: Have the exact devices you wish to sync ready in hand.
Step-by-Step: Syncing Your Remote Control
Follow these exact steps to program your handheld remote or visor clip. The process relies on communicating with the motor unit’s internal receiver.
Step 1: Locate the Learn Button Safely climb your stepladder and locate the motor unit. Look for the Learn Button. On Security+ 2.0 models, this button is almost always yellow and circular. It is typically located near the antenna wire or under the light lens.
Step 2: Clear Old Codes (Optional but Recommended) If you are moving into a new house or lost an old remote, clear the memory first. Press and hold the yellow Learn Button for exactly 10 seconds. The LED light next to the button will turn off, indicating all previous remotes are erased.
Step 3: Initiate Pairing Mode Briefly press and release the yellow Learn Button. The LED indicator will light up solidly and stay on for 30 seconds. This means the opener is actively listening for a new device.
Step 4: Sync the Remote While the LED is lit, stand exactly 3 to 5 feet away from the motor unit. Press and hold the button on your remote that you wish to use. Hold it for 2 seconds, release, and repeat the press up to three times until the motor unit lights flash or you hear two distinct clicks.
Step 5: Test the System Step back and press the remote button once. Your garage door should immediately respond. If it does, congratulations! You have successfully completed the process.
How to Program a Keyless Entry Pad
Many US homeowners prefer an exterior PIN pad so family members can enter without carrying a remote. The process is just as straightforward.
- Press and release the yellow Learn Button on the motor unit.
- Within 30 seconds, enter your desired 4-digit PIN on the exterior keypad.
- Press and hold the ENTER button on the keypad.
- Wait for the motor unit lights to blink. Once they blink, release the ENTER button.
- Test your new PIN to ensure the door activates smoothly.
Troubleshooting Common Programming Errors
Even with precise steps, technology can occasionally hiccup. Here is how an expert troubleshoots the most common issues.
- The LED Light Won’t Turn On: Your motor unit might be in “Lock Mode.” Look for a blinking light on your wall control panel and press the Lock button to disable it.
- Remote Blinks But Door Won’t Move: This usually indicates a weak battery in the remote or a frequency jam. Try replacing the battery with a high-quality, name-brand lithium coin cell.
- The Door Reverses Immediately: This is rarely a programming issue. It is a safety sensor issue. Check the infrared sensors at the bottom of your door tracks. Ensure they are perfectly aligned and free of cobwebs or debris.
Frequently Asked Questions (FAQ)
1. How do I know for sure if my Liftmaster has Security+ 2.0?
The easiest way to identify this technology is by the color of the Learn Button. If your learn button is yellow, you have a Security+ 2.0 system (manufactured after 2011). Older models typically feature purple, red, or orange buttons.
2. Can I program an older Genie or Chamberlain remote to this opener?
Generally, no. Security+ 2.0 uses highly specific encrypted frequencies (315 MHz and 390 MHz dual-band). Unless you purchase a universal remote that explicitly states it is “compatible with Security+ 2.0” on the packaging, older remotes will not sync.
3. Do I need to reprogram my remotes after a power outage?
No, you do not. LiftMaster openers use non-volatile memory chips. This means the system remembers all your paired remotes and keypads indefinitely, even if the power goes out for several days.
4. How many remotes can I program to one Security 2.0 opener?
A single Security+ 2.0 motor unit can store the unique codes for up to 35 individual remotes and up to 2 keyless entry pads. This is more than enough for a large family and multiple vehicles.
5. Why is my remote range so short after programming?
If you have to stand incredibly close to the door for it to work, the issue is likely your motor unit’s antenna. Ensure the thin, hanging antenna wire is fully extended and not tangled in the mounting hardware.
Conclusion
Mastering your garage door system saves you the high cost of a professional technician and ensures your home remains secure against modern digital threats. By understanding the technology and following the precise steps outlined above, you can maintain seamless access to your home for years to come.
Did this guide save you time and money today? Please share this article on your favorite social media platforms like Facebook, X, or Pinterest to help your friends, family, and neighbors secure their homes too!
Leave a Reply