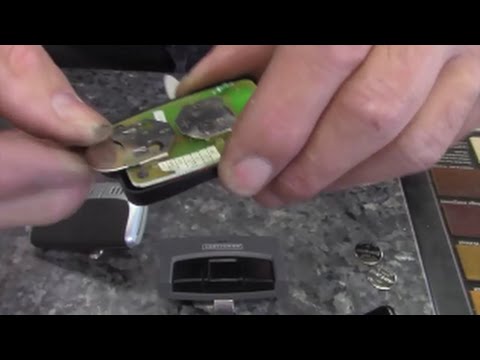
There is nothing quite as frustrating as pressing your clicker and hearing silence instead of the familiar hum of your garage door opening. If you are stranded outside or rushing to leave, knowing how to open a garage door remote to change battery is an essential skill that saves time, money, and unnecessary stress. This guide will walk you through the process safely and efficiently, getting you back on the road in minutes.
Understanding Your Garage Door Remote Type
Before you grab a screwdriver, it is vital to identify which style of remote you own. Manufacturers design these devices differently, and using the wrong opening method can crack the plastic casing or damage the internal circuit board. According to industry standards, most residential remotes fall into three primary categories. Understanding this distinction is the first step in learning how to open a garage door remote to change battery without causing damage.
1. The Slide-Off Cover (Most Common)
Brands like LiftMaster, Chamberlain, and Craftsman often use this design. The back panel slides downward or upward to reveal the battery compartment. No tools are typically required, though a fingernail or plastic pry tool helps if the plastic has fused over time.
2. The Screw-Secured Case
Older models or universal remotes often feature a small Phillips-head screw on the back. These provide a tighter seal against moisture but require a precision screwdriver. Forcing these open without removing the screw first is the number one cause of broken remote casings.
3. The Snap-Fit / Clamshell Design
These remotes have no visible screws or sliding panels. They are held together by internal plastic tabs along the seam. Opening them requires a specific prying technique at designated notches. This is where most DIYers struggle, making this guide particularly valuable for owners of Genie or older Stanley remotes.
Expert Insight: “Always check the manufacturer’s stamp on the back of the remote before attempting to open it. The model number dictates not only the opening mechanism but also the exact battery voltage required. Using a 3V battery in a 1.5V system can permanently fry the transmitter.” — Certified Garage Door Technician
Essential Tools and Safety Precautions
Preparation prevents breakage. Gather these items before you begin:
- Replacement Battery: Usually a CR2032 3V lithium coin cell, but verify via your manual or the old battery.
- Precision Screwdriver Set: Specifically #0 or #00 Phillips for small electronics.
- Plastic Spudger or Guitar Pick: Metal tools conduct electricity and scratch plastic; always use non-conductive plastic.
- Microfiber Cloth: To clean contacts and prevent oil transfer from fingers.
- Well-Lit Workspace: Small screws and batteries are easily lost.
⚠️ Critical Safety Warning
Never use excessive force. If the case does not yield with moderate pressure, you are likely missing a hidden screw or using the wrong pry point. Additionally, avoid touching the circuit board directly with bare skin; static discharge can corrupt the remote’s programming. For comprehensive background on how these radio frequency transmitters function and their safety protocols, refer to the Garage Door Opener entry on Wikipedia.org.
Step-by-Step: How To Open A Garage Door Remote To Change Battery
Follow this universal workflow, adapting to your specific remote type identified above.
Step 1: Locate the Opening Mechanism
Inspect the back and sides of the remote. Look for:
- A textured grip area indicating a slide panel.
- A recessed screw head.
- A small notch or indentation along the side seam (for snap-fit models).
Step 2: Open the Casing Safely
- For Slide Panels: Press down firmly on the textured area and slide in the direction of the arrow. If stuck, tap the remote gently against your palm to loosen debris.
- For Screw Models: Remove the screw completely and store it in a magnetic tray. Insert a plastic spudger into the seam and twist gently to separate the halves.
- For Snap-Fit Models: Insert your plastic tool into the side notch. Twist to release the first tab, then work your way around the perimeter. Do not pull straight apart; this breaks the alignment pins.
Step 3: Remove the Old Battery
Note the orientation (+/-) before removal. Use a non-metallic tool to pop the battery out. Avoid metal tweezers, as they can short-circuit residual charge.
Step 4: Clean the Contacts
Corrosion is a silent killer of remote performance. Wipe the metal contacts with a dry microfiber cloth. If you see white/green residue, lightly dampen a cotton swab with isopropyl alcohol, clean, and let dry completely for 60 seconds.
Step 5: Install the New Battery
Insert the fresh CR2032 (or specified battery) with the correct polarity. Press down until it seats flush. A loose battery causes intermittent failures.
Step 6: Reassemble and Test
Align the casing halves precisely. Snap or slide them back together until you hear/feel a secure click. Replace any screws. Stand within 10 feet of the garage door and test. If it works, test again from your normal parking distance to confirm signal strength.
Battery Types Comparison: Choosing the Right Replacement
Using the wrong battery is a common reason remotes fail even after replacement. Refer to this table to ensure compatibility:
| Battery Type | Voltage | Common Brands | Lifespan | Notes |
|---|---|---|---|---|
| CR2032 | 3V | LiftMaster, Chamberlain | 2–3 Years | Most common; thin profile |
| CR2016 | 3V | Older Genie, Stanley | 1–2 Years | Thinner than CR2032; do not substitute |
| A23 / 23A | 12V | Universal Remotes | 1 Year | Cylindrical; higher voltage for longer range |
| AAA / AA | 1.5V | Visor Clips, Large Fobs | 6–12 Months | Bulkier remotes; check series wiring |
| CR2450 | 3V | Smart/Wi-Fi Remotes | 3–5 Years | Higher capacity for Bluetooth features |
Pro Tip: Always buy name-brand lithium batteries (Energizer, Duracell, Panasonic). Generic dollar-store batteries often have inconsistent voltage output that confuses sensitive garage door logic boards.
Troubleshooting: When a New Battery Doesn’t Work
You’ve successfully learned how to open a garage door remote to change battery, installed a fresh cell, and… nothing. Don’t panic. Consider these diagnostics:
- Battery Orientation: Double-check polarity. Reversed installation is harmless but non-functional.
- Contact Corrosion: Even new batteries won’t bridge corroded terminals. Re-clean with alcohol.
- Signal Interference: LED light bulbs in garage fixtures emit RF noise. Turn off garage lights and retest.
- Remote Desynchronization: Power surges or battery depletion can erase coding. Consult your opener’s manual for the “Learn Button” reprogramming sequence.
- Dead Remote Circuit Board: If the LED on the remote doesn’t illuminate when pressed (with known-good battery), the internal oscillator or solder joints may have failed. Replacement is usually more cost-effective than repair.
Frequently Asked Questions (FAQ)
Q1: How often should I replace my garage door remote battery?
Most CR2032-powered remotes last 2 to 3 years under normal use (2–4 presses daily). If you notice reduced range, delayed response, or need multiple presses, replace the battery immediately rather than waiting for total failure. Proactive replacement prevents being locked out.
Q2: Can I use a rechargeable CR2032 battery in my garage remote?
Generally, no. Standard rechargeable CR2032s output 2.8V–3.0V nominal but drop voltage faster under load. Many garage remotes require a stable 3.0V threshold. Some newer LIR2032 rechargeables are compatible, but always verify with your manufacturer. Sticking with primary lithium cells ensures reliability.
Q3: Do I need to reprogram my remote after changing the battery?
Usually, no. Battery replacement alone does not erase memory. However, if the battery was dead for an extended period (weeks/months), the capacitor may have discharged fully, requiring reprogramming. If your remote has a “Learn” indicator or your opener requires it post-battery change, follow the manufacturer’s sync procedure.
Q4: What if my remote casing is cracked or won’t close properly?
A compromised case exposes electronics to moisture, dust, and physical shock. While temporary tape fixes exist, replace the remote housing or the entire unit. Moisture ingress causes corrosion that eventually destroys the board. Many manufacturers sell replacement shells for popular models at $5–$10.
Q5: Why does my remote work up close but not from my driveway?
This indicates a weak signal, not necessarily a dead battery. Causes include: partial battery depletion, antenna wire damage inside the opener unit, RF interference from nearby electronics, or misaligned safety sensors. Try replacing the battery first; if unresolved, inspect the opener’s hanging antenna wire for kinks or disconnection.
Q6: Is it safe to open a smart Wi-Fi garage remote myself?
Yes, but exercise extra caution. Smart remotes contain additional components (Bluetooth modules, capacitors) that are more fragile. Use only plastic tools, ground yourself to prevent ESD, and avoid touching any chips or antennas. If under warranty, check whether user-opening voids coverage before proceeding.
Conclusion: Confidence in Every Click
Mastering how to open a garage door remote to change battery transforms a moment of frustration into a simple, empowering maintenance task. By identifying your remote type, using proper tools, cleaning contacts, and selecting the correct battery, you ensure reliable access to your home for years to come. Remember: patience beats force, and preparation prevents costly mistakes.
Your garage door remote is a small device with outsized importance in daily life. Treating it with care during battery changes extends its lifespan and keeps your household running smoothly.
Found this guide helpful? Share it with friends, family, or neighbors who might be stuck outside their garage right now! Tag us on social media with your successful battery swap—we love seeing our community conquer DIY challenges. 🔧🏠 #GarageDoorFix #DIYHomeMaintenance #RemoteBatteryChange
Leave a Reply