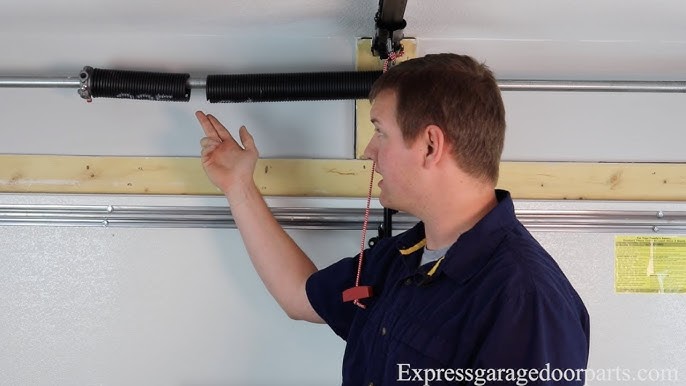
Is your garage door refusing to open, or does it slam shut with a terrifying bang? You are likely dealing with a broken torsion spring, one of the most high-tension components in your home. While knowing how to fix a garage door spring torsion springs might seem like a money-saving DIY project, it is crucial to understand the immense risks involved before picking up a wrench. This guide will walk you through the realities of the repair, safety protocols, and when to call a professional.
Understanding the Danger: Why Torsion Springs Are Different
Before we discuss any tools or techniques, we must address the elephant in the room: safety.
Torsion springs are mounted horizontally above the garage door opening. They store an incredible amount of kinetic energy—enough to lift a door weighing hundreds of pounds. When these springs break, they do so violently. According to industry data, garage door springs are under extreme tension (often 200+ pounds of force), and improper handling can lead to severe injury or even death.
Unlike extension springs, which stretch along the horizontal tracks, torsion springs twist. This twisting motion creates torque. If you attempt to release this tension without the proper winding bars and technique, the metal bar can become a projectile.
Expert Note: The International Door Association (IDA) strongly recommends that torsion spring replacement be performed by trained professionals due to the high risk of injury.
Signs Your Torsion Spring Needs Replacement
How do you know if your problem is actually the spring? Look for these common indicators:
- A Loud “Bang” Sound: The most common sign is a noise resembling a gunshot or firecracker coming from the garage.
- Visible Gaps: Inspect the spring closely. If you see a separation or gap in the coils, the spring is broken.
- Door Won’t Open: The opener motor may run, but the door stays put or only lifts a few inches.
- Cables Are Loose: If the lifting cables hanging from the bottom brackets appear slack, the spring is no longer counterbalancing the door’s weight.
- Uneven Movement: The door may tilt to one side as it attempts to rise.
Tools Required for the Job
If you determine that you must proceed with caution, or if you are preparing to assist a professional, you will need specific tools. Do not attempt this with makeshift items.
| Tool | Purpose |
|---|---|
| Winding Bars | Two solid steel bars (usually 18-24 inches long) used to wind/unwind the spring. |
| Vise Grips | To clamp the track below the roller and prevent the door from falling. |
| Socket Wrench Set | For removing bolts from the center bracket and cable drums. |
| Stepladder | A sturdy ladder to reach the torsion tube safely. |
| Safety Glasses | Essential eye protection against flying debris. |
Step-by-Step: How to Fix a Garage Door Torsion Spring
Disclaimer: This section is for educational purposes. If you are unsure, stop and call a licensed technician.
Step 1: Secure the Garage Door
Never work on a spring with the door open. Close the door completely. Use your vise grips to clamp the garage door track just below the bottom roller on both sides. This prevents the door from shooting up if the tension is released unexpectedly.
Step 2: Release the Tension
This is the most dangerous part. Insert a winding bar into one of the holes on the winding cone. Pull down firmly to unwind the spring slightly, then insert the second bar into the next hole. Never remove the first bar until the second is securely in place. Repeat this process until all tension is released from both springs (if it is a dual-spring system).
Step 3: Remove the Old Spring
Once the tension is gone, you can safely unbolt the center bearing plate and the cable drums. Slide the old, broken spring off the torsion tube. Note the direction of the winding (left-wind vs. right-wind) as this is critical for the new spring.
Step 4: Install the New Spring
Slide the new spring onto the tube. Ensure it matches the exact specifications of the old one: wire size, inside diameter, and length. Reattach the winding cones and secure the center bearing plate.
Step 5: Wind the New Spring
Refer to the manufacturer’s instructions for the number of quarter-turns required. Generally, you will need to wind the spring using your two winding bars, alternating them carefully. Each quarter-turn adds tension. Count every turn meticulously. An incorrect count can cause the door to operate poorly or damage the opener.
Step 6: Test and Adjust
Remove the vise grips. Operate the door manually first. It should lift smoothly and stay open about halfway up. If it falls, it needs more tension. If it shoots up, it has too much. Once balanced, reconnect the automatic opener.
Why Hiring a Professional Is Often Smarter
While learning how to fix a garage door spring torsion springs is empowering, the cost-benefit analysis often favors hiring a pro.
- Liability and Insurance: If you injure yourself or damage your property, homeowner’s insurance may not cover DIY accidents involving high-tension repairs.
- Correct Calibration: Professionals use precise calculations to balance the door. An improperly balanced door puts strain on the opener, leading to premature failure.
- Warranty: Most professional repairs come with a warranty on parts and labor. DIY fixes offer no such guarantee.
- Time Efficiency: A pro can complete the job in 30–60 minutes. A DIYer might spend half a day researching and struggling with stubborn bolts.
For more detailed technical standards on door systems, you can refer to general mechanical principles outlined on Wikipedia.
Cost Comparison: DIY vs. Professional
| Factor | DIY Repair | Professional Service |
|---|---|---|
| Cost | $50 – $100 (Parts only) | $200 – $400 (Parts + Labor) |
| Risk Level | High | Low |
| Time Investment | 3 – 6 Hours | 1 Hour |
| Warranty | None | 1 – 5 Years |
| Tools Needed | Must purchase/rent | Included |
FAQ Section
Q1: Can I fix a torsion spring myself if I have never done it before? A: It is highly discouraged. Torsion springs are under extreme tension. Without prior experience and the correct winding bars, the risk of severe injury is significant. It is safer to hire a certified technician.
Q2: How long do garage door torsion springs last? A: Most standard torsion springs are rated for 10,000 cycles. One cycle is one opening and one closing. For an average family, this translates to 7–10 years of use.
Q3: What is the difference between torsion and extension springs? A: Torsion springs are mounted above the door and twist to store energy. Extension springs are located on both sides of the upper horizontal track and stretch to provide lift. Torsion springs are generally safer, smoother, and longer-lasting.
Q4: Do I need to replace both springs if only one is broken? A: Yes. If your garage door has two springs and one breaks, the other is likely near the end of its life cycle. Replacing both ensures balanced operation and prevents another service call soon after.
Q5: What size winding bars do I need? A: The size depends on the hole diameter in the winding cone. Common sizes are 3/8 inch or 1/2 inch. Using a bar that is too small can slip and cause injury. Always use solid steel bars, not screwdrivers or rebar.
Q6: Why does my garage door make a grinding noise after spring replacement? A: This could indicate that the spring is over-wound, putting too much stress on the opener gears, or that the rollers need lubrication. Check the balance of the door manually first.
Conclusion
Knowing how to fix a garage door spring torsion springs is valuable knowledge, but it comes with a heavy responsibility. The potential for injury is real, and the margin for error is slim. If you choose to proceed, prioritize safety above all else: use the right tools, secure the door, and never rush the tensioning process.
However, for most homeowners, the peace of mind and warranty provided by a professional technician are worth the investment. Your garage door is the largest moving object in your home—treat it with respect.
Did you find this guide helpful? Share it with your neighbors on Facebook or Twitter to help keep our community safe!
Leave a Reply