Introduction
Is your garage door remote suddenly unresponsive, or is the keypad beeping incessantly at 2 AM? It is one of the most frustrating moments for any homeowner: you are ready to leave for work, but your garage door refuses to budge. The good news is that this is rarely a major mechanical failure. In most cases, it is simply a power issue. Knowing how to change battery on Chamberlain garage door opener systems can save you from expensive service calls and get your life back on track in minutes. Whether you have a modern MyQ-enabled unit or a classic model, this guide will walk you through the process with clarity and confidence.
Identifying Your Chamberlain Model
Before rushing to the hardware store, it is crucial to identify which type of battery needs replacing. Chamberlain produces various openers and accessories, and they do not all use the same power source. Confusing the backup battery with the remote control battery is a common mistake that leads to unnecessary purchases.
The Two Main Battery Types
- Remote Control/Keypad Batteries: These are small, coin-cell or AAA batteries located inside your handheld clicker or wireless keypad. If your remote has a weak range or requires multiple presses to work, this is likely the culprit.
- Opener Backup Battery: Many newer Chamberlain models (especially those with Wi-Fi/MyQ capabilities) come with a sealed lead-acid backup battery. This allows the door to operate during power outages. If your unit beeps every few seconds or displays a specific error code, this large internal battery may need replacement.
Note: Always check your owner’s manual for the specific model number, usually found on a sticker on the motor unit.
Part 1: How to Change the Remote Control Battery
For most users, the issue lies with the handheld remote. This is a quick fix that requires no tools other than perhaps a small flathead screwdriver or a coin.
Step-by-Step Replacement Guide
- Locate the Compartment: Turn your remote over. Look for a small slot or a seam along the side. Some older models have a screw holding the case together, while newer ones snap apart.
- Open the Case:
- For snap-fit remotes: Insert a coin or flat tool into the slot and gently twist to pop the cover off.
- For screwed remotes: Use a Phillips-head screwdriver to remove the tiny screws. Keep them in a safe place!
- Remove the Old Battery: Note the orientation of the existing battery. There will be a positive (+) and negative (-) side. Gently lift the old battery out.
- Insert the New Battery: Place the new battery in the exact same orientation. Using the wrong polarity can damage the remote’s circuit board.
- Close and Test: Snap the cover back on or replace the screws. Stand within 10 feet of the garage door and press the button. The LED light should flash brightly, indicating fresh power.
Common Battery Types for Remotes
| Remote Type | Typical Battery Model | Estimated Lifespan |
|---|---|---|
| Standard Clicker | CR2032 (Coin Cell) | 1–2 Years |
| Older Large Remote | 9V or AA Batteries | 6–12 Months |
| Wireless Keypad | 9V Battery | 1–2 Years |
Tip: Always buy high-quality alkaline or lithium batteries from reputable brands like Duracell or Energizer. Cheap generic batteries often leak over time, corroding the contacts inside your remote.
Part 2: Replacing the Backup Battery in the Motor Unit
If your Chamberlain opener has a backup battery system, it is designed to keep your door functional during blackouts. However, these batteries degrade over time, typically lasting 3 to 5 years. When they fail, the unit will emit a periodic beep to alert you.
Safety First
Warning: Before working on the motor unit, always unplug the opener from the wall outlet. Although the backup battery operates at low voltage, it is best practice to disconnect all power sources to prevent accidental activation of the door.
Step-by-Step Replacement Guide
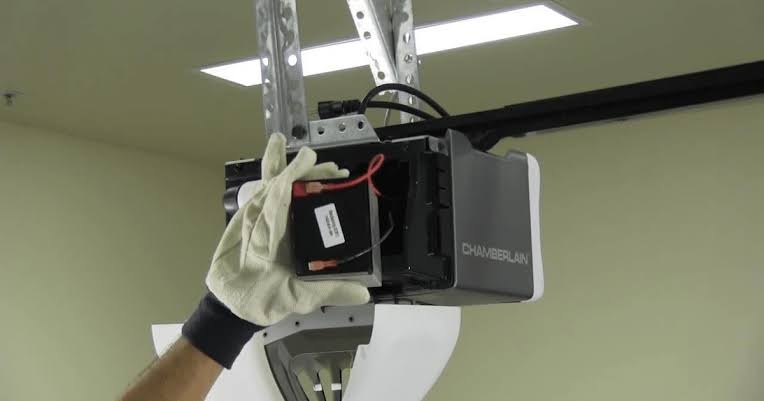
- Access the Battery Compartment: Locate the battery housing on the motor unit. On most Chamberlain Belt Drive and Smart Garage Hub models, this is a plastic box attached to the side or rear of the main motor assembly.
- Disconnect the Old Battery:
- Open the compartment lid.
- You will see two wires connecting the battery to the motherboard: one red (positive) and one black (negative).
- Gently pull the connectors off the battery terminals. Do not pull on the wires themselves; pull on the plastic connector heads.
- Remove the Battery: Lift the old sealed lead-acid battery out of the compartment. These batteries can be heavy, so handle with care.
- Install the New Battery: Place the new Chamberlain-compatible backup battery into the slot. Ensure it sits flat and secure.
- Reconnect the Wires:
- Connect the Red wire to the Positive (+) terminal.
- Connect the Black wire to the Negative (-) terminal.
- Push firmly until you hear a click or feel resistance, ensuring a tight connection.
- Close and Restore Power: Close the battery compartment lid. Plug the opener back into the wall outlet. The unit may beep once or twice as it recognizes the new battery. This is normal.
How to Reset the System
After replacing the backup battery, the system may need a reset to clear the “low battery” error code.
- Press and hold the “Learn” button on the motor unit for 6 seconds until the LED turns off.
- Alternatively, consult your specific model’s manual, as some MyQ units require a reset via the mobile app.
Understanding Battery Maintenance and Longevity
To maximize the lifespan of your garage door system, understanding how environmental factors affect batteries is essential. According to general electrical principles, extreme temperatures significantly impact battery chemistry.
- Heat: High temperatures in attics or garages can cause batteries to dry out or swell, reducing their capacity.
- Cold: Freezing temperatures can slow down the chemical reactions in batteries, leading to temporary performance drops.
For more detailed information on battery chemistry and safety standards, you can refer to the Battery Recycling and Safety guidelines on Wikipedia.
Signs Your Battery Is Failing
- Intermittent Operation: The door works sometimes but not others.
- Dim LED Light: The light on your remote is noticeably fainter than usual.
- Reduced Range: You have to stand much closer to the door than before to make it open.
- Constant Beeping: The motor unit emits a chirp every 30–60 seconds (indicating backup battery failure).
Troubleshooting Common Issues
Even after changing the battery, you might face issues. Here are quick fixes for common problems.
Remote Still Not Working?
- Check Contacts: Inspect the metal contacts inside the remote. If they look corroded (white or green powder), clean them gently with a cotton swab dipped in rubbing alcohol.
- Reprogram the Remote: Sometimes, changing the battery resets the remote’s memory. You may need to re-sync it with the opener using the “Learn” button on the motor unit.
- Check the Antenna: Ensure the hanging antenna wire on the motor unit is not tangled or broken.
Backup Battery Won’t Charge?
- Check Connections: Ensure the red and black wires are securely attached. A loose connection prevents charging.
- Power Source: Verify that the opener is plugged in and receiving power. The backup battery only charges when the unit is connected to mains electricity.
- Defective Battery: If the new battery fails to hold a charge after 24 hours, it may be defective. Contact Chamberlain support for a warranty claim.
FAQ Section
Q1: How often should I change the battery in my Chamberlain remote?
A: Typically, you should replace remote batteries every 1–2 years. However, if you notice a decrease in range or the LED light dimming, replace it immediately. High-use households may need to change them more frequently.
Q2: Can I use a rechargeable battery in my Chamberlain remote?
A: It is generally not recommended. Rechargeable batteries often have a lower voltage (1.2V vs 1.5V for alkaline), which can cause signal transmission issues. Stick to high-quality disposable alkaline or lithium batteries for reliable performance.
Q3: What type of backup battery does my Chamberlain opener need?
A: Most Chamberlain openers with backup capability use a specific 12V sealed lead-acid battery. The exact model number varies by opener series (e.g., B970, C970). Always check the label on your existing battery or consult your owner’s manual to ensure compatibility.
Q4: Why is my garage door opener beeping after I changed the battery?
A: If the backup battery was replaced, the beeping should stop once the new battery is recognized. If it continues, try resetting the opener by unplugging it for 30 seconds. If the remote is beeping, check if the battery is inserted correctly or if the contacts are dirty.
Q5: Is it safe to replace the backup battery myself?
A: Yes, it is safe for most homeowners. The backup battery operates at low voltage (12V) and poses minimal risk of electric shock. However, always unplug the main unit first to prevent the door from activating accidentally during the process. Handle the battery upright to avoid acid leaks.
Q6: Where can I buy replacement batteries for Chamberlain openers?
A: You can purchase remote batteries at any grocery store, pharmacy, or hardware store. For specific backup batteries, it is best to buy directly from Chamberlain’s official website, Amazon, or authorized dealers like Home Depot and Lowe’s to ensure you get a genuine, compatible product.
Conclusion
Learning how to change battery on Chamberlain garage door opener components is a simple yet empowering skill for any homeowner. Whether you are swapping out a tiny coin cell in your remote or replacing the hefty backup battery in the motor unit, following these steps ensures your garage remains secure and accessible. Regular maintenance not only saves you money on professional repairs but also extends the life of your entire garage door system.
Don’t let a dead battery strand you in the driveway. Take five minutes today to check your remotes and listen for those warning beeps. If you found this guide helpful, please share it with your neighbors or on social media to help others tackle their DIY home repairs with confidence!
Leave a Reply