Have you ever stood in your driveway, remote in hand, feeling completely stuck because your garage door simply won’t respond? You are not alone. Thousands of homeowners face this frustration daily, often wondering where is the learn button on a Liftmaster garage door opener to re-sync their devices. Finding this small but critical component is the key to restoring convenience and security to your home.
In this guide, we will walk you through exactly how to locate this button, understand what its color means, and program your remotes or keypads with confidence. Whether you have a newer model with Wi-Fi capabilities or an older unit, we have got you covered.
Understanding the Liftmaster Learn Button
Before we dive into the physical search, it is essential to understand what this button actually does. The “Learn” button is the brain’s gateway for your garage door opener. It allows the motor unit to accept new signals from remotes, wireless keypads, and smart home hubs.
Without pressing this button, your opener will ignore any new device trying to communicate with it. This security feature prevents unauthorized access, ensuring that only devices you explicitly approve can open your garage.
Why Can’t I Find It?
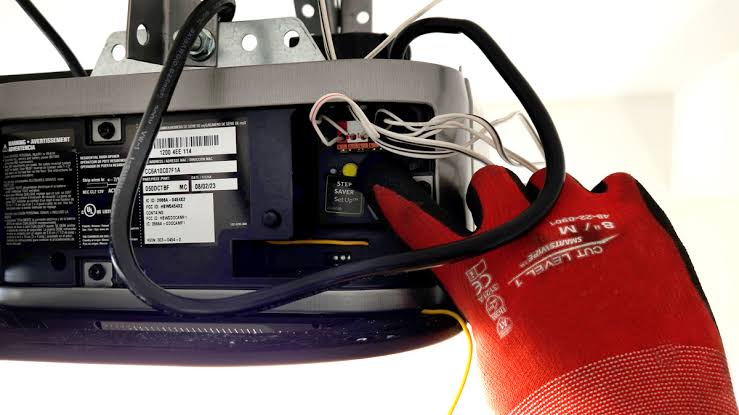
The location of the learn button has changed slightly over the years as Liftmaster (a brand of Chamberlain Group) has updated its designs. However, it is almost always located on the back panel or the side of the motor unit itself, not on the wall control or the remote.
If you are looking at the ceiling-mounted motor box, you might need a stepladder and a flashlight. The button is typically situated near the antenna wire or the light lens cover.
Locating the Button by Model Type
Liftmaster openers generally fall into three categories based on the color of the learn button. Identifying the color is crucial because it dictates the programming procedure and compatibility with accessories.
1. Yellow Learn Button
Models with a yellow learn button are typically older units, manufactured before 2011. These use older security codes.
- Location: Usually on the back panel, near the hanging antenna wire.
- Action: Pressing it clears all previously programmed remotes. You must reprogram all devices after pressing it.
2. Purple Learn Button
Purple buttons indicate Security+ 2.0 technology. These are common in models produced between 2011 and 2016.
- Location: Often found on the back panel, sometimes under the light lens cover.
- Action: Like the yellow button, pressing it erases all codes. It offers enhanced encryption against code grabbing.
3. Red, Orange, or Green Learn Button
These colors represent the newest generation of Liftmaster openers, featuring MyQ technology and Wi-Fi connectivity.
- Location: Frequently located on the side of the motor unit or near the terminal block.
- Action: These buttons allow for more flexible programming. In many cases, pressing and releasing the button does not erase all codes, allowing you to add a single remote without resetting the entire system.
Pro Tip: If you cannot see the button clearly, check the label on the motor unit. It often includes a diagram indicating the exact position of the learn button and the antenna.
Step-by-Step: How to Program Your Remote
Now that you know where is the learn button on a Liftmaster garage door, let’s put it to use. Follow these precise steps to program your remote control.
Preparation
- Ensure your garage door is closed.
- Have your remote control ready with fresh batteries.
- Position yourself safely on a stepladder if the motor unit is high up.
The Programming Process
- Locate the Button: Find the colored learn button on your motor unit as described above.
- Press and Release: Firmly press and release the learn button. You will notice the indicator light next to the button turn on or blink. This signifies the opener is in “programming mode.”
- Note: You have approximately 30 seconds to complete the next step before the mode times out.
- Press the Remote Button: Within those 30 seconds, press and hold the button on your remote control that you wish to use. Hold it for about 2–3 seconds.
- Confirm Success: Watch the motor unit’s light. It should blink or turn off, indicating that the code has been accepted. Some models may also emit a click sound.
- Test the Remote: Step down from the ladder and test the remote. The door should operate smoothly.
If the door does not respond, repeat the process. Ensure you are within range and that the remote batteries are not dead.
Troubleshooting Common Issues
Even when you know the location, things can go wrong. Here are some common scenarios and solutions.
The Light Doesn’t Blink
If pressing the learn button does not activate the indicator light, the logic board may be faulty, or the unit may have lost power. Check your circuit breaker and ensure the opener is plugged in securely.
The Remote Won’t Program
- Battery Check: Replace the batteries in your remote. Weak batteries are the most common cause of failure.
- Interference: LED light bulbs in the garage can sometimes interfere with radio frequencies. Try turning off the garage lights while programming.
- Distance: Stand closer to the motor unit during programming.
Accidental Reset
If you accidentally held the learn button down for too long (usually 6–10 seconds), you may have erased all programmed devices. Do not panic. Simply follow the programming steps above for each of your remotes and keypads again.
Comparison: Old vs. New Liftmaster Models
Understanding the evolution of these buttons can help you troubleshoot better.
| Feature | Older Models (Yellow/Purple) | Newer Models (Red/Orange/Green) |
|---|---|---|
| Security Protocol | Standard Rolling Code | Security+ 2.0 / MyQ |
| Reset Behavior | Erases all codes immediately | May allow single-device addition |
| Wi-Fi Capability | No | Yes (MyQ Enabled) |
| Button Location | Back Panel | Side or Back Panel |
| Compatibility | Limited modern accessories | Full smart home integration |
For more detailed technical specifications on garage door opener safety standards, you can refer to Wikipedia’s article on Garage Door Openers. This resource provides historical context and regulatory information that underscores the importance of proper maintenance and security features.
FAQ Section
1. What if my Liftmaster opener doesn’t have a learn button?
Very few residential Liftmaster openers lack a learn button. If you cannot find one, look for a set of dip switches (small sliding switches) inside the remote and the motor unit. Older models from the 1990s used dip switches instead of a learn button. You must match the switch positions exactly to program the remote.
2. Can I program a universal remote to my Liftmaster?
Yes, but it must be compatible with your specific frequency and security protocol. Check the packaging of the universal remote to ensure it supports Liftmaster/Chamberlain Security+ or Security+ 2.0 codes. The programming process is similar: press the learn button on the motor, then press the button on the universal remote.
3. How do I know if my learn button is working?
When you press the learn button, the adjacent LED light should illuminate or blink. If there is no light response, the button may be defective, or the internal fuse may have blown. In such cases, contacting a professional technician is recommended.
4. Does pressing the learn button delete my Wi-Fi settings?
On MyQ-enabled models, pressing the learn button typically does not delete your Wi-Fi network settings. However, it will remove paired remotes and keypads. Your smartphone app connection usually remains intact, but you may need to re-pair physical devices.
5. Where is the learn button on a Liftmaster keypad?
The learn button is not on the keypad. The keypad is programmed to the motor unit. You must go to the motor unit on the ceiling, press the learn button there, and then enter your desired PIN on the keypad within the 30-second window.
6. Is it safe to stand on a ladder to reach the button?
Always prioritize safety. Ensure your ladder is on stable, level ground. If possible, have someone spot you. If the motor unit is difficult to access or you feel uncomfortable, consider hiring a professional garage door technician to assist with programming.
Leave a Reply