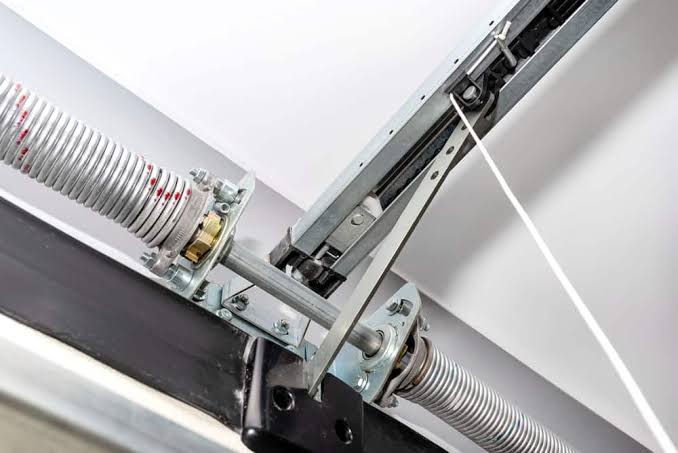
Replacing a broken garage door spring can feel like a daunting task, especially when you’re stuck with a car trapped inside or outside your home. Many homeowners ask themselves, “Is it hard to replace a garage door spring?” because they want to save money but fear the potential dangers. The short answer is: it depends on the type of spring and your comfort level with high-tension mechanical repairs.
Garage door springs are under extreme tension, holding hundreds of pounds of weight. A mistake during replacement can lead to serious injury or property damage. In this guide, we’ll break down the complexity, safety risks, and steps involved so you can decide whether to tackle this job yourself or call a professional.
Why Replacing a Garage Door Spring Is Considered Difficult
The primary reason people find garage door spring replacement difficult is the high level of tension involved. These springs are not ordinary hardware; they are engineered to counterbalance the heavy weight of your garage door, which can range from 150 to over 400 pounds.
The Danger of High-Tension Springs
When a spring breaks, it releases energy violently. During replacement, you must safely wind or unwind the spring using specialized tools. If the winding bar slips or the clamp fails, the spring can unwind with enough force to cause severe injury, including broken bones or even fatal accidents. According to the Consumer Product Safety Commission (CPSC), garage door-related injuries send thousands of Americans to emergency rooms each year, with spring failures being a significant contributor.
Specialized Tools Are Required
You cannot replace a garage door spring with standard household tools. You need:
- Winding bars: Solid steel rods designed to handle the torque.
- Vise grips or locking pliers: To secure the track and prevent movement.
- C-clamps: To hold the door in place.
- Safety glasses and gloves: Essential personal protective equipment (PPE).
Without these specific tools, the job becomes exponentially harder and more dangerous.
Torsion Springs vs. Extension Springs: Which Is Harder to Replace?
Not all garage door springs are created equal. The difficulty level largely depends on whether your door uses torsion springs or extension springs.
| Feature | Torsion Springs | Extension Springs |
|---|---|---|
| Location | Mounted above the door opening | Mounted along the horizontal tracks |
| Difficulty Level | High | Moderate |
| Risk Factor | Very High (high torque) | Moderate (snap-back risk) |
| Tools Needed | Winding bars, vice grips | Safety cables, wrenches |
| DIY Friendly? | Not recommended for beginners | Possible with caution |
Torsion Springs: The Professional’s Domain
Torsion springs are mounted on a metal shaft above the garage door. They work by twisting (torque) to lift the door. Replacing them requires precise winding to match the door’s weight. One wrong turn can leave the door unbalanced or cause the spring to explode off the shaft. Due to the high risk, most experts advise against DIY replacement for torsion springs.
Extension Springs: A Slightly Easier Task
Extension springs stretch along the side tracks. When the door is closed, they are fully extended; when open, they contract. While still dangerous, they are generally easier to replace because they don’t require winding with bars. However, they must have safety cables installed to prevent them from snapping across the room if they break.
Step-by-Step Guide: How Professionals Replace Garage Door Springs
If you are determined to understand the process, here is how a professional approaches the task. Note: This is for informational purposes only. We strongly recommend hiring a licensed technician for torsion spring replacement.
- Disconnect the Opener: Pull the emergency release cord to disconnect the automatic opener. Manually close the door completely.
- Secure the Door: Use C-clamps on the vertical tracks just below the bottom rollers to prevent the door from moving.
- Release Tension (Torsion Only): Insert winding bars into the winding cone. Slowly unwind the spring until all tension is released. This is the most dangerous step.
- Remove the Old Spring: Unbolt the spring from the center bracket and remove it from the shaft.
- Install the New Spring: Slide the new spring onto the shaft. Ensure it matches the exact length, wire size, and wind direction of the old one.
- Wind the Spring: Using winding bars, wind the spring the specified number of quarter-turns. This number is critical for proper balance.
- Test the Balance: Remove the clamps and manually lift the door halfway. It should stay in place. If it falls or rises, the tension is incorrect.
For a deeper understanding of garage door mechanics, you can refer to Wikipedia’s article on garage doors which covers historical and technical aspects.
Cost Comparison: DIY vs. Professional Replacement
Many homeowners consider DIY to save money, but is it worth the risk? Let’s look at the costs.
- DIY Cost: $50–$150 for parts and tools. You save on labor but assume all liability.
- Professional Cost: $200–$400 including parts, labor, and warranty. Most pros offer a 1–5 year warranty on both parts and labor.
While DIY seems cheaper, if you make a mistake, you could damage the door, the opener, or worse, injure yourself. Medical bills far outweigh the cost of a professional service call.
Signs You Need a Garage Door Spring Replacement
How do you know if your spring is actually the problem? Look for these signs:
- Loud Bang: A sudden loud noise from the garage often indicates a spring has snapped.
- Door Won’t Open: The opener struggles or fails to lift the door.
- Gap in the Spring: For torsion springs, you may see a visible gap where the coil has separated.
- Uneven Movement: The door tilts to one side as it moves.
FAQ Section
Is it safe to replace a garage door spring myself?
It is not safe for most homeowners to replace torsion springs due to the high tension involved. Extension springs are slightly safer but still carry risks. If you lack experience with high-tension mechanical systems, hire a professional.
How long do garage door springs last?
Standard garage door springs are rated for 10,000 cycles (one open and one close equals one cycle). For an average family, this translates to 7–10 years. Heavy-use doors may wear out sooner.
Can I replace just one spring?
If your door has two springs, it is highly recommended to replace both. Since they were installed at the same time, the second spring is likely near the end of its life. Replacing only one can lead to imbalance and premature failure of the new spring.
What tools do I need to replace a garage door spring?
For torsion springs, you need winding bars, vise grips, C-clamps, a ladder, and safety glasses. For extension springs, you need wrenches, pliers, and safety cables. Never use screwdrivers or makeshift tools as winding bars.
How much does it cost to hire a professional?
The average cost ranges from $200 to $400, depending on your location, the type of spring, and the weight of your door. Emergency or after-hours services may cost more.
Why did my garage door spring break?
Springs break due to metal fatigue over time. Factors that accelerate this include lack of lubrication, extreme temperature changes, rust, and poor installation. Regular maintenance can extend their lifespan.
Conclusion
So, is it hard to replace a garage door spring? Yes, particularly if it’s a torsion spring. The combination of high tension, specialized tools, and safety risks makes it a challenging and potentially dangerous DIY project. While extension springs are somewhat more manageable, the margin for error is small.
For most US homeowners, the peace of mind and warranty offered by a professional technician are worth the investment. Your safety and the longevity of your garage door system are paramount. If you’re unsure, always consult a licensed garage door specialist.
Leave a Reply