Have you ever stood in your garage, staring at that old, noisy motor, wondering if you can replace it yourself? Many homeowners ask, is it hard to install a new garage door opener? The answer depends on your comfort level with basic tools and following instructions, but for most people, it is a manageable weekend project.
Installing a garage door opener can save you hundreds of dollars in labor costs. However, it requires patience, attention to detail, and a strong focus on safety. In this guide, we will break down the difficulty, required tools, and common pitfalls to help you decide if DIY is right for you.
Understanding the Difficulty Level
Before you buy a new unit, it is essential to understand what you are getting into. The question “is it hard to install a new garage door opener” does not have a simple yes or no answer. It varies based on several factors.
Factors That Influence Difficulty
- Type of Opener: Chain-drive openers are generally easier to assemble than belt-drive or direct-drive models.
- Garage Structure: A standard two-car garage with a center beam is straightforward. Unique layouts or high ceilings may require additional bracing or extensions.
- Existing Infrastructure: If you are replacing an old opener, you may reuse existing brackets and wiring, which simplifies the process. New installations require mounting all hardware from scratch.
- Electrical Access: Having a nearby outlet makes the job easier. Running new electrical lines adds significant complexity and may require a licensed electrician.
Most manufacturers design modern openers with DIYers in mind. They include detailed manuals, pre-assembled rail sections, and color-coded wiring. If you can use a drill, read a tape measure, and follow step-by-step instructions, you can likely handle this task.
Tools and Materials You Will Need
Preparation is half the battle. Gathering the right tools before you start prevents frustration and mid-project trips to the hardware store.
Essential Tools List
- Power Drill: With various bits for wood and metal.
- Socket Set and Wrenches: For tightening bolts and nuts.
- Screwdrivers: Both flathead and Phillips head.
- Ladder: A sturdy stepladder that reaches the ceiling height.
- Tape Measure: For precise alignment.
- Level: To ensure the rail is straight.
- Pliers: For bending and cutting wires.
- Safety Glasses: To protect your eyes from debris.
Optional but Helpful Items
- Helper: While not strictly necessary, having a second person to hold the rail while you secure it is invaluable.
- Wire Strippers: If you need to connect low-voltage wires.
- Stud Finder: To locate ceiling joists for secure mounting.
Step-by-Step Installation Overview
While every model differs slightly, the general process remains consistent. Here is a high-level overview of what to expect.
Step 1: Unpack and Assemble the Rail
Lay out all parts on the floor. Assemble the rail sections according to the manual. Ensure all bolts are tight but do not overtighten, as this can strip threads. Attach the trolley and spring mechanism to the rail.
Step 2: Install the Header Bracket
The header bracket attaches to the wall above the garage door. Use a level to ensure it is perfectly horizontal. Secure it into the wall studs or masonry using appropriate anchors. This bracket bears significant weight, so stability is crucial.
Step 3: Mount the Opener Unit
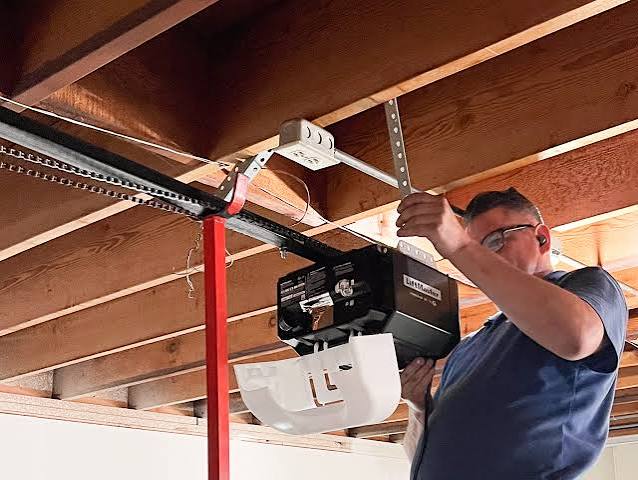
Lift the motor unit onto the ceiling brackets. If you have a helper, they can hold the unit while you secure it. If working alone, use temporary supports like wooden blocks to hold the unit in place. Ensure the unit is centered over the door.
Step 4: Attach the Rail to the Motor and Bracket
Connect the assembled rail to the motor unit. Then, attach the other end of the rail to the header bracket. Use the provided pins or bolts. Check the alignment with your level. The rail should be parallel to the ground and centered over the door.
Step 5: Install the Safety Sensors
Modern openers require safety sensors near the floor on both sides of the door. These prevent the door from closing if an object is detected. Mount them about six inches off the ground. Run the low-voltage wires along the wall to the motor unit. Ensure the lenses are aligned and clean.
Step 6: Electrical Connections and Programming
Plug the opener into a grounded outlet. Follow the manual to program the remote controls and keypad. Test the up and down functions. Adjust the travel limits and force settings as instructed. Most modern units have automatic learning modes that simplify this process.
Common Challenges and How to Overcome Them
Even with careful planning, you may encounter issues. Being aware of common problems helps you solve them quickly.
| Challenge | Solution |
|---|---|
| Misaligned Rail | Use a level frequently. Loose bolts can cause shifting. Tighten all connections before final testing. |
| Sensor Issues | Ensure sensors are facing each other directly. Clean lenses with a soft cloth. Check for sunlight interference. |
| Door Balance Problems | Before installing, test the door manually. It should stay in place when halfway open. If not, adjust springs professionally. |
| Weak Signal | Keep remotes away from metal objects. Reprogram if necessary. Check battery levels in remotes. |
For more detailed technical specifications on garage door components, you can refer to Wikipedia’s article on garage doors to understand the mechanical principles involved.
Safety First: Critical Precautions
Garage doors are heavy and under high tension. Safety must be your top priority.
- Disconnect Power: Always unplug the old opener before starting.
- Release Tension: If removing an old opener, follow the manual to release spring tension safely. Never attempt to adjust torsion springs yourself; call a professional.
- Use Proper Ladders: Ensure your ladder is stable and on level ground. Do not overreach.
- Test Safety Features: After installation, test the auto-reverse feature by placing a 2×4 block of wood on the floor. The door should reverse upon contact.
When to Call a Professional
While DIY is rewarding, some situations warrant professional help.
- Complex Electrical Work: If you need to install a new circuit or outlet, hire a licensed electrician.
- Spring Replacement: Torsion springs are dangerous. Incorrect handling can cause severe injury.
- Structural Modifications: If your garage lacks proper support beams, a contractor may need to reinforce the ceiling.
- Lack of Confidence: If you feel unsure at any point, stop and call a pro. It is better to be safe than sorry.
FAQ Section
Is it hard to install a new garage door opener for a beginner?
It is moderately challenging but achievable for a beginner with basic DIY skills. The key is reading the manual thoroughly and taking your time. Most kits are designed for self-installation.
How long does it take to install a garage door opener?
For an experienced DIYer, it takes 3–5 hours. Beginners may take 6–8 hours or spread the work over two days. Rushing leads to mistakes.
Can I install a garage door opener by myself?
Yes, but having a helper makes lifting the motor and aligning the rail much easier. If working alone, use temporary supports to hold the unit in place.
What is the hardest part of installing a garage door opener?
Aligning the rail and mounting the motor unit securely are often the most difficult steps. Ensuring the safety sensors work correctly can also be tricky.
Do I need special tools to install a garage door opener?
No special tools are required. Standard household tools like a drill, wrenches, and screwdrivers are sufficient. A helper is highly recommended but not mandatory.
Will installing it myself void the warranty?
Most manufacturers allow DIY installation without voiding the warranty, provided you follow the instructions. Keep your receipt and registration documents.
Conclusion
So, is it hard to install a new garage door opener? It is a manageable project for most homeowners who are comfortable with basic tools and careful planning. By understanding the steps, gathering the right tools, and prioritizing safety, you can successfully upgrade your garage system.
The satisfaction of completing the job yourself, along with the cost savings, makes it a worthwhile endeavor. Remember to take your time, double-check alignments, and test all safety features thoroughly.
If you found this guide helpful, please share it with friends or family who might be considering a similar project. Your experience could help them tackle their own DIY challenges with confidence!
Leave a Reply