Water pooling in your garage isn’t just an annoyance; it’s a threat to your home’s structural integrity and your stored belongings. If you are frustrated by damp floors and mold risks, learning how to stop water from leaking under garage door is the first step toward a dry, secure space. This guide provides actionable, professional-grade solutions to seal the gap effectively.
Why Does Water Leak Under Your Garage Door?
Before applying a fix, it is crucial to understand the root cause. Most leaks occur due to a combination of poor drainage, worn-out seals, or improper door alignment. According to general building standards, garage floors are often sloped slightly toward the door to facilitate runoff, but without a proper barrier, rainwater easily seeps in during heavy storms.
The gap between the bottom of the door and the concrete floor is typically designed to be minimal (about 1/4 to 1/2 inch). However, over time, weather stripping degrades, concrete settles, or debris prevents a tight seal. Identifying whether the issue is a seal failure or a drainage problem will determine which solution works best for you.
Method 1: Install a Heavy-Duty Bottom Seal
The most common and effective solution is replacing or upgrading the rubber weather stripping at the bottom of the door. Standard factory seals often harden and crack after a few years of exposure to UV rays and temperature fluctuations.
Step-by-Step Installation Guide
- Measure the Width: Use a tape measure to determine the exact width of your garage door. Buy a replacement seal that is slightly longer to allow for trimming.
- Remove the Old Seal: Open the door fully. Locate the retaining channel (usually aluminum) at the bottom edge. Pull out the old rubber gasket carefully. If it is glued, use a putty knife to scrape it off.
- Clean the Channel: Wipe down the channel with a damp cloth to remove dirt, rust, or old adhesive. A clean surface ensures a tighter fit.
- Insert the New Seal: Start from one end and push the new rubber seal into the channel. Use a rubber mallet if necessary to tap it gently into place. Ensure it sits evenly across the entire width.
- Test the Fit: Close the door. The new seal should compress slightly against the floor, creating a watertight barrier without preventing the door from closing completely.
Pro Tip: Look for seals made from EPDM rubber. This material is highly resistant to ozone, sunlight, and extreme temperatures, ensuring longevity compared to standard vinyl.
Method 2: Add a Garage Door Threshold Seal
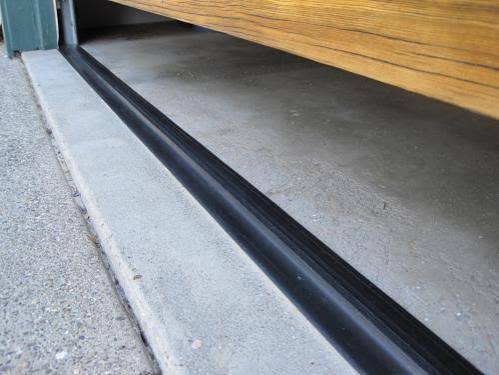
If replacing the bottom seal isn’t enough, or if your floor is uneven, installing a threshold seal is a superior option. These are T-shaped or bulb-style rubber strips that adhere directly to the concrete floor in front of the door.
Advantages vs. Disadvantages
| Feature | Bottom Door Seal | Threshold Seal |
|---|---|---|
| Installation Difficulty | Moderate (requires ladder) | Easy (floor-level work) |
| Effectiveness on Uneven Floors | Low | High |
| Durability | Medium (exposed to elements) | High (protected when door is closed) |
| Cost | $20 – $40 | $30 – $60 |
How to Install a Threshold Seal
- Prepare the Surface: Sweep and vacuum the area where the seal will sit. Use a degreaser to remove any oil stains, as adhesive will not stick to dirty concrete.
- Dry Thoroughly: Ensure the concrete is completely dry. Moisture is the enemy of adhesive bonding.
- Apply Adhesive: Most threshold seals come with industrial-strength adhesive. Apply a continuous bead along the bottom of the seal or directly onto the floor, following the manufacturer’s instructions.
- Position the Seal: Place the seal so that the “T” or bulb part faces the door. When the door closes, it should press firmly against this rubber barrier.
- Let it Cure: Do not close the garage door for at least 24 hours to allow the adhesive to set fully.
Method 3: Improve Exterior Drainage
Sometimes, the best way to stop water from leaking under garage door is to prevent it from reaching the door in the first place. If water pools in front of your garage, no seal will hold back the pressure indefinitely.
Check Your Grading
Stand outside your garage during a rainstorm. Observe where the water flows. Ideally, the ground should slope away from the garage at a gradient of at least 1/4 inch per foot. If water pools near the entrance, you may need to add soil or regrade the landscape.
Install a French Drain
For severe drainage issues, consider installing a French drain. This involves digging a trench in front of the garage, laying perforated pipe, and covering it with gravel. This system captures surface water and redirects it away from the foundation. For detailed engineering principles on drainage, you can refer to Wikipedia’s article on Drainage Systems to understand the broader context of water management around structures.
Method 4: Adjust Door Alignment and Tracks
A perfectly sealed door won’t work if it doesn’t close evenly. If one side of the door hits the floor before the other, gaps will remain on the opposite side.
- Inspect the Tracks: Look for dents, bends, or loose bolts in the vertical and horizontal tracks. Tighten any loose hardware with a socket wrench.
- Check the Springs: Warning: Garage door springs are under high tension. Do not attempt to adjust them yourself unless you are trained. Call a professional if the door feels unbalanced.
- Limit Switch Adjustment: If the door stops before touching the seal, adjust the “down limit” screw on the opener motor. Turn it slightly to allow the door to travel further down until it compresses the seal. Test in small increments to avoid damaging the door or the opener.
Common Mistakes to Avoid
- Using Silicone Caulk Alone: While silicone is waterproof, it is not durable enough to withstand the friction of a moving garage door. It will peel and fail within weeks.
- Ignoring Debris: Leaves, twigs, and pebbles can prevent the seal from making contact. Keep the track and threshold clean.
- Over-Tightening the Door: Forcing the door down too hard can bend the tracks or burn out the opener motor. The seal should compress, not crush.
FAQ Section
Q1: Can I use expanding foam to seal the gap?
A: No, expanding foam is rigid and will crack when the door moves. It is also difficult to remove if applied incorrectly. Always use flexible rubber seals designed for dynamic movement.
Q2: How often should I replace my garage door seal?
A: Inspect your seal annually. Typically, high-quality EPDM seals last 5–7 years. Replace them immediately if you see cracks, tears, or if they have become brittle.
Q3: Will a threshold seal trip people or vehicles?
A: Most threshold seals are low-profile (less than 1 inch high). They are designed to be driven over safely. However, ensure you choose a model rated for vehicle traffic if cars will pass over it.
Q4: What if my concrete floor is cracked?
A: Seal cracks in the concrete with a concrete patching compound before installing a threshold seal. A smooth surface ensures better adhesion and prevents water from seeping through the slab itself.
Q5: Is it better to call a professional?
A: If the issue is related to spring tension, track alignment, or major structural drainage, hiring a professional is safer and more cost-effective in the long run. For simple seal replacements, DIY is highly feasible.
Conclusion
Learning how to stop water from leaking under garage door is a manageable task that can save you hundreds of dollars in water damage repairs. By upgrading to a high-quality EPDM bottom seal, adding a threshold barrier, and ensuring proper exterior drainage, you can create a dry, secure environment for your vehicle and storage items.
Don’t wait for the next storm to test your defenses. Take action today to protect your home. If you found this guide helpful, please share it with your neighbors on social media—because a dry garage is a happy garage!
Leave a Reply