Introduction
Does your plain steel or fiberglass garage door make your home’s exterior feel cold and uninviting? You are not alone; many homeowners crave the warmth of natural timber without the high cost or maintenance of real wood. Learning how to stain a garage door to look like wood is a transformative DIY project that can dramatically boost your curb appeal for a fraction of the price of a full replacement. This guide will walk you through every step to achieve a realistic, high-end finish that lasts.
Can You Actually Stain a Non-Wood Garage Door?
This is the most common question we receive, and the answer requires nuance. Technically, you cannot “stain” steel, aluminum, or fiberglass in the traditional sense because these materials lack the porous grain structure needed to absorb pigment. However, you can achieve an identical visual result using specialized faux wood finishing techniques.
According to industry data from the National Association of Realtors, upgrading a garage door yields one of the highest returns on investment (ROI) for exterior projects, often recouping over 90% of costs at resale. While real wood doors can cost $3,000–$6,000+, a faux wood stain job typically runs between $200 and $500 in materials. The key lies in using a gel stain or tinted polyurethane combined with a graining tool to mimic organic texture. For more context on material properties, understanding the base substrate is crucial; you can reference Wikipedia’s entry on Garage Doors to better understand the composition of steel versus fiberglass panels before beginning.
What Materials Do I Need for a Faux Wood Finish?
Preparation accounts for 70% of a successful faux wood project. Using the wrong products is the primary reason DIY attempts fail or peel within a year. Below is a comprehensive checklist optimized for US climate conditions.
Essential Supplies Checklist
- High-Quality Bonding Primer: Must be rated for metal/fiberglass (e.g., Zinsser Bulls Eye or INSL-X STIX).
- Faux Wood Gel Stain or Tinted Polyurethane: Brands like Minwax Gel Stain or General Finishes Exterior 450 work best because they sit on top rather than soaking in.
- Wood Graining Tool: A rocker-style grainer is essential for creating realistic cathedrals and knots.
- High-Density Foam Rollers: 4-inch size for smooth base coat application.
- Synthetic Bristle Brushes: 2-inch angled sash brush for cutting in edges.
- Painter’s Tape & Plastic Sheeting: To protect hardware, windows, and driveway.
- TSP (Trisodium Phosphate) Cleaner: For degreasing and etching the surface.
- UV-Resistant Clear Topcoat: Marine-grade spar urethane for protection against sun fading.
Material Comparison: Gel Stain vs. Tinted Polyurethane
| Feature | Gel Stain | Tinted Polyurethane |
|---|---|---|
| Opacity | Semi-transparent, shows base color | More opaque, consistent color |
| Durability | Moderate (needs topcoat) | High (color + sealer in one) |
| Application Ease | Forgiving, slow drying | Faster drying, less margin for error |
| Realism | Excellent depth and layering | Good, but can look flat if rushed |
| Best For | Detailed grain work | Large, flat panel sections |
Step-by-Step: How To Stain A Garage Door To Look Like Wood
Follow this precise process to ensure adhesion and longevity. Temperature matters: Only apply products when ambient temperature is between 50°F and 85°F (10°C–29°C) and humidity is below 70%.
Step 1: Deep Clean and Degloss
Dirt and factory oils prevent primer adhesion. Mix ½ cup TSP per gallon of warm water. Scrub the entire door with a stiff nylon brush, paying special attention to bottom panels where road grime accumulates. Rinse thoroughly with a garden hose and allow to dry completely (minimum 4 hours). If the door has existing gloss paint, lightly scuff-sand with 220-grit sandpaper to create a mechanical bond.
Step 2: Prime for Adhesion
Apply a thin, even coat of bonding primer using a foam roller. Back-brush immediately to work primer into embossed panel details. Dry time: 2–4 hours depending on product. Lightly sand with 320-grit paper after drying to remove any raised fibers or dust nibs. Wipe clean with a tack cloth.
Step 3: Apply the Base Color Coat
Your base coat determines the undertone of your faux wood. For a walnut look, use a medium tan or light brown latex paint. For cherry, use a reddish-tan. Apply two thin coats, allowing 2 hours between coats. Avoid heavy buildup in recessed areas.
Step 4: Create the Wood Grain Texture
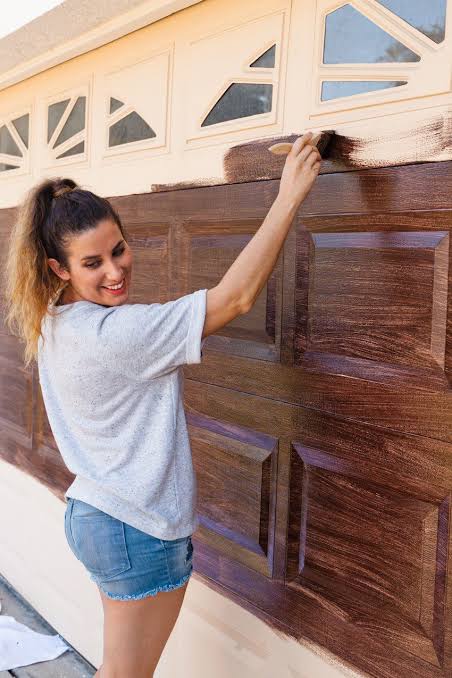
This is where the magic happens. Working in manageable sections (approximately 2’x2’), apply gel stain with a brush or rag. Immediately drag the wood graining tool through the wet stain in long, slightly wavy strokes. Vary pressure to create natural-looking grain variation. Use the corner of the tool to add knot patterns sparingly—real wood has imperfections, so perfection looks fake. Feather edges between sections while the stain is still wet to avoid lap marks.
Step 5: Seal and Protect
After the stain cures fully (24–48 hours), apply two coats of UV-resistant clear topcoat. This step is non-negotiable for exterior applications. Without it, UV rays will bleach your faux finish within months. Apply thinly; thick coats can turn milky or crack. Allow 4 hours between coats and 72 hours before exposing to rain.
Pro Tips for Realistic Results
- Study Real Wood: Before starting, examine photos of the wood species you’re mimicking. Note grain direction, knot placement, and color variation.
- Work in Shade: Direct sunlight causes premature drying, making blending impossible. Work early morning or on overcast days.
- Practice First: Test your graining technique on a scrap piece of primed cardboard. Adjust pressure and stain viscosity before touching your door.
- Avoid Overworking: Once you’ve pulled the grain, stop. Re-stroking wet stain destroys the pattern. Trust the process.
- Maintain Annually: Inspect your finish each spring. Spot-repair chips and reapply topcoat every 2–3 years to extend lifespan.
Frequently Asked Questions (FAQ)
How long does a faux wood stained garage door last?
With proper preparation and UV-sealing, a professionally executed faux wood finish typically lasts 5–8 years before needing significant touch-ups. Real wood doors require annual maintenance, whereas faux finishes are far more resilient to moisture and insects.
Can I use regular interior wood stain on my garage door?
Absolutely not. Interior stains lack UV inhibitors and exterior binders. They will fade, chalk, and peel within weeks when exposed to sunlight and weather. Always use products explicitly labeled for exterior or multi-surface use.
Is it cheaper to stain or replace a garage door?
Staining is significantly cheaper. A quality faux wood transformation costs $200–$500 in materials and 1–2 weekends of labor. New wood-look steel doors range from $1,500–$4,000 installed. Staining is ideal if your existing door is structurally sound but aesthetically outdated.
Will the finish withstand power washing?
No. High-pressure water can delaminate the finish. Clean your faux wood door annually with a soft sponge, mild detergent, and low-pressure rinse. Treat it like painted cabinetry, not concrete.
What if my door already has peeling paint?
You must remove all loose material before starting. Scrape, sand, and feather edges until smooth. Spot-prime bare metal with rust-inhibitive primer. Skipping this step guarantees premature failure of your new finish.
Can I do this in humid climates like Florida or Texas?
Yes, but timing is critical. Avoid rainy seasons and high-humidity days (>70%). Choose marine-grade topcoats designed for coastal environments. Proper sealing is even more vital in humid regions to prevent moisture infiltration beneath the finish.
Conclusion
Mastering how to stain a garage door to look like wood empowers you to elevate your home’s exterior without breaking the bank. By following these detailed steps—from meticulous prep to strategic graining and protective sealing—you can achieve a stunning, realistic wood aesthetic that withstands the elements. Remember, patience during preparation pays dividends in durability and beauty.
If this guide helped you transform your garage door, share it on Pinterest, Facebook, or Instagram to inspire fellow DIY enthusiasts! Tag us in your before-and-after photos—we’d love to celebrate your success. Happy staining!
Leave a Reply