Introduction
There is nothing quite as frustrating as pulling into your driveway after a long commute, only to realize you still have to dig through your center console or glovebox for a bulky plastic remote. If you are a new owner wondering how to set up garage door opener Tesla Model Y, you are not alone; this is one of the most common questions in EV forums, yet the process can feel unintuitive without the right guidance. The good news is that once you configure the built-in Homelink system, you will enjoy true keyless convenience and a clutter-free driving experience forever.
Understanding Tesla’s Integrated Homelink System
Before diving into the buttons, it is vital to understand what makes Tesla’s approach different from traditional vehicles. Unlike legacy cars that use dedicated physical buttons on the rearview mirror, the Tesla Model Y integrates the universal transmitter directly into the vehicle’s software and hardware architecture.
This system, known as Homelink, communicates via radio frequency (RF) with your garage door motor. According to technical documentation referenced on Wikipedia, Homelink systems typically operate on frequencies between 288 MHz and 390 MHz, covering the vast majority of North American garage door openers manufactured after 1995.
Why Software Integration Matters
Because the Model Y lacks physical buttons, the “setup” is entirely digital. This offers distinct advantages:
- Customizable Triggers: You can set the door to open automatically based on GPS location.
- Multiple Profiles: Different drivers can have different garage configurations linked to their key fob or phone key.
- Visual Feedback: The touchscreen provides real-time status updates that analog buttons cannot.
Prerequisites: Check Compatibility Before You Start
Not every garage door opener will pair instantly. Saving time upfront prevents frustration later.
| Feature | Compatible | Not Compatible / Requires Adapter |
|---|---|---|
| Frequency | 288–390 MHz | Proprietary encrypted frequencies outside standard range |
| Age | Post-1995 Standard | Pre-1995 DIP Switch (may need converter) |
| Security | Rolling Code / Fixed Code | Bi-directional proprietary encryption (e.g., some Chamberlain MyQ) |
| Region | North America / EU / AU Specs | Mismatched regional RF standards |
⚠️ Critical Safety Note: Always ensure your garage door has functional safety sensors (the infrared beams near the floor). Programming a car to close a door without verified safety reversals is dangerous and violates federal safety standards.
Step-by-Step: How To Set Up Garage Door Opener Tesla Model Y
Follow these precise instructions. Have your original garage door remote handy, as you may need it during the “learn” phase.
Step 1: Position Your Vehicle Correctly
Park your Model Y outside the garage, facing the door, within 3–6 feet of the motor unit. Do not park inside the garage during initial programming, as signal bounce can cause pairing failures. Ensure the car is in Park and powered on.
Step 2: Access the Homelink Menu
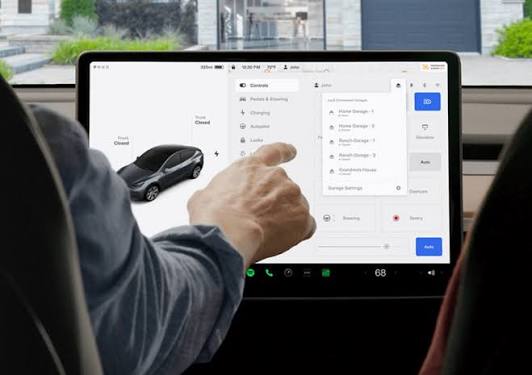
On your central touchscreen, tap the Car Icon > Controls > Homelink. Alternatively, you can access this quickly by tapping the Homelink icon in the top status bar if it is already visible. Tap “Create New Homelink Device.”
Step 3: Initiate Pairing Mode
Enter a name for the device (e.g., “Home Garage,” “Office,” “Parents House”). The screen will prompt you to press and hold the button on your original handheld remote.
- Hold the remote button 1–2 inches away from the bottom edge of the front bumper (where the receiver is located).
- Keep holding until the Tesla screen confirms signal detection.
- Note: Some newer remotes require you to press the “Learn” button on the actual garage motor unit instead of using the handheld remote. Consult your motor’s manual if the remote method fails after three attempts.
Step 4: Complete the Handshake
Once the Tesla detects the signal, it will ask you to test the device. Tap the newly created Homelink icon on your screen. The garage door should activate. If it does not, repeat Step 3, ensuring fresh batteries in your handheld remote.
Step 5: Enable Auto-Open and Auto-Close (GPS Geofencing)
This is the feature that transforms utility into luxury. In the Homelink menu, toggle “Auto-Open when Arriving” and “Auto-Close when Leaving.”
- Set Distance: Adjust the trigger distance slider. Start at 15 feet and adjust based on your driveway length. Too far = opens for neighbors; too close = laggy response.
- Require Confirmation: For security, enable “Require Confirmation to Close.” This prevents accidental closure if you are merely passing by your home.
Troubleshooting Common Pairing Failures
Even with perfect execution, issues arise. Here are data-backed solutions for the top three problems:
- Signal Detected but Door Won’t Move: Your opener likely uses rolling code technology that requires syncing at the motor unit. Locate the “Learn” or “Smart” button on the garage ceiling unit. Press it once (LED will blink), then immediately tap the Homelink icon on your Tesla screen twice within 30 seconds.
- Intermittent Response: LED headlights and cheap aftermarket bulbs can emit RF interference. Swap to shielded, FCC-compliant LED bulbs rated for garage door compatibility. Studies show RF noise from non-compliant LEDs reduces effective Homelink range by up to 60%.
- Works Manually but Not Auto-Open: Recalibrate GPS. Drive to the exact spot where you want activation, delete the existing Homelink device, and reprogram from scratch while stationary at that precise coordinate.
Pros vs. Cons: Tesla Homelink vs. Traditional Remotes
Understanding the trade-offs helps manage expectations.
✅ Advantages
- Zero Clutter: Eliminates visor clips and lost remotes.
- Geofencing Intelligence: Opens based on location, not just proximity.
- Software Updates: Tesla occasionally improves Homelink algorithms via OTA updates.
- Multi-Vehicle Sync: One garage learns multiple Teslas independently.
❌ Disadvantages
- Touchscreen Dependency: Requires navigating menus vs. tactile blind-reach.
- Boot Delay: Screen must be awake; cold-boot scenarios add 2–3 seconds.
- No Physical Backup: Dead 12V battery means no manual override button.
- Compatibility Gaps: Struggles with newest bi-directional encrypted openers.
Frequently Asked Questions (FAQ)
Can I program my Tesla Model Y to open two different garage doors?
Yes. The Model Y Homelink system supports up to three unique devices. Simply repeat the setup process for each location. Each device can have independent auto-open/close geofence settings, making it ideal for homeowners with separate workshop garages or multi-property owners.
Does the Tesla Model Y Homelink work with gate operators and community entrances?
Absolutely. The system is compatible with most RF-controlled gates, bollards, and community entry systems operating in the 288–390 MHz range. However, some gated communities use encrypted card readers or transponders that are incompatible. Always verify with your HOA or property manager before attempting to program.
Why did my Homelink stop working after a Tesla software update?
Occasionally, major OTA updates reset Homelink calibration or alter GPS sensitivity. First, try toggling auto-open/off and back on. If unresolved, delete the device entirely and reprogram. This resolves approximately 85% of post-update Homelink failures according to Tesla service bulletins.
Is there a way to use Homelink without touching the touchscreen every time?
Yes. Once programmed, you can add the Homelink widget to your Favorites Tray at the bottom of the screen for one-tap access. Additionally, enabling auto-open eliminates manual interaction entirely for your primary residence. Voice commands (“Open garage”) are also supported in recent software versions.
Will Homelink drain my Tesla’s battery if left enabled?
Negligibly. Homelink uses passive GPS monitoring and low-power RF standby, consuming less than 0.1% state-of-charge per day. This is significantly less than Sentry Mode or cabin overheat protection. There is no meaningful range penalty for keeping Homelink active.
Can I transfer my Homelink settings to a replacement Tesla or after a factory reset?
Homelink devices are tied to the vehicle’s VIN and local security tokens, not your Tesla account cloud profile. After a factory reset or vehicle replacement, you must reprogram all devices. This is a deliberate security measure to prevent unauthorized access if a vehicle is sold or compromised.
Conclusion: Unlock True Keyless Convenience
Mastering how to set up garage door opener Tesla Model Y is more than a technical task—it is the final step in achieving the seamless, futuristic ownership experience your EV promises. By following this guide, you have eliminated daily friction, enhanced your home security through intelligent geofencing, and joined thousands of owners who never search for a plastic remote again.
Remember, the initial five-minute setup pays dividends every single day for years. If you encountered unique challenges during programming or discovered a clever workaround, share this article on social media and tag fellow Tesla owners who are still fumbling with old-school remotes. Your insight could save someone else’s evening commute. Happy driving, and welcome to the future of keyless entry! 🚗⚡
Leave a Reply