Introduction
There is nothing quite as frustrating as sitting in your driveway, rain pouring down, while you fumble for a bulky garage remote that has inevitably slid under the passenger seat. If you own this versatile wagon, learning how to set up garage door opener in Subaru Outback is one of the most practical upgrades you can make for your daily convenience. By utilizing the built-in HomeLink system, you can replace cluttered visor clips with a seamless, integrated button press that works every time. This guide will walk you through the process safely and efficiently, ensuring you get back inside your warm garage without the hassle.
Understanding Your Subaru Outback’s HomeLink System
Before diving into the programming sequence, it is vital to understand what you are actually working with. Most modern Subaru Outbacks (2015 and newer) come equipped with HomeLink, a universal transceiver system typically located in the overhead console or integrated directly into the rearview mirror frame. Unlike older universal remotes that simply cloned a signal, HomeLink uses Radio Frequency technology to communicate directly with your garage door motor’s logic board.
This distinction matters because the setup process differs depending on whether your garage opener uses “rolling code” security (standard post-1996) or older fixed-code technology. According to automotive safety data, over 90% of residential openers in the US now use rolling codes, which change the access signal every time the door operates to prevent theft. Recognizing this ensures you do not waste time trying outdated programming methods.
Key Features of the Outback HomeLink
- Three Programmable Channels: You can store up to three different devices (e.g., main garage, detached workshop, community gate).
- Battery-Free Operation: The system draws power from the vehicle’s electrical system, meaning no more dead remote batteries.
- Security Encryption: Compatible with Security+ 2.0 and other modern encryption standards used by LiftMaster, Chamberlain, and Genie.
- Visual Feedback: LED indicators provide real-time status updates during the pairing process.
Pre-Programming Checklist: Safety and Preparation
Safety and preparation are often overlooked in tutorials, yet they account for the majority of failed setups. Before you begin learning how to set up garage door opener in Subaru Outback, please complete these essential steps:
- Clear the Door Path: Ensure no people, pets, or objects are in the doorway. The programming process may cause the door to cycle unexpectedly.
- Locate the Learn Button: Find the colored “Learn” or “Smart” button on your garage motor unit. It is usually yellow, purple, red, or orange and located near the antenna wire or light lens.
- Check Compatibility: Verify your opener model is listed on the official HomeLink compatibility database. While rare, some proprietary European or industrial openers require an external adapter.
- Ignition Status: For most Subarus, the ignition must be in the “ON” or “ACC” position. Some newer models with push-button start require the engine to be running to maintain sufficient voltage during the handshake protocol.
- Erase Old Codes (Recommended): If you bought the car used or are reprogramming a previously used channel, clear the memory first to prevent signal conflicts.
Expert Tip: Always keep your original handheld remote handy during this process. Many rolling-code openers require the original transmitter to complete the synchronization bridge between the car and the motor.
Step-by-Step: How To Set Up Garage Door Opener In Subaru Outback
Follow these precise instructions to program your HomeLink system. This method applies to the vast majority of Subaru Outbacks equipped with the standard three-button overhead console.
Step 1: Clear Previous Programming (If Necessary)
Press and hold the two outer HomeLink buttons simultaneously for approximately 10–20 seconds. Watch the indicator lights; when they flash rapidly or turn solid green (depending on model year), release the buttons. The system is now reset. Skip this step only if you are certain the chosen channel is completely unused.
Step 2: Initiate Training Mode
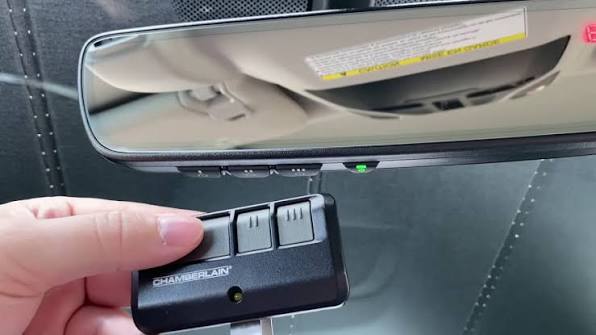
Hold your original garage remote 1–3 inches away from the HomeLink buttons. Simultaneously press and hold both the desired HomeLink button AND the button on your handheld remote. Keep holding both until the HomeLink indicator light changes from a slow blink to a rapid flash or solid illumination. This confirms the car has captured the frequency. Release both buttons.
Step 3: Activate the Garage Motor’s Learn Mode
Go to your garage ceiling unit. Press and release the “Learn” or “Smart” button. You typically have 30 seconds to complete the next step before the motor exits learning mode. Do not hold this button down; a single firm press is sufficient. The learn indicator light on the motor should illuminate or begin blinking.
Step 4: Complete the Handshake
Return to your vehicle immediately. Firmly press and hold the programmed HomeLink button for 2 seconds, then release. Repeat this press-hold-release cycle up to three times. On the first or second press, you should hear the garage door activate or see the motor’s lights flash. This confirms successful synchronization.
Step 5: Test and Verify
Exit the vehicle and test the system from outside the garage range to ensure it does not trigger accidentally. Then, test from the driver’s seat at various distances. If the door responds consistently, your setup is complete.
Troubleshooting Common Programming Failures
Even professionals encounter hiccups. Here is a diagnostic table based on field service data:
| Symptom | Probable Cause | Recommended Solution |
|---|---|---|
| Light blinks slowly but never turns solid | Weak remote battery or incorrect distance | Replace handheld remote battery; adjust distance to 1-3 inches |
| Car programs but door won’t open | Rolling code sync incomplete | Re-do Step 3 & 4 within the 30-second window; ensure Learn button was pressed (not held) |
| Works intermittently | Signal interference or low car battery | Check vehicle battery health; remove nearby LED bulbs or RF devices temporarily |
| No response at all | Incompatible opener or wrong channel | Verify compatibility; try clearing memory and starting fresh on a different channel |
| Door opens but won’t close via HomeLink | Safety sensor misalignment | Inspect photo-eye sensors at floor level; clean lenses and ensure alignment |
FAQ: Your Top Questions Answered
Can I program my Subaru Outback HomeLink without the original remote?
Generally, no. For security reasons, rolling-code openers manufactured after 1996 require the original transmitter to bridge the encryption key to the vehicle. However, if you have access to the garage motor’s control panel and know the PIN code, some newer smart openers allow direct Wi-Fi-based provisioning through manufacturer apps that can then sync to HomeLink.
Why does my HomeLink work sometimes but not others?
Intermittent operation usually points to voltage issues or RF interference. First, test your vehicle’s battery; HomeLink requires stable 12V power. Second, check if you recently installed LED garage lighting or solar equipment, as cheap drivers can emit radio noise that drowns out the HomeLink signal. Replacing problematic bulbs with FCC-compliant versions often resolves this instantly.
Is the HomeLink system compatible with all garage door brands?
HomeLink supports virtually all major North American brands including LiftMaster, Chamberlain, Craftsman, Genie, Overhead Door, and Sommer. However, some niche commercial operators or very old pre-1990s units may require an external compatibility bridge. Always check the manufacturer’s compatibility tool before assuming failure.
How do I erase a single HomeLink button without resetting all three?
Unfortunately, most Subaru HomeLink systems do not support individual channel deletion. You must clear all three channels simultaneously using the two-outer-button method described above, then reprogram any devices you wish to keep. Plan accordingly to avoid disrupting other paired devices.
Does programming HomeLink void my Subaru warranty?
Absolutely not. HomeLink is either factory-installed equipment or an approved accessory designed specifically for integration with your vehicle’s electrical system. Programming it follows manufacturer-approved procedures and has zero impact on your new vehicle limited warranty or certified pre-owned coverage.
What if my Outback has the HomeLink buttons in the rearview mirror instead of the overhead console?
The programming procedure is identical regardless of button location. The mirror-integrated version functions exactly the same as the overhead console version; only the physical placement differs. Follow the same four-step process outlined above without modification.
Conclusion
Mastering how to set up garage door opener in Subaru Outback transforms a minor daily annoyance into effortless automation. By following this structured approach—preparing safely, executing the four-step handshake precisely, and troubleshooting methodically—you gain reliable, secure access without relying on fragile plastic remotes. The investment of fifteen minutes pays dividends every single day you own the vehicle.
Did this guide save you from rainy-day frustration? Share this article on Facebook, X (Twitter), or Reddit to help fellow Subaru owners reclaim their convenience. Have a unique setup challenge we didn’t cover? Drop a comment below—we read every question and update our guides based on real owner experiences. Safe driving and smooth openings!
Leave a Reply