Have you ever stood in your driveway, pressing the remote button repeatedly, only to watch your garage door remain stubbornly closed? It is a frustrating experience that many homeowners face when their smart home devices lose synchronization or encounter software glitches. If you are dealing with unresponsive remotes, keypad errors, or Wi-Fi connectivity problems, learning how to reset Liftmaster garage door opener to factory settings is often the most effective first step toward a solution.
Resetting your unit clears out old codes, resolves minor software bugs, and provides a clean slate for reprogramming your devices. In this comprehensive guide, we will walk you through the exact steps to perform a factory reset on various Liftmaster models, ensuring you can regain control of your garage security without needing to call a professional technician.
Why You Might Need a Factory Reset
Before diving into the technical steps, it is helpful to understand why a factory reset is necessary. A factory reset returns your garage door opener to its original state, as if it just came out of the box. This process erases all previously programmed remotes, keypads, and Wi-Fi credentials.
You should consider performing a reset if:
- You have moved into a new home and want to ensure previous owners cannot access your garage.
- Your remote controls or wireless keypad have stopped working despite fresh batteries.
- You are experiencing persistent Wi-Fi connectivity issues with the MyQ app.
- The opener is behaving erratically, such as reversing unexpectedly or failing to close completely.
According to industry standards, regular maintenance and occasional resets can extend the lifespan of your garage door system by preventing code conflicts and ensuring secure access.
Identifying Your Liftmaster Model
Not all Liftmaster openers are created equal. The reset procedure can vary slightly depending on the age and type of your unit. Most modern Liftmaster openers fall into two categories: those with a “Learn” button and older models with DIP switches.
Models with a “Learn” Button
Most units manufactured after 1993 feature a “Learn” button located on the motor head unit. This button is typically colored yellow, purple, orange, or red. This is the standard interface for resetting and programming modern Liftmaster openers.
Older Models with DIP Switches
If your opener is an older model, it may use a series of small switches (DIP switches) inside the remote and the motor unit. These models require a different approach, often involving matching the switch positions rather than pressing a single button. For the purpose of this guide, we will focus primarily on the modern “Learn” button method, as it covers the vast majority of units currently in use. For historical context on garage door automation technology, you can refer to Wikipedia’s entry on Garage Door Openers.
Step-by-Step: How To Reset Liftmaster Garage Door Opener To Factory Settings
Follow these precise instructions to reset your unit. Please note that safety is paramount. Always keep hands and fingers clear of moving parts during this process.
Step 1: Locate the Motor Head Unit
The motor head unit is the main box attached to your garage ceiling. You will need a sturdy ladder to reach it safely. Ensure the ladder is stable and placed on a flat surface.
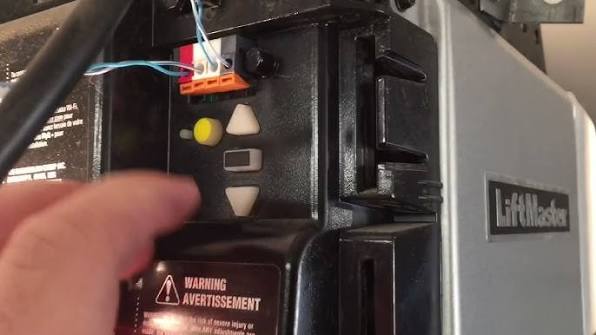
Step 2: Find the “Learn” Button
Look for the “Learn” button on the back or side of the motor unit. It is usually located near the antenna wire. The color of the button indicates the frequency and security type of your opener:
- Yellow: Standard security (older models).
- Purple: Security+ 2.0 (newer, more secure models).
- Orange/Red: Various specific frequencies.
Step 3: Perform the Reset
- Press and hold the “Learn” button for approximately 6 to 10 seconds.
- Watch the indicator light next to the button. It will initially turn on, then blink, and finally turn off completely.
- Once the light goes out, release the button.
Important: The moment the light turns off, your opener has been reset to factory settings. All previously programmed remotes, keypads, and Wi-Fi connections are now erased.
Step 4: Verify the Reset
To confirm the reset was successful, try using any of your old remotes. They should no longer operate the door. If the door does not respond, the reset was successful. If the door still opens, repeat Step 3, ensuring you hold the button long enough for the light to extinguish.
Reprogramming Your Devices After Reset
Once the unit is reset, you must reprogram all your access devices. Here is how to do it efficiently.
Reprogramming Remote Controls
- Press the “Learn” button once briefly. The indicator light will turn on or blink.
- Within 30 seconds, press and hold the button on your remote control that you wish to program.
- Release the button when the opener’s lights flash or you hear a click.
- Test the remote by pressing the button again. The door should operate.
Reprogramming Wireless Keypads
- Enter a new PIN on the keypad.
- Press and hold the “Learn” button on the motor unit until the light activates.
- Return to the keypad and enter your PIN again, followed by the “Enter” or “Send” button.
- The opener should flash or click, confirming the code is accepted.
Reconnecting to Wi-Fi (MyQ App)
If you use the Liftmaster MyQ app, you will need to reconnect your opener to your Wi-Fi network.
- Open the MyQ app on your smartphone.
- Select your device and choose “Set Up Wi-Fi.”
- Follow the on-screen prompts to enter your Wi-Fi credentials.
- Ensure your garage has a strong Wi-Fi signal. If not, consider using a Wi-Fi extender.
Troubleshooting Common Issues
Even with a reset, issues can persist. Here are some common problems and solutions.
| Issue | Possible Cause | Solution |
|---|---|---|
| Remote not working | Dead batteries | Replace batteries with fresh alkaline ones. |
| Opener not responding | Power outage | Check if the unit is plugged in and the circuit breaker is on. |
| Wi-Fi connection fails | Weak signal | Move router closer or use a Wi-Fi extender. |
| Door reverses immediately | Obstructed sensors | Clean the safety eyes and ensure they are aligned. |
Frequently Asked Questions (FAQ)
1. Will resetting my Liftmaster opener delete my Wi-Fi settings?
Yes, a factory reset erases all stored data, including Wi-Fi credentials. You will need to reconnect your opener to your home network via the MyQ app after the reset is complete.
2. How long does it take to reset a Liftmaster garage door opener?
The actual reset process takes only about 10 seconds. However, reprogramming all your remotes, keypads, and Wi-Fi can take 15–30 minutes depending on the number of devices.
3. Can I reset my opener without a ladder?
No, you must physically access the motor head unit to press the “Learn” button. Using a sturdy ladder is essential for safety. Never attempt to reach the unit while standing on unstable surfaces.
4. What if my “Learn” button is not working?
If the button feels unresponsive or the light does not activate, check the power supply to the opener. If the unit has power but the button still fails, the internal circuit board may be faulty, and you may need professional repair.
5. Is it safe to reset the opener myself?
Yes, it is safe as long as you follow proper safety precautions. Ensure the garage door is closed before starting, and keep clear of moving parts. Always disconnect power if you are performing any electrical repairs beyond a simple reset.
6. Do I need to reset my opener if I change the batteries in my remote?
No, changing batteries in your remote does not require a reset. Simply replace the batteries and test the remote. Only perform a reset if the remote fails to work with new batteries or if you are experiencing broader system issues.
Leave a Reply