Introduction
There is nothing quite as heart-stopping as realizing your automatic garage opener isn’t working because the emergency release was accidentally triggered. If you are currently staring at an open garage bay and wondering how to reset LiftMaster garage door after pulling red cord, take a deep breath; this is one of the most common and easily fixable homeowner maintenance issues. This guide will walk you through safely re-engaging your system without damaging the motor or risking personal injury.
Understanding the Emergency Release Mechanism
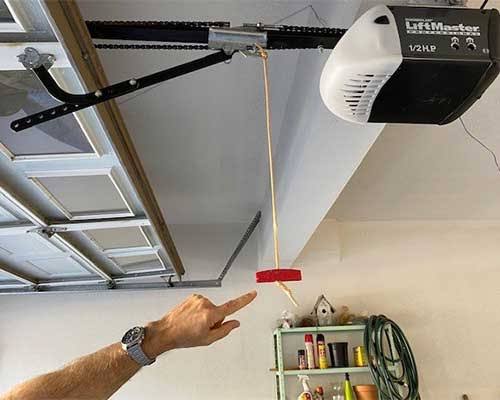
Before diving into the reset process, it is vital to understand what actually happened when that red handle was pulled. The red cord is attached to the emergency release lever on the trolley assembly. When pulled, it physically disconnects the trolley (which moves along the rail) from the carriage that attaches to your garage door.
This mechanism exists for two primary reasons:
- Power Outages: Allowing you to open the door manually when electricity fails.
- Safety Emergencies: Enabling manual operation if the opener malfunctions or traps a vehicle/person.
According to mechanical engineering principles documented on Wikipedia, modern trolley-style openers utilize a spring-loaded latch system that requires positive physical force to re-engage. Simply pushing the cord back up rarely works; you must realign the internal carriage with the trolley’s drive mechanism.
⚠️ Critical Safety Warning: Never attempt to reset the release mechanism while the garage door is in the open position unless you have secured the door with locking pliers or a C-clamp on the track below the bottom roller. An unsecured door can free-fall, causing severe injury or property damage. Always ensure the door is fully closed before re-engaging the trolley.
Step-by-Step: How To Reset LiftMaster Garage Door After Pulling Red Cord
Follow these precise steps to restore automatic function. This process applies to most belt-drive and chain-drive LiftMaster models (including Security+ 2.0 systems).
Step 1: Secure the Garage Door Position
Ensure the garage door is completely closed. If the door is open, carefully lower it by hand until it rests fully on the concrete floor. Verify that the tracks are clear of debris and that no rollers are derailed.
Step 2: Locate the Trolley and Release Lever
Stand on a stable stepladder near the motor unit. Identify the trolley assembly on the rail. You will see the red cord hanging down and a metal lever arm adjacent to it. On most LiftMaster units, the lever points toward the motor when disengaged.
Step 3: Align the Carriage and Trolley
This is the step most homeowners miss. Look closely at the trolley and the carriage (the piece connected to the door’s top bracket). There should be a visible gap between them where they separated.
- Gently slide the carriage along the rail toward the trolley.
- Ensure the attachment points are within 1/8 inch of alignment.
- Do not force components; they should slide smoothly.
Step 4: Re-Engage the Release Lever
With the carriage aligned:
- Grasp the red cord firmly.
- Pull the cord down and toward the garage door (away from the motor) with moderate force.
- You should hear and feel a distinct “click” as the spring-loaded latch seats back into the trolley’s drive slot.
- Visually confirm the lever has returned to its engaged position (typically pointing downward or perpendicular to the rail).
Step 5: Test the Connection Manually
Before using the remote, lift the door manually by approximately 6 inches. The trolley should move in unison with the door. If the door lifts but the trolley stays stationary, the re-engagement failed. Repeat Steps 3–4.
Step 6: Restore Power and Test Automatic Operation
If the manual test passes, press your wall button or remote. Observe the first full cycle. Listen for unusual grinding or clicking sounds, which indicate partial engagement.
Troubleshooting: When the Reset Doesn’t Work
Even when following the correct procedure for how to reset LiftMaster garage door after pulling red cord, complications arise. Here is a diagnostic table:
| Symptom | Probable Cause | Solution |
|---|---|---|
| No “click” during re-engagement | Latch spring broken or debris in slot | Inspect latch mechanism; clean rail; replace trolley if damaged |
| Trolley engages but slips under load | Worn carriage teeth or stretched chain/belt | Check drive component tension; inspect gear teeth for wear |
| Door reverses immediately after reset | Travel limits lost during manual operation | Reprogram up/down travel limits per owner’s manual |
| Motor runs but door doesn’t move | Internal gear stripped (unrelated to cord) | Professional inspection required; likely gear replacement |
| Cord feels loose/no resistance | Release lever detached internally | Remove trolley cover; reseat lever pin; replace assembly if cracked |
Expert Insight on Wear Patterns
Industry service data indicates that approximately 15–20% of emergency release failures stem from repeated use without proper lubrication. The latch mechanism contains a steel spring and pivot pin that corrode over time. Applying a silicone-based lubricant (never WD-40) to the release lever pivot point every 12 months significantly reduces re-engagement failures.
Secondary Considerations: Post-Reset Maintenance
After successfully resetting your system, treat this as a maintenance trigger. Pulling the red cord often reveals underlying issues:
- Check Balance: Disconnect the opener again (with door closed) and lift the door halfway. It should stay in place. If it falls or rises, your torsion springs need professional adjustment. Unbalanced doors are the #1 cause of premature opener failure.
- Inspect Rollers: Nylon rollers typically last 7–10 years; steel rollers, 3–5 years. Replace any chipped or flat-spotted rollers during your reset inspection.
- Verify Sensor Alignment: Manual operation can shift the rail slightly. Ensure photo-eye sensors are aligned within 1/4 inch vertically and horizontally. Misalignment causes intermittent reversal issues post-reset.
Frequently Asked Questions (FAQ)
Q1: Can I reset the LiftMaster red cord while the door is open?
Technically yes, but it is strongly discouraged. Re-engaging with the door open puts significant lateral stress on the trolley latch and increases the risk of the door falling unexpectedly. Only do this if absolutely necessary, and always secure the door to the track with clamps first. The safest method always involves a fully closed door.
Q2: Why does my garage door still not work after resetting the red cord?
If the trolley clicks into place but the opener still fails, the issue likely extends beyond the release mechanism. Common culprits include stripped internal gears (especially in units older than 10 years), failed logic boards, or misaligned safety sensors. Consult your model-specific troubleshooting guide or contact a certified technician if basic diagnostics fail.
Q3: How much force should I use when pulling the red cord to re-engage?
Moderate, deliberate force—approximately 10–15 pounds of pull pressure. You should never need to yank violently or use tools. If excessive force is required, the latch is likely obstructed, corroded, or broken. Forcing it can snap the lever arm, requiring complete trolley replacement ($80–$150 part cost plus labor).
Q4: Will pulling the red cord damage my LiftMaster opener?
No, when used correctly. The emergency release is a designed safety feature. However, repeated unnecessary use accelerates wear on the latch spring and trolley bearings. Reserve the red cord for genuine emergencies or scheduled maintenance testing (once annually). Daily manual operation via the release cord is not recommended.
Q5: Do I need to reprogram my remote after pulling the red cord?
Generally, no. The emergency release is purely mechanical and does not affect the opener’s electronic memory or programmed remotes. However, if you had to adjust travel limits or force settings during troubleshooting, you may need to re-sync certain smart home integrations. Standard RF remotes retain their programming regardless of mechanical disengagement.
Q6: My red cord broke off during reset—what now?
The cord itself is replaceable without replacing the entire trolley. Most LiftMaster models use a standard nylon pull cord with a knotted end. Purchase a replacement cord (part number varies by model; typically $5–$12), thread it through the lever eyelet, and tie a secure double knot. Ensure at least 6 inches of clearance from the floor when the lever is in the engaged position to prevent accidental activation.
Conclusion
Knowing how to reset LiftMaster garage door after pulling red cord empowers you to handle one of the most common garage door disruptions confidently and safely. By following the alignment-first approach, respecting safety protocols, and treating each reset as a maintenance opportunity, you extend both your opener’s lifespan and your peace of mind. Remember: patience during re-engagement prevents costly trolley replacements, and annual lubrication keeps the mechanism reliable when you truly need it.
Found this guide helpful? Share it on Facebook, Pinterest, or your neighborhood Nextdoor group so fellow homeowners aren’t left stranded. Tag us with your successful reset photos—we love seeing DIY wins! Your share could save someone a frustrating evening and an unnecessary service call. 💪🏡
Leave a Reply