Introduction
Is your Craftsman garage door opener grinding loudly, struggling to lift the door, or failing to move entirely? You are likely dealing with worn-out internal components, and learning how to replace worm gear on Craftsman garage door opener is the most cost-effective solution to restore functionality. This common issue can be resolved with basic tools and a few hours of careful work, saving you hundreds of dollars in professional service fees while extending the life of your existing unit.
What Is a Worm Gear and Why Does It Fail?
Before diving into the repair process, it is crucial to understand what component you are actually fixing. The worm gear is a critical part of the opener’s transmission system that transfers rotational force from the motor to the drive mechanism that lifts your garage door. According to mechanical engineering principles documented on Wikipedia, this specific gear arrangement provides high reduction ratios and self-locking capabilities essential for holding heavy garage doors in position safely.
Common Signs of Worm Gear Failure
Identifying failure early prevents secondary damage to your motor or chain drive. Watch for these definitive indicators:
- Grinding or Stripping Noises: A distinct plastic-on-metal grinding sound during operation indicates teeth have worn smooth.
- Motor Runs But Door Doesn’t Move: The motor hums or spins freely without engaging the trolley or chain.
- Inconsistent Movement: The door jerks, stalls mid-cycle, or reverses unexpectedly without obstruction.
- Visible Plastic Shavings: Finding white or gray debris near the opener housing confirms internal gear deterioration.
- Age-Related Wear: Most nylon worm gears last 10–15 years; units older than this are prime candidates for replacement regardless of current symptoms.
Expert Insight: “The worm gear is intentionally designed as the sacrificial component in Craftsman openers,” explains certified garage door technician Mark Reynolds. “It’s made of engineered nylon rather than steel specifically so it fails before the more expensive motor or sprocket assembly. Replacing it is expected maintenance, not a catastrophic failure.”
Tools and Parts You’ll Need Before Starting
Preparation eliminates frustration and safety risks. Gather everything before disconnecting power.
Essential Tool List
| Tool | Purpose | Notes |
|---|---|---|
| Phillips & Flathead Screwdrivers | Housing removal, terminal access | Magnetic tips prevent dropped screws |
| Socket Wrench Set (¼” & ⅜”) | Motor mount bolts, gear retainer | Deep sockets often required |
| Needle-Nose Pliers | Retaining clip removal, wire handling | Insulated grips recommended |
| Clean Shop Rags | Grease cleanup, surface prep | Lint-free preferred |
| Lithium-Based Garage Door Grease | New gear lubrication | Never use WD-40 or silicone spray |
| Replacement Worm Gear Kit | Model-specific part | Verify using opener’s model number |
| Safety Glasses & Gloves | Personal protection | Nylon shards can be sharp |
| Voltage Tester | Power verification | Confirm zero voltage before touching wires |
Selecting the Correct Replacement Part
Craftsman has used multiple worm gear designs across decades of production. Using an incompatible gear will cause immediate re-failure or motor damage. Locate your model number on the back or side panel of the opener unit, then cross-reference with the manufacturer’s parts diagram. Most modern Craftsman belt and chain drive openers use part number 41A2817 or 53C446, but always verify against your specific model.
Step-by-Step: How To Replace Worm Gear On Craftsman Garage Door Opener
Follow these instructions precisely. Rushing causes misalignment, premature wear, or electrical hazards.
Step 1: Disconnect Power and Secure the Door
Safety is non-negotiable. Unplug the opener from the ceiling outlet and turn off the circuit breaker controlling the garage. Use your voltage tester on the opener’s terminal block to confirm zero power. Manually lower the garage door completely and lock it in place with C-clamps on the track below the bottom roller. This prevents accidental movement while the drive mechanism is disassembled.
Step 2: Remove the Opener Cover and Access the Gear Assembly
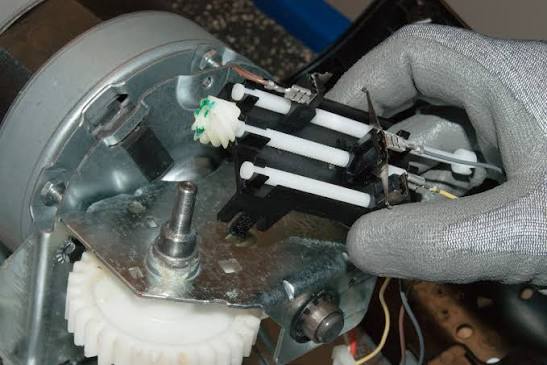
Remove the four to six Phillips screws securing the outer housing cover. Set screws aside in a magnetic tray. Carefully lift the cover away, noting any wiring harness connections that may need gentle disconnection. Photograph wire routing with your phone before disconnecting anything—this reference prevents reassembly errors. Locate the worm gear assembly mounted directly to the motor shaft inside the exposed chassis.
Step 3: Extract the Worn Worm Gear
Using needle-nose pliers, carefully remove the retaining clip or E-clip securing the gear to the motor shaft. Slide the old worm gear off the shaft; if stuck, apply gentle penetrating oil and allow five minutes of soak time. Do not pry forcefully, as this can bend the motor shaft or damage bearings. Inspect the shaft for scoring or burrs; minor imperfections can be smoothed with fine emery cloth, but significant damage requires professional assessment.
Step 4: Clean the Housing and Inspect Adjacent Components
Thoroughly wipe out all old grease, plastic fragments, and metal shavings from the gear cavity using clean rags. Examine the mating spur gear or sprocket for corresponding wear patterns. If the mating gear shows pitting, cracking, or uneven tooth wear, replace both gears simultaneously. Installing a new worm gear against a damaged mating surface guarantees premature re-failure within weeks.
Step 5: Install the New Worm Gear and Lubricate Properly
Slide the new worm gear onto the motor shaft, ensuring proper orientation (most have directional markings or asymmetric keyways). Reinstall the retaining clip securely. Apply a generous but controlled amount of lithium-based garage door grease to all gear teeth and contact surfaces. Over-lubrication attracts dust and creates mess; under-lubrication causes heat buildup and accelerated wear. Aim for complete tooth coverage with no excess pooling.
Step 6: Reassemble, Restore Power, and Test Operation
Reconnect any wiring harnesses using your reference photos. Replace the housing cover and secure all screws evenly. Remove C-clamps from the track. Restore power at the breaker first, then plug in the opener. Operate the door through three complete cycles, listening for smooth engagement and watching for consistent travel speed. Adjust force and limit settings per your owner’s manual if the door doesn’t stop precisely at fully open and closed positions.
Pros and Cons of DIY Worm Gear Replacement
Understanding trade-offs helps you decide whether to proceed or call a professional.
Advantages:
- Cost Savings: Parts typically $25–$45 versus $150–$300 professional service call
- Skill Development: Builds confidence for future garage door maintenance tasks
- Immediate Resolution: No scheduling delays or waiting for technician availability
- Component Familiarity: Better understanding of your opener’s condition and lifespan
Disadvantages:
- Time Investment: 2–4 hours for first-time repair versus 30–60 minutes for experienced technicians
- Risk of Misdiagnosis: Gear wear may indicate underlying motor or alignment issues
- Warranty Considerations: Self-repair may void remaining manufacturer warranty
- Safety Exposure: Working with torsion springs, electricity, and elevated equipment carries inherent risk
Frequently Asked Questions
How long does a replacement worm gear typically last?
With proper installation and regular lubrication, a quality replacement worm gear should provide 10–15 years of reliable service. Factors affecting longevity include door weight balance, usage frequency, climate conditions, and adherence to maintenance schedules. Annual inspection and re-greasing significantly extends operational life.
Can I replace just the worm gear, or do I need the entire kit?
While technically possible to replace only the worm gear, most experts strongly recommend purchasing the complete gear kit that includes the mating spur gear and fresh grease. The mating gear experiences identical wear cycles, and replacing only one component creates mismatched tolerances that accelerate failure. Complete kits cost only marginally more and ensure optimal performance.
Why did my new worm gear fail within months of replacement?
Premature failure usually stems from one of three causes: incorrect gear model for your opener, inadequate cleaning leaving abrasive debris in the housing, or insufficient/improper lubrication. Less commonly, an unbalanced garage door places excessive load on the drive train. Have your door’s spring tension and balance professionally checked if replacements fail repeatedly.
Is it safe to operate the opener without the cover during testing?
No. Operating the opener with the housing removed exposes live electrical components and moving gears, creating serious shock and entanglement hazards. Always reinstall the cover completely before restoring power. If diagnostic testing with the cover off is absolutely necessary, maintain extreme distance and use insulated tools only.
Should I upgrade to a newer opener instead of repairing?
Consider replacement if your opener lacks modern safety features (photoelectric sensors, auto-reverse), exceeds 20 years of age, uses obsolete parts, or requires frequent repairs beyond gear replacement. However, if the unit is otherwise functional and meets current safety standards, worm gear replacement remains the economically rational choice. Compare repair cost against 30% of new unit price as a general decision threshold.
Conclusion
Learning how to replace worm gear on Craftsman garage door opener empowers you to maintain your home’s most-used mechanical system confidently and affordably. With proper preparation, attention to detail, and respect for safety protocols, this repair restores quiet, reliable operation for another decade of service. The satisfaction of solving the problem yourself—and keeping hundreds of dollars in your pocket—makes the effort genuinely worthwhile.
Found this guide helpful? Share it with fellow homeowners on Facebook, Pinterest, or your neighborhood Nextdoor group! Someone in your community is probably listening to that same frustrating grinding noise right now. Tag a friend who loves DIY projects, and let’s keep garages running smoothly together. 🔧🏠
Leave a Reply