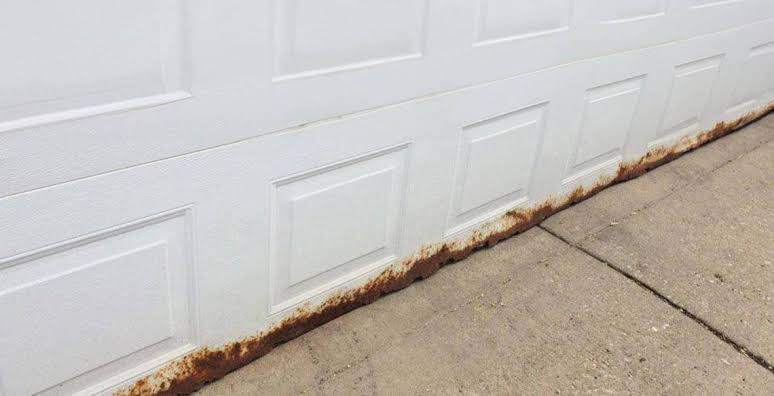
A damaged or rotting garage door bottom panel is more than just an eyesore; it compromises your home’s security, energy efficiency, and structural integrity. If you are searching for how to replace the bottom panel of a garage door, you are likely trying to avoid the steep cost of a full door replacement while ensuring your family’s safety. This comprehensive guide will walk you through the process with expert precision, helping you determine if this DIY project is right for you or if professional intervention is required.
Can You Replace Just the Bottom Panel of a Garage Door?
Yes, in many cases, you can replace only the bottom panel without installing an entirely new door. However, feasibility depends heavily on the door’s age, material, and the extent of the damage. According to industry data from the International Door Association (IDA), sectional garage doors are designed with interchangeable panels, but manufacturers often discontinue specific panel styles after 10–15 years.
When Replacement Is Viable vs. When It Is Not
Understanding the viability of this repair saves time and prevents wasted expenditure. Use the table below to assess your situation:
| Scenario | Viability | Recommended Action |
|---|---|---|
| Damage isolated to bottom 18″ | High | Replace bottom panel only |
| Door is <10 years old | High | Source OEM matching panel |
| Rot extends into side stiles | Medium | Inspect track/hardware alignment |
| Door is >20 years/discontinued | Low | Consider full door replacement |
| Torsion spring system involved | Caution | Hire certified technician |
Note: Always verify panel compatibility before purchasing. For foundational knowledge on sectional door mechanics, refer to the Garage door entry on Wikipedia.org.
What Tools Do I Need to Replace a Garage Door Bottom Panel?
Before beginning, gather the correct tools. Using improper equipment is the leading cause of injury and secondary damage during garage door bottom panel replacement. Precision matters; having the right gear ensures the new panel seats correctly in the existing tracks.
Essential Tool Checklist
- Adjustable Wrenches & Socket Set: For removing hinge bolts and bracket nuts.
- C-Clamps or Vise Grips (Minimum 4): Critical for securing the door to the track above the work area to prevent accidental descent.
- Rubber Mallet: To gently tap the new panel into alignment without denting steel or fiberglass.
- Level (48-inch): Ensures the new panel is perfectly horizontal; even a ¼-inch variance causes binding.
- Safety Glasses & Cut-Resistant Gloves: Steel edges are razor-sharp; eye protection is non-negotiable.
- Drill/Driver with Metal Bits: For pre-drilling holes if the new panel lacks factory perforations.
- Silicone-Based Lubricant: For re-lubricating hinges and rollers post-installation.
Expert Tip: Never use standard pliers on garage door hardware. The torque required for garage door bolts often strips standard tool jaws. Invest in a dedicated garage door wrench set if you plan future maintenance.
Step-by-Step: How To Replace The Bottom Panel Of A Garage Door
This tutorial assumes you have confirmed the repair is viable and have gathered all tools. Safety Warning: Garage doors weigh 150–300 lbs. The bottom panel bears significant tension from the opener and springs. If your door uses torsion springs mounted above the door, do not attempt this repair unless you have specialized training. Extension spring systems are generally safer for DIY, but caution remains paramount.
Step 1: Secure the Door and Disconnect Power
Disconnect the garage door opener from power to prevent accidental activation. Manually lower the door until it rests fully on the floor. Place C-clamps on the vertical tracks directly above the second panel (the one above the damaged bottom panel). This creates a mechanical stop, preventing the upper sections from crashing down when you remove the bottom panel’s hinges. Double-check clamp tightness; test by gently lifting the door—it should not move.
Step 2: Remove Hinges and Bottom Brackets
Using your socket set, unbolt all hinges connecting the bottom panel to the panel above it. Work from left to right, placing bolts in a labeled container. Next, remove the bottom corner brackets where the lift cables attach. Critical: Do NOT detach the lift cables from the drum or spring system. Only disconnect them from the bottom bracket. Support the cable end with a zip tie to prevent fraying. Photograph each connection point before disassembly for accurate reassembly reference.
Step 3: Extract the Damaged Panel
With hinges and brackets removed, slide the damaged panel horizontally out of the side tracks. You may need to tilt it slightly inward to clear the track curvature. Have an assistant support the panel’s weight during extraction; unbalanced removal can scratch adjacent panels or bend track guides. Inspect the exposed track interior for debris, rust, or bent sections while accessible. Clean thoroughly with a wire brush and degreaser.
Step 4: Prepare and Install the New Panel
Compare the new panel against the old one before installation. Verify width, thickness, hinge hole spacing, and weather seal groove alignment. Apply a thin bead of silicone sealant along the top edge of the new panel where it meets the panel above—this prevents water infiltration. Slide the new panel into the side tracks from the bottom, tilting as needed. Ensure it sits flush against the floor and aligns vertically with upper panels. Use your 48-inch level across the top edge; adjust track position minutely if necessary.
Step 5: Reattach Hardware and Test Alignment
Reinstall hinges using original bolts (or manufacturer-supplied replacements). Torque to spec—typically 25–30 ft-lbs for residential steel doors. Overtightening warps panels; undertightening causes wobble. Reconnect lift cables to bottom brackets, ensuring equal tension on both sides. Remove C-clamps slowly while supporting the door manually. Reconnect opener power and operate the door through three full cycles. Watch for binding, uneven movement, or unusual noise. Adjust track alignment or roller position incrementally until operation is smooth.
Step 6: Seal and Weatherproof
Install a new bottom weather seal (astragal) if not pre-attached. The seal should compress evenly against the floor across the entire width. Test by closing the door on a dollar bill at multiple points; resistance should be uniform. Apply exterior-grade caulk along panel seams if gaps exceed 1/16″. Lubricate all hinges, rollers, and springs with silicone-based lubricant (never WD-40, which attracts grime).
Common Mistakes to Avoid During Bottom Panel Replacement
Even experienced DIYers make errors that compromise safety or longevity. Avoid these pitfalls:
- Skipping Track Inspection: A bent track section hidden behind the old panel will destroy the new panel within weeks. Always inspect and straighten tracks during panel access.
- Ignoring Spring Tension: Uneven spring tension causes premature wear on the new panel’s hinges. Measure spring stretch (extension systems) or wind count (torsion systems) before reassembly.
- Using Non-OEM Panels: Generic panels often have slight dimensional variances causing binding. Spend extra for exact-match OEM parts; labor savings justify the premium.
- Neglecting Roller Replacement: Old, worn rollers transfer stress to new panels. Replace nylon rollers every 7 years or steel rollers showing flat spots during panel service.
- Rushing Alignment Checks: Misalignment by 1/8″ accumulates over cycles. Spend 20 minutes fine-tuning; it prevents callbacks and extends panel life by 3–5 years.
Frequently Asked Questions (FAQ)
How much does it cost to replace the bottom panel of a garage door?
Material costs range from $150–$400 for a single bottom panel, depending on size, insulation value, and material (steel vs. wood composite). Professional installation adds $200–$350 in labor. Total DIY cost typically falls between $200–$450, versus $800–$1,500 for full door replacement. Prices vary regionally; obtain three quotes if hiring.
Is it safe to replace a garage door bottom panel myself?
It is conditionally safe. Extension spring systems with proper clamping and PPE are manageable for competent DIYers. Torsion spring systems store lethal energy; never DIY these. If unsure about spring type or your skill level, hire a DASMA-certified technician. Safety incidents during garage door repair account for 30,000 ER visits annually per CPSC data.
How long does bottom panel replacement take?
Experienced DIYers complete the job in 3–5 hours, including cleanup and testing. First-timers should budget 6–8 hours. Professional technicians typically finish in 2–3 hours due to specialized tools and familiarity. Rushing increases error risk; allocate adequate time for alignment verification.
Will the new panel match my existing garage door?
Exact matches are possible only if the manufacturer still produces your model. Doors older than 15 years often require custom fabrication or accepting a visual mismatch. Some homeowners paint the new panel to blend, though texture differences remain visible. Request sample swatches before ordering; monitor lighting conditions affect color perception.
Can I replace the bottom panel if my door is insulated?
Yes, but ensure the replacement panel has identical R-value and core construction (polystyrene vs. polyurethane). Mixing insulated and non-insulated panels creates thermal bridging, reducing overall door efficiency by up to 40%. Verify foam density and facing material match exactly to maintain warranty and performance.
What maintenance prevents future bottom panel damage?
Apply water-repellent sealant annually to wood-composite panels. Keep the floor threshold clean and dry; standing water accelerates corrosion. Lubricate moving parts biannually. Inspect weather seals quarterly; compromised seals allow moisture intrusion. Address minor dents immediately; they trap water and initiate rot/corrosion cycles. Proactive maintenance extends panel lifespan by 50%+.
Conclusion: Restore Your Garage Door with Confidence
Learning how to replace the bottom panel of a garage door empowers you to extend your door’s service life while saving hundreds in replacement costs. By following safety protocols, using correct tools, and respecting mechanical tolerances, you achieve professional-grade results. Remember: when in doubt about spring systems or structural integrity, consult a certified professional. Your safety outweighs any potential savings.
If this guide helped you tackle your garage door repair confidently, please share it with fellow homeowners on Facebook, Pinterest, or Nextdoor. Together, we build safer, more efficient homes—one panel at a time. Have questions or success stories? Drop them in the comments below; our community thrives on shared expertise!
Leave a Reply