Introduction
There are few sounds more alarming than the loud bang of a garage door cable snapping, followed by the door hanging crookedly in its tracks. It’s a stressful situation that can leave your car trapped inside or your home vulnerable. If you are wondering how to put the cable back on a garage door, you are not alone; this is one of the most common yet dangerous repairs homeowners face.
While it is tempting to jump in and fix it immediately, garage door springs and cables operate under extreme tension. This guide will walk you through the safety precautions, necessary tools, and step-by-step process to reseat a derailed cable or understand when to call a professional. We prioritize your safety above all else, ensuring you have the knowledge to make the right decision.
Is It Safe to Fix a Garage Door Cable Yourself?
Before touching any tools, we must address the elephant in the room: safety. Garage doors are heavy, often weighing between 150 to 400 pounds. The counterbalance system, which includes torsion or extension springs, holds enough energy to cause severe injury or even death if released incorrectly.
According to the U.S. Consumer Product Safety Commission (CPSC), thousands of injuries occur annually due to garage door accidents. Therefore, understanding the risk is the first step in learning how to put the cable back on a garage door.
When to Call a Professional
You should immediately call a licensed technician if:
- The cable has completely snapped.
- The torsion spring (the large spring above the door) looks broken or gap-filled.
- The door is stuck halfway and feels incredibly heavy.
- You do not have winding bars or proper safety gear.
If the cable has simply slipped off the drum but remains intact, and the door is fully closed, you may be able to reseat it carefully. However, proceed with extreme caution.
Tools and Materials You Will Need
Preparation is key to a smooth repair. Having the right tools prevents frustration and reduces the time you spend working under tension.
| Tool/Material | Purpose |
|---|---|
| Vise-Grip Pliers | To clamp the track below the roller, preventing the door from falling. |
| Winding Bars | Essential for adjusting torsion springs (if required). |
| Adjustable Wrench | For loosening and tightening set screws on the drum. |
| Ladder | A sturdy stepladder to reach the drums safely. |
| Safety Glasses | To protect eyes from debris or snapping metal. |
| Work Gloves | Heavy-duty gloves to protect hands from sharp cable ends. |
Pro Tip: Never use screwdrivers as winding bars. They can slip and cause serious injury. Always use hardened steel winding bars designed for garage doors.
Step-by-Step: How To Put The Cable Back On A Garage Door
This section details the process for a standard torsion spring system where the cable has derailed from the drum but has not snapped. If you have an extension spring system (springs along the tracks), the mechanism differs, and professional help is strongly recommended due to the high risk of the safety cable failing.
Step 1: Secure the Garage Door
The most critical step is ensuring the door does not fall while you work.
- Close the garage door completely.
- Place vise-grip pliers tightly on the vertical track, just below the bottom roller bracket on both sides. This acts as a mechanical stop.
- Disconnect the garage door opener by pulling the red emergency release cord. This ensures the motor doesn’t engage accidentally.
Step 2: Release Tension from the Spring
You cannot reseat a cable under full tension. You must slightly loosen the spring to create slack in the cable.
- Insert your winding bars into the winding cone of the torsion spring.
- Slowly unwind the spring by moving the bar downward. Do this incrementally.
- Watch the cable drum. As the spring loosens, the cable will become slack.
- Once there is enough slack to manipulate the cable, stop. Do not fully unwind the spring unless necessary.
For more detailed technical specifications on spring types, you can refer to the general mechanics described on Wikipedia’s Garage Door page.
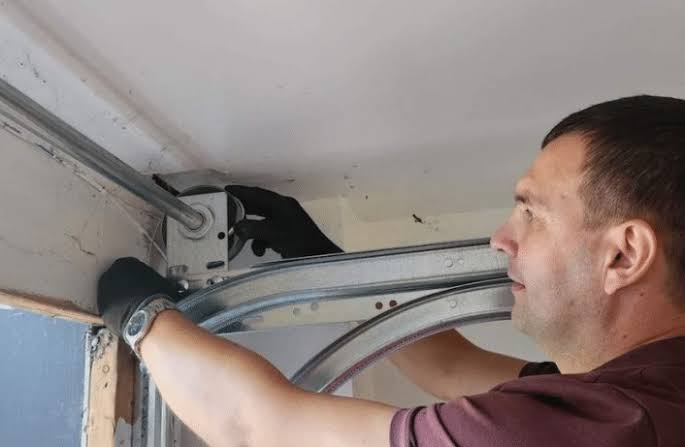
Step 3: Reseat the Cable on the Drum
Now that the cable is slack, you can guide it back into place.
- Climb your ladder and locate the drum where the cable slipped off.
- Inspect the cable for fraying. If the strands are broken, do not reuse it. Replace the cable entirely.
- Place the end of the cable into the slot or hole on the drum.
- Begin winding the cable onto the drum by hand. Ensure it winds tightly and evenly. Overlapping cables can cause future derailments.
- Make sure the cable sits in the correct groove if your drum has one.
Step 4: Re-tension the Spring
Once the cable is seated correctly:
- Use your winding bars to wind the spring back up.
- Count the number of quarter-turns you unwound earlier. You must return it to the exact same tension.
- Tighten the set screws on the winding cone securely.
Step 5: Test the Balance
- Remove the vise-grip pliers from the tracks.
- Lift the door manually about halfway.
- Let go. A properly balanced door should stay in place. If it slams down or flies up, the tension is incorrect, and you need to adjust the springs again.
Common Mistakes to Avoid
Even with the best intentions, DIYers often make errors that lead to further damage. Here are the top pitfalls:
- Ignoring Cable Wear: If the cable looks rusty or frayed, reseating it is a temporary fix at best. It will likely snap again soon. Replace both cables simultaneously to ensure even wear.
- Uneven Winding: If the cable overlaps itself on the drum, it will bunch up and eventually jump off again. Take your time to wind it neatly.
- Skipping Safety Gear: Metal cables under tension can whip like a snake if they slip. Always wear safety glasses and gloves.
- Forgetting the Locking Pliers: Never trust the opener or the spring alone to hold the door. Mechanical locking via pliers is your only true safety net.
Cost Comparison: DIY vs. Professional Repair
Is it worth saving money by doing it yourself? Let’s look at the numbers.
| Factor | DIY Repair | Professional Service |
|---|---|---|
| Cost | $20–$50 (Tools & Parts) | $150–$350 (Labor & Parts) |
| Time | 2–4 Hours | 1 Hour |
| Risk Level | High | Low (Insured) |
| Warranty | None | Usually 1 Year |
| Expertise Needed | High | None |
While DIY saves money upfront, the risk of injury or improper installation leading to premature failure is significant. If you are unsure, the professional route is the safer investment.
FAQ Section
1. Why did my garage door cable come off?
Cables typically derail due to loose set screws on the drum, uneven spring tension, or worn-out rollers causing the door to jerk. Sometimes, a simple obstruction in the track can force the cable out of alignment.
2. Can I use any type of cable for replacement?
No. Garage door cables are specific to the weight and size of your door. Using the wrong gauge or length can lead to immediate failure. Always match the manufacturer’s specifications or consult a professional for the correct part number.
3. How often should I inspect my garage door cables?
It is recommended to inspect your cables, springs, and rollers every six months. Look for signs of rust, fraying, or gaps in the spring coils. Regular lubrication of rollers and hinges can also prevent jerky movements that stress the cables.
4. What happens if only one cable breaks?
If one cable breaks, the door will hang unevenly, putting immense strain on the remaining cable, springs, and opener. Do not operate the door. The remaining cable is likely near failure as well. Both sides should be repaired simultaneously.
5. Is it normal for the cable to be loose?
A small amount of play is normal, but the cable should never be sagging significantly when the door is closed. If it is loose, the spring tension may be insufficient, or the cable may have slipped on the drum.
6. Can I lubricate the cables?
Generally, you should not lubricate garage door cables. Lubricant can attract dirt and grit, which acts as an abrasive and wears down the cable strands faster. Keep cables clean and dry.
Conclusion
Learning how to put the cable back on a garage door is a valuable skill, but it comes with significant responsibility. By following the steps outlined above—securing the door, releasing tension carefully, and reseating the cable neatly—you can potentially save on repair costs. However, always prioritize safety over savings. If at any point you feel uncomfortable or notice significant wear on your springs or cables, call a professional.
A well-maintained garage door ensures the security of your home and the safety of your family. Don’t let a small issue become a major hazard.
Found this guide helpful? Share it with your neighbors on Facebook or Twitter to help them stay safe too! Have questions? Leave a comment below, and we’ll do our best to assist you.
Leave a Reply