Introduction
Is your garage letting in drafts, water, or pests through that worn-out strip at the bottom? You’re not alone—millions of homeowners face this common issue every year. Learning how to replace seal on bottom of garage door is a simple DIY project that can save you hundreds of dollars in professional repair costs while improving your home’s energy efficiency and protection against the elements.
A damaged or deteriorated garage door bottom seal compromises your home’s insulation, allows moisture intrusion, and creates an open invitation for insects and rodents. The good news? With the right tools and about 30-60 minutes of your time, you can restore your garage door’s protective barrier and enjoy peace of mind knowing your space is properly sealed.
Why Your Garage Door Bottom Seal Matters
Before diving into the replacement process, it’s important to understand why this seemingly small component plays such a crucial role in your home’s overall performance.
Energy Efficiency Impact
According to the U.S. Department of Energy, proper weatherization—including garage door seals—can reduce heating and cooling costs by up to 15%. A compromised bottom seal creates an air gap that allows conditioned air to escape and outside air to enter, forcing your HVAC system to work harder.
Protection Against Elements
Your garage door bottom seal serves as the first line of defense against:
- Water infiltration during rainstorms
- Dust and debris from outdoor environments
- Pests including insects, rodents, and small animals
- Extreme temperatures that affect stored items
Structural Integrity
Moisture entering through a damaged seal can lead to concrete deterioration, metal corrosion, and wood rot over time. Addressing seal issues promptly prevents costly structural repairs down the road.
Signs You Need to Replace Your Garage Door Seal
Identifying when replacement is necessary helps prevent further damage. Watch for these warning signs:
| Indicator | What to Look For | Urgency Level |
|---|---|---|
| Visible cracks | Splitting or tearing along the rubber strip | High |
| Gaps when closed | Light visible underneath closed door | High |
| Water entry | Moisture or puddles after rain | High |
| Drafts | Noticeable air movement near floor | Medium |
| Hardened material | Rubber feels stiff or brittle | Medium |
| Pest activity | Insects or droppings in garage | High |
If you notice two or more of these indicators, immediate replacement is recommended.
Tools and Materials You’ll Need
Gathering the right supplies before starting ensures a smooth replacement process:
Essential Tools
- Measuring tape (25-foot minimum)
- Utility knife with fresh blades
- Screwdriver (flathead and Phillips)
- Pliers or channel locks
- Rubber mallet (optional but helpful)
- Safety glasses and work gloves
Materials Required
- Replacement bottom seal (measure your door width first)
- Silicone lubricant for smooth operation
- Cleaning solution (mild soap and water)
- Rags for cleanup
Choosing the Right Seal Type
Not all garage door seals are created equal. Consider these options:
Vinyl Seals: Budget-friendly ($15-$25), moderate durability, suitable for mild climates Rubber Seals: Mid-range pricing ($25-$40), excellent flexibility, good temperature resistance Thermoplastic Seals: Premium option ($40-$60), superior durability, best for extreme weather
For detailed information about different weatherization materials, visit Wikipedia’s article on weatherstripping.
Step-by-Step Guide: How to Replace Seal on Bottom of Garage Door
Follow these detailed instructions for a successful replacement:
Step 1: Measure Your Garage Door Width
Accurate measurements prevent ordering the wrong size seal. Measure the exact width of your garage door from edge to edge. Most residential garage doors range from 8 to 16 feet wide. Add 2-3 inches to your measurement to ensure proper coverage and allow for trimming if needed.
Step 2: Remove the Old Seal
Begin by opening your garage door completely and securing it in place. Locate the retainer channel at the bottom of the door where the old seal sits. Using your screwdriver, carefully remove any screws or fasteners holding the retainer in place.
Pull the old seal out of the channel gradually. If it’s stuck due to age or corrosion, use pliers to gently extract it. Take note of how the old seal was positioned—this helps with proper installation of the new one.
Step 3: Clean the Retainer Channel
Thoroughly clean the channel using your cleaning solution and rags. Remove all debris, rust, old adhesive, and dirt. This step is crucial for ensuring the new seal fits properly and lasts longer. Allow the channel to dry completely before proceeding.
Step 4: Prepare the New Seal
Unroll your new bottom seal and let it acclimate to room temperature for 15-20 minutes if it was stored in cold conditions. This makes the material more flexible and easier to install. Cut the seal to your measured length using a sharp utility knife, ensuring clean, straight edges.
Step 5: Install the New Seal
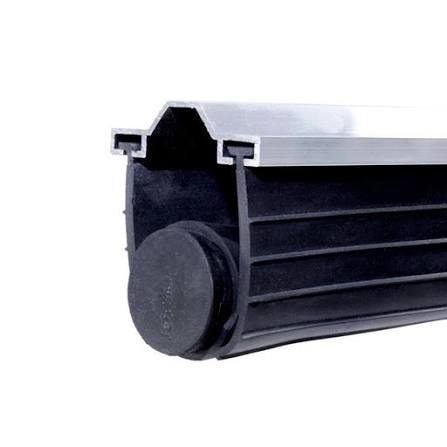
Starting from one end, insert the new seal into the retainer channel. Work your way across the door, pressing firmly to ensure the seal seats properly throughout its entire length. For T-style seals, make sure the “T” portion faces downward toward the ground.
If your seal uses a retainer bar, position it over the installed seal and secure it with the original screws. Tighten evenly across the length—avoid overtightening which can distort the seal.
Step 6: Test and Adjust
Close your garage door slowly and inspect the seal’s contact with the ground. You should see even compression along the entire width. Check for gaps by looking for light penetration from inside the garage.
Make adjustments as needed:
- If gaps exist, loosen screws slightly and reposition
- If the seal drags excessively, trim 1/8 inch from the bottom
- Apply silicone lubricant to reduce friction if necessary
Step 7: Final Inspection
Operate your garage door through three complete cycles (open-close-open). Listen for unusual sounds and watch for proper sealing action. The door should close smoothly without excessive resistance.
Common Mistakes to Avoid
Learning from others’ errors saves time and frustration:
Incorrect Measurements: Always measure twice before cutting. Ordering a seal that’s too short requires starting over.
Skipping Cleaning: Installing over dirty channels leads to poor fit and premature failure.
Overtightening Screws: This compresses the seal unevenly and reduces effectiveness.
Ignoring Weather Conditions: Install during moderate temperatures (50-80°F) for optimal material flexibility.
Wrong Seal Type: Match the seal profile to your existing retainer system. Universal seals don’t always fit perfectly.
Maintenance Tips for Long-Lasting Performance
Extend your new seal’s lifespan with proper care:
- Clean quarterly with mild soap and water
- Inspect seasonally for wear, especially after extreme weather
- Lubricate annually with silicone-based products (avoid petroleum-based lubricants)
- Address minor damage immediately before it worsens
- Keep the area clear of debris that could tear the seal
With proper maintenance, quality garage door bottom seals last 5-7 years on average.
FAQ Section
Q: How often should I replace my garage door bottom seal?
A: Most seals last 5-7 years under normal conditions. However, harsh climates, frequent use, or exposure to chemicals may require replacement every 3-4 years. Inspect annually and replace when you notice cracking, gaps, or reduced effectiveness.
Q: Can I replace just a section of the seal instead of the entire length?
A: While technically possible, replacing the entire seal is recommended. Partial replacements create weak points where sections join, leading to premature failure. Full replacement ensures uniform performance and better value long-term.
Q: What’s the difference between T-style and bulb-style seals?
A: T-style seals have a flat top with a vertical “T” extension that fits into a channel, providing excellent stability. Bulb-style seals feature a rounded bottom that compresses against the floor, offering superior sealing on uneven surfaces. Choose based on your door’s retainer system and floor condition.
Q: Will replacing the seal help with noise reduction?
A: Yes, a properly installed bottom seal reduces noise transmission by blocking air gaps that carry sound. While not a complete soundproofing solution, it contributes to a quieter garage environment, especially beneficial if your garage shares walls with living spaces.
Q: Is professional installation worth the cost?
A: For most homeowners, DIY replacement is straightforward and cost-effective. Professional installation typically costs $100-$200 plus parts. Consider hiring a professional only if your door has unusual configurations, significant damage, or if you’re uncomfortable working with garage door mechanisms.
Q: Can I use adhesive-backed seals instead of channel-mounted ones?
A: Adhesive seals work for temporary fixes or doors without retainer channels. However, they generally don’t last as long as channel-mounted seals and may fail in extreme temperatures. For permanent solutions, channel-mounted seals provide superior durability and performance.
Conclusion
Learning how to replace seal on bottom of garage door empowers you to maintain your home’s efficiency, comfort, and protection without breaking the bank. This straightforward DIY project delivers immediate benefits: reduced energy bills, improved pest control, better moisture management, and enhanced overall garage functionality.
By following our comprehensive guide, you’ve gained the knowledge to tackle this task confidently. Remember to choose quality materials, take accurate measurements, and perform regular maintenance to maximize your investment.
Did this guide help you successfully replace your garage door seal? Share your experience on social media and help other homeowners discover this money-saving DIY solution. Tag us in your before-and-after photos—we love seeing successful home improvement projects!
Have questions or tips of your own? Drop them in the comments below. Your insights might help fellow readers tackle their own garage door seal replacements with confidence.
Leave a Reply