Introduction
There are few things more frustrating than pressing your garage door remote and hearing nothing but silence, or worse, a series of confusing clicks from your LiftMaster unit. When troubleshooting fails, you likely need to learn how to replace logic board on LiftMaster garage door opener to restore your home’s security and convenience. This guide provides a safe, empathetic, and detailed walkthrough to help you diagnose the issue and complete the replacement with confidence, saving you hundreds of dollars in service calls.
What Are the Signs of a Failed LiftMaster Logic Board?
Before purchasing a replacement part, it is crucial to confirm that the logic board (also known as the motherboard or circuit board) is actually the culprit. Misdiagnosis is the most common reason DIY repairs fails. According to industry technicians, approximately 30% of “dead” openers are simply suffering from faulty safety sensors or capacitor issues rather than board failure.
Look for these definitive symptoms:
- No Response to Power: The unit has power (LED lights work), but the motor does not engage, and there is no clicking sound from the relay.
- Erratic Behavior: The door opens partially then reverses, or the lights flash in a specific diagnostic pattern (e.g., 5 flashes) that persists even after resetting.
- Burnt Components: Visible scorch marks, bulging capacitors, or a distinct ozone/burnt plastic smell emanating from the motor head.
- Remote Programming Failure: You cannot program new remotes or keypads, indicating the receiver portion of the board has failed.
- Age of Unit: If your opener is over 10 years old and exhibiting intermittent issues, the board is statistically the most likely failure point due to capacitor degradation and solder joint fatigue.
Expert Insight: “Always check the wall control panel first. If the wall button works but remotes don’t, it’s a receiver issue on the board. If neither works and power is confirmed, it’s almost certainly the logic board or a stripped gear.” — Certified Garage Door Technician
Safety First: Critical Precautions Before Starting
Replacing a logic board involves working with high-voltage electricity and heavy mechanical components. Skipping safety steps can result in severe injury or electrocution.
- Disconnect Power: Unplug the opener from the ceiling outlet. Do not rely solely on turning off the light switch; physically remove the plug.
- Discharge Capacitors: Wait at least 5 minutes after unplugging to allow stored electrical charge in the capacitors to dissipate. Touching a charged capacitor can deliver a painful shock even when unplugged.
- Secure the Door: Manually close the garage door and lock it or use C-clamps on the tracks below the bottom roller. This prevents the door from falling if the trolley disengages during repair.
- Use Proper Tools: Insulated screwdrivers, a nut driver set, and needle-nose pliers are essential. Avoid metal tools near exposed circuitry.
- Document Wiring: Take high-resolution photos of all wire connections before disconnecting anything. Color-coding varies by model year, and photos are your best insurance against reassembly errors.
For foundational understanding of how these electromechanical systems integrate, refer to the general principles outlined in the Garage door opener Wikipedia entry, which explains the relationship between the logic board, motor, and safety systems.
Tools and Parts You Will Need
Gather everything before starting to avoid mid-repair delays. Using the correct OEM part is non-negotiable; universal boards often lack model-specific firmware.
| Item | Specification/Notes |
|---|---|
| Replacement Logic Board | Exact OEM part number matching your LiftMaster model (check label on motor housing) |
| Screwdrivers | Phillips #2 and flathead, insulated handles |
| Nut Drivers | 1/4″, 5/16″, and 7/16″ typically required |
| Needle-Nose Pliers | For releasing wiring harness clips |
| Digital Multimeter | Optional but recommended for verifying power input |
| Ladder | Stable, non-conductive fiberglass ladder preferred |
| Camera/Phone | For documenting wire routing and connector orientation |
| Anti-Static Wrist Strap | Recommended to prevent ESD damage to new board |
Step-by-Step: How To Replace Logic Board On LiftMaster Garage Door Opener
Follow this precise sequence. Rushing causes mistakes; take your time with each step.
Step 1: Access the Logic Board Compartment
Remove the outer cover of the motor unit. Most LiftMaster models use 4–6 screws securing the lens cover and main housing. Set screws aside in a magnetic tray. Gently lower the cover; some models have a wiring harness connecting the light socket to the board—disconnect this carefully if present.
Step 2: Document and Disconnect All Wiring
This is the most critical step. Photograph every connection from multiple angles. Then, systematically disconnect:
- Safety sensor wires (typically grey terminals)
- Wall control wires (red/white terminals)
- Motor leads (usually blue/yellow/red spade connectors)
- Antenna wire (single white wire, often clipped to chassis)
- Ribbon cables connecting to display panels or accessory ports
Press the release tab on each Molex connector; never pull by the wires themselves. Use needle-nose pliers gently if tabs are stiff.
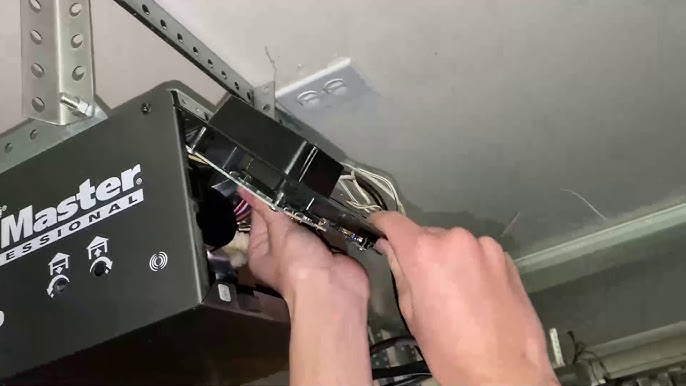
Step 3: Remove the Old Logic Board
Locate the mounting screws securing the board to the chassis (typically 3–5 screws). Support the board with one hand while removing the last screw to prevent it from dropping. Note any standoffs, grounding straps, or insulating washers—their exact placement must be replicated. Lift the board straight out, watching for hidden clips or adhesive pads.
Step 4: Install the New Logic Board
Place the new board onto the standoffs, ensuring alignment pins seat properly. Reinstall all mounting screws to manufacturer torque specifications (snug, not overtightened—overtightening cracks PCBs). Reattach grounding straps and insulating washers exactly as documented. A missing ground strap is a leading cause of post-replacement interference issues.
Step 5: Reconnect All Wiring Harnesses
Using your reference photos, reconnect every wire and harness. Double-check terminal assignments against the wiring diagram printed on the new board or included documentation. Ensure all spade connectors are fully seated and Molex clips audibly click into place. Route wires away from moving parts and sharp edges, using original cable ties or clips.
Step 6: Reassemble and Test
Reinstall the housing cover and secure all screws. Plug the unit back in. Observe the startup sequence: LED indicators should illuminate normally. Test operation using the wall control first, then test remotes. Reprogram remotes and keypads per your model’s manual—new boards reset all memory. Verify safety sensor reversal by placing an object in the door’s path during closing.
Troubleshooting Common Post-Replacement Issues
Even with perfect installation, issues can arise. Address these systematically:
- Door Reverses Immediately: Safety sensors are misaligned or wired incorrectly. Check LED status on sensors; solid amber/green indicates proper alignment.
- Motor Hums But Doesn’t Move: Not a board issue. Likely a failed capacitor (separate component) or stripped drive gear. The new board is functioning correctly.
- Remotes Won’t Program: Antenna wire may be pinched or disconnected. Verify antenna connection and ensure remote batteries are fresh. Some models require holding the learn button for 10+ seconds.
- Intermittent Operation: Loose wire connection or insufficient grounding. Re-inspect all terminals and verify ground strap contact.
- Diagnostic Flash Codes Persist: Consult your model-specific code chart. Some codes indicate peripheral failures (sensors, limit switches) unrelated to the board itself.
Frequently Asked Questions (FAQ)
How much does it cost to replace a LiftMaster logic board?
OEM replacement boards typically range from $80 to $180 depending on the model. Professional installation adds $100–$200 in labor. DIY replacement saves significant money but requires comfort with electrical components. Always compare the board cost against a new opener price; if the board exceeds 40% of a new unit’s cost and your opener is over 12 years old, replacement may be more economical long-term.
Can I use a universal logic board instead of an OEM part?
While universal boards exist, they are not recommended for LiftMaster openers. Modern units use proprietary firmware for security rolling codes, MyQ integration, and model-specific safety protocols. Universal boards often lack these features, creating security vulnerabilities and compatibility issues. Invest in the exact OEM part number listed on your unit’s specification label.
How long does a LiftMaster logic board typically last?
Under normal conditions, logic boards last 10–15 years. Premature failure is often caused by power surges (install a surge protector!), excessive heat buildup in unventilated garages, or moisture intrusion. Regular maintenance—including cleaning dust from vents and ensuring proper garage ventilation—extends board lifespan significantly.
Will replacing the logic board erase my programmed remotes?
Yes. New logic boards ship with blank memory. You will need to reprogram all remotes, keypads, and vehicle Homelink systems after installation. Keep your programming instructions handy; the process typically takes 5–10 minutes per device. Some newer MyQ-enabled models may require WiFi reconfiguration through the app.
Is it worth replacing the logic board on an older opener?
Evaluate based on three factors: age, condition, and cost. If your opener is under 12 years old, mechanically sound (quiet operation, smooth travel), and the board costs less than half a new unit, replacement is justified. If the opener is older, noisy, or shows wear on gears/chains, invest in a new unit with updated safety features and warranty coverage instead.
Conclusion
Learning how to replace logic board on LiftMaster garage door opener empowers you to restore your garage’s functionality safely and affordably. By methodically diagnosing the issue, observing rigorous safety protocols, and following precise reassembly steps, you can extend your opener’s life by another decade. Remember: patience and documentation prevent costly mistakes, and when in doubt, consulting a certified technician is always the safer choice.
Found this guide helpful? Share it with friends and neighbors on Facebook, Nextdoor, or X who might be struggling with their own garage door woes! Your share could save someone hours of frustration and hundreds in repair bills. Happy fixing! 🔧
Leave a Reply