Introduction
Is your garage door stuck halfway or making loud banging noises? A broken torsion spring is likely the culprit, and knowing how to replace broken torsion spring on garage door can save you hundreds of dollars in professional repair costs. However, this task involves high-tension components that can be dangerous if handled incorrectly. This comprehensive guide will walk you through the entire process safely, helping you understand when to DIY and when to call a professional.
Garage door torsion springs typically last 7-12 years or approximately 10,000 cycles (one cycle equals one opening and closing). When they break, your garage door becomes essentially unusable until repaired. Understanding the replacement process empowers you to make informed decisions about your home maintenance while prioritizing safety above all else.
Understanding Torsion Springs: Why They Break
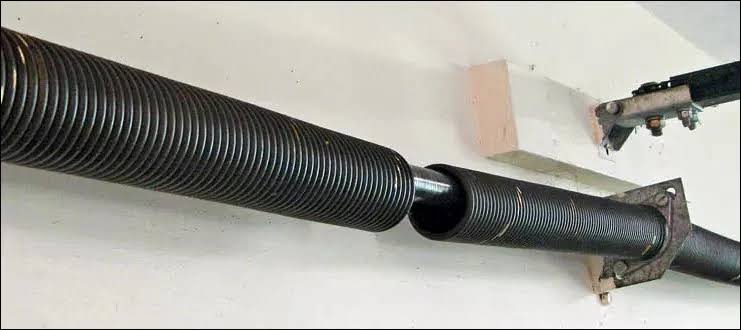
Before diving into the replacement process, it’s crucial to understand what you’re dealing with. Torsion springs are mounted horizontally above your garage door and work by twisting (torsion) to counterbalance the door’s weight. According to the International Door Association, torsion spring failures account for nearly 60% of all garage door service calls.
Common Signs of a Broken Torsion Spring
- Loud snapping sound from the garage
- Door won’t open or closes rapidly
- Visible gap in the spring coil
- Door appears crooked or uneven
- Cables appear loose or disconnected
These springs endure tremendous stress every time your garage door operates. Factors contributing to premature failure include extreme temperature fluctuations, lack of lubrication, poor installation, and normal wear over time.
Safety First: Critical Warnings Before You Begin
⚠️ WARNING: Torsion springs contain extremely high tension and can cause serious injury or death if mishandled.
Before attempting any repair, consider these essential safety points:
- Torsion springs store enough energy to lift heavy objects unexpectedly
- Improper handling can result in severe injuries including broken bones
- If you’re uncomfortable with any step, call a professional immediately
- Always wear safety glasses and heavy-duty gloves
- Never work alone—have someone nearby in case of emergency
The Consumer Product Safety Commission reports thousands of garage door-related injuries annually, many involving spring systems. Your safety is paramount throughout this process.
Tools and Materials You’ll Need
Gathering the right tools before starting ensures a smoother replacement process:
| Tool/Material | Purpose | Estimated Cost |
|---|---|---|
| Winding bars (2) | Safely wind/unwind springs | $15-25 |
| Socket wrench set | Remove/replace hardware | $20-40 |
| Vice grips | Secure cables during work | $10-15 |
| Safety glasses | Eye protection | $5-10 |
| Heavy-duty gloves | Hand protection | $10-20 |
| Replacement torsion spring | Main component | $30-80 |
| Lubricant | Post-installation maintenance | $5-10 |
Pro Tip: Purchase winding bars specifically designed for garage door springs. Using makeshift tools like screwdrivers can slip and cause serious accidents.
Step-by-Step Guide: How To Replace Broken Torsion Spring On Garage Door
Step 1: Disconnect the Garage Door Opener
Begin by unplugging your garage door opener or pulling the emergency release cord. This prevents accidental activation during the repair process. Manually close the door completely if possible, ensuring it rests securely on the ground.
Step 2: Release Tension from the Old Spring
This is the most critical and dangerous step. Insert your winding bars into the holes on the winding cone. Keep firm control while slowly releasing tension by rotating the cone counterclockwise. Never remove the winding bars until all tension is completely released.
According to Wikipedia’s garage door article, proper tension release requires maintaining constant pressure on the winding bars throughout the process.
Step 3: Remove the Broken Spring
Once tension is fully released:
- Loosen the set screws on the winding cone
- Remove the stationary cone from the center bracket
- Carefully slide the broken spring off the torsion tube
- Inspect cables and drums for damage
Document the spring’s specifications before removal, including wire size, inside diameter, and length. This information is crucial for ordering the correct replacement.
Step 4: Install the New Torsion Spring
Slide the new spring onto the torsion tube, ensuring it matches the original specifications exactly. Attach the stationary cone to the center bracket and secure the winding cone. Double-check that all components align properly before proceeding.
Step 5: Wind the New Spring
Using your winding bars, wind the spring according to the manufacturer’s specifications. Most residential doors require 7-8 quarter turns per spring. Count each turn carefully and maintain even tension on both sides if you have dual springs.
Important: The number of turns determines proper balance. Too few turns make the door heavy; too many create excessive tension.
Step 6: Reconnect Cables and Test
Reattach any disconnected cables to their drums, ensuring they wind evenly. Slowly test the door manually first, checking for smooth operation and proper balance. The door should stay in place when lifted halfway.
Step 7: Final Adjustments and Lubrication
Make minor adjustments to cable tension if needed. Apply garage door lubricant to the springs, rollers, and hinges. Reconnect your garage door opener and test the automatic operation several times.
When to Call a Professional
While this guide provides detailed instructions, certain situations warrant professional assistance:
- Dual spring systems requiring precise balancing
- Commercial garage doors with heavier components
- Damaged cables or drums needing replacement
- Uncertainty about spring specifications
- Previous unsuccessful DIY attempts
Professional technicians typically charge $150-350 for torsion spring replacement, including labor and parts. Consider this cost against potential medical bills from improper handling.
Maintenance Tips to Extend Spring Life
Preventive maintenance can significantly extend your torsion spring’s lifespan:
- Lubricate springs quarterly with silicone-based lubricant
- Inspect cables monthly for fraying or wear
- Check balance semi-annually by lifting door halfway
- Clean tracks regularly to reduce strain on the system
- Avoid slamming doors which creates unnecessary stress
Regular maintenance can extend spring life by 30-50%, according to industry studies.
FAQ Section
Q: How long does it take to replace a torsion spring?
A: Experienced DIYers typically complete the job in 2-3 hours. First-timers should allow 4-5 hours to work carefully and safely. Professional technicians usually finish within 1-2 hours.
Q: Can I replace just one torsion spring on a dual-spring system?
A: No, always replace both springs simultaneously. Even if one appears functional, it has experienced similar wear and will likely fail soon. Replacing both ensures balanced operation and prevents future immediate repairs.
Q: What happens if I wind the spring too many times?
A: Over-winding creates excessive tension, making the door difficult to close and potentially damaging other components. It also increases the risk of spring failure. Always follow manufacturer specifications precisely.
Q: How do I know what size spring to order?
A: Measure the broken spring’s wire diameter, inside diameter, and length. Also note the number of turns required for proper balance. Many springs have specifications printed on them. When in doubt, consult a professional or provide photos to suppliers.
Q: Is it safe to lubricate torsion springs?
A: Yes, regular lubrication with silicone-based spray helps prevent rust and reduces friction. Avoid petroleum-based lubricants as they attract dirt and debris. Lubricate every 3-4 months for optimal performance.
Q: What’s the difference between torsion and extension springs?
A: Torsion springs mount above the door and twist to provide lifting force, while extension springs run along the horizontal tracks and stretch to counterbalance weight. Torsion springs are generally safer, more durable, and provide smoother operation than extension springs.
Conclusion
Learning how to replace broken torsion spring on garage door empowers homeowners to handle common repairs confidently while understanding the associated risks. By following proper safety protocols, using correct tools, and adhering to manufacturer specifications, you can successfully complete this repair and restore your garage door’s functionality.
Remember, safety should always be your top priority. If any step feels uncertain or dangerous, don’t hesitate to contact a qualified technician. The modest cost of professional service pales in comparison to potential injury risks.
Found this guide helpful? Share it with friends and family who might benefit from this knowledge. Bookmark this page for future reference, and consider subscribing for more home maintenance tips and tutorials. Your garage door—and your wallet—will thank you!
Stay safe, stay informed, and keep your garage door running smoothly!
Leave a Reply