Introduction
Is your garage letting in cold air, rain, or pesky critters because of a worn-out threshold gasket? You are not alone, and fixing this issue is one of the most cost-effective home maintenance tasks you can tackle this weekend. Learning how to replace bottom seal on Wayne Dalton garage door models is a straightforward DIY project that restores energy efficiency and protects your stored belongings from moisture damage. In this comprehensive guide, we will walk you through every step with empathy and precision, ensuring your garage stays sealed tight against the elements.
Why Is My Wayne Dalton Garage Door Bottom Seal Failing?
Before grabbing your tools, it is vital to understand why these seals deteriorate. Wayne Dalton doors, particularly the classic TorqueMaster and 8000/9000 series foam-core models, utilize specific retainer systems that differ from standard sectional doors. Over time, UV exposure causes vinyl or rubber compounds to become brittle, while repeated friction against concrete driveways accelerates wear.
According to industry maintenance data, garage door weatherstripping typically lasts between 5 to 7 years, depending on climate severity. If you notice visible cracks, gaps larger than 1/8 inch when the door is closed, or water pooling inside after a storm, immediate replacement is necessary. Ignoring this can lead to increased heating bills by up to 15% due to thermal leakage, making timely replacement both an economic and structural necessity.
What Tools Do I Need to Replace a Wayne Dalton Bottom Seal?
Gathering the correct supplies prevents frustrating mid-project trips to the hardware store. Wayne Dalton doors often require specific replacement seals rather than generic universal kits.
Essential Tool Checklist
- Replacement Seal: Verify your model number (e.g., 8300, 9600) to get the correct T-style or bulb seal.
- Cordless Drill/Driver: With Phillips #2 and square-drive bits.
- Pliers: Needle-nose for removing old fasteners.
- Flathead Screwdriver: For prying out stubborn retainer clips.
- Rubber Mallet: To gently tap new seals into channels without damage.
- Silicone Spray or Soapy Water: Lubricant to ease installation.
- Tape Measure: For precise trimming.
- Safety Glasses & Gloves: Mandatory protection against rusted metal and debris.
Pro Tip: Always purchase OEM (Original Equipment Manufacturer) Wayne Dalton seals when possible. Aftermarket universal seals frequently fail to seat correctly in proprietary retainers, leading to premature re-failure.
Step-by-Step: How To Replace Bottom Seal On Wayne Dalton Garage Door
This tutorial assumes you have a standard Wayne Dalton sectional door with a bottom bracket retainer system. Always prioritize safety; never work under a raised door without proper support.
Step 1: Secure the Door and Remove Old Seal
Raise the door fully and engage the manual lock or clamp locking pliers onto the track just below a roller to prevent accidental descent. Disconnect the automatic opener if applicable. Using your pliers and flathead screwdriver, carefully extract the old seal from the aluminum retainer channel. Some older Wayne Dalton models use screws through the seal itself; remove these first. Clean the channel thoroughly with a wire brush to eliminate rust, dirt, and old adhesive residue. A clean surface ensures the new seal seats evenly and lasts longer.
Step 2: Prepare and Lubricate the New Seal
Measure your door width precisely and cut the new seal to size using sharp utility shears, leaving approximately 1/4 inch extra on each end for compression fit. Apply a generous coat of silicone spray or diluted dish soap solution along the entire length of the seal’s insertion edge. This lubrication reduces friction by up to 60%, preventing the seal from bunching or tearing during installation—a common frustration point for DIYers. Never use petroleum-based lubricants like WD-40, as they degrade vinyl and rubber compounds over time.
Step 3: Insert the Seal Into the Retainer Channel
Starting at one end, align the seal’s T-bar or bulb profile with the retainer channel opening. Use your rubber mallet to tap the seal gently but firmly into place, working in 6-inch increments across the door width. Maintain even pressure to avoid kinking. If resistance increases significantly, stop and reapply lubricant; forcing the seal can permanently deform it. For Wayne Dalton doors with screw-through retainers, pre-drill pilot holes through the seal at manufacturer-specified intervals (typically every 12 inches) before securing with provided stainless steel screws. Hand-tighten only—overtightening compresses the seal unevenly and creates leak points.
Step 4: Test and Adjust the Seal Compression
Lower the door slowly onto a clean, dry concrete surface. Observe the seal contact line: it should compress uniformly across the entire width with no visible gaps. Place a piece of paper under the seal at multiple points; you should feel slight resistance when pulling it out, indicating proper compression. If gaps persist, adjust the door’s travel limit settings on your opener or shim the retainer bracket as needed. Proper compression extends seal life by reducing abrasive drag during operation.
Wayne Dalton Seal Types: Which One Do You Have?
Identifying your exact seal type prevents costly returns. Wayne Dalton has used several designs over decades.
| Seal Type | Compatible Models | Key Identification Feature | Availability |
|---|---|---|---|
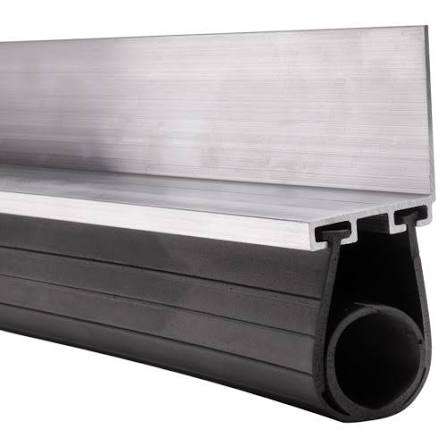
| T-Bulb Vinyl | 8000/9000 Series Foam Core | T-shaped top with round bulb bottom | Widely Available |
| Bead Style Rubber | Classic Steel Doors (Pre-2005) | Round bead insertion edge | Limited/OEM Only |
| U-Channel Universal | Retrofit Applications | Wraps around bottom panel edge | Generic Hardware Stores |
| Astragal Kit | Commercial/Heavy Duty | Aluminum retainer + replaceable insert | Specialty Suppliers |
When uncertain, photograph your existing seal profile and consult a Wikipedia overview of garage door components to cross-reference terminology before purchasing. Accurate identification saves time and ensures optimal performance.
Common Mistakes to Avoid During Replacement
Even experienced DIYers stumble on these pitfalls. Avoiding them ensures professional-grade results:
- Skipping Channel Cleaning: Debris causes uneven seating and premature wear. Spend 10 minutes cleaning—it pays dividends.
- Using Wrong Lubricant: Petroleum products destroy seal integrity within months. Stick to silicone or soapy water.
- Over-Tightening Screws: Compresses seal asymmetrically, creating leaks. Snug is sufficient.
- Ignoring Travel Limits: A misadjusted opener slams the seal into concrete, destroying it in weeks. Recalibrate after every seal change.
- Buying Generic Seals: Proprietary Wayne Dalton channels reject universal profiles. Invest in OEM parts for longevity.
Frequently Asked Questions (FAQ)
How often should I replace my Wayne Dalton garage door bottom seal?
Most manufacturers recommend inspection every 12 months and replacement every 5–7 years. However, harsh climates (extreme heat, salt air, heavy snow) may necessitate replacement every 3–4 years. Watch for cracking, brittleness, or loss of compression as primary indicators.
Can I use a universal seal on my Wayne Dalton door?
Technically possible with U-channel retrofit kits, but strongly discouraged. Universal seals rarely match Wayne Dalton’s proprietary retainer dimensions, leading to poor sealing, accelerated wear, and potential voiding of door warranties. OEM-specific seals guarantee proper fit and performance.
Why does my new seal still leak after installation?
Common causes include improper travel limit adjustment (door doesn’t close fully), uneven concrete floor, incorrect seal size, or debris in the retainer channel. Verify door closure force settings and test with paper method described above. Floor irregularities may require concrete grinding or adjustable threshold seals.
Is it safe to replace the seal myself, or should I hire a pro?
DIY replacement is safe for homeowners comfortable with basic tools and ladder safety. However, if your door uses torsion springs (especially Wayne Dalton TorqueMaster systems), do not attempt spring-related adjustments. Seal replacement alone doesn’t involve springs, but if you suspect spring issues during the process, hire a certified technician immediately. Spring tension poses severe injury risk.
What’s the difference between vinyl and rubber bottom seals?
Vinyl seals are more affordable and resistant to UV degradation but become stiff in extreme cold (<20°F). Rubber (EPDM) seals remain flexible in sub-zero temperatures and offer superior compression recovery but cost 20–30% more. Choose vinyl for moderate climates; choose rubber for regions with harsh winters or high temperature swings.
How do I dispose of the old seal responsibly?
Vinyl and rubber weatherstripping are generally non-recyclable through municipal programs. Check with local waste facilities for construction material recycling options. Some auto parts stores accept rubber for repurposing. Never burn seals—they release toxic fumes. Bag securely to prevent wildlife entanglement during disposal.
Conclusion: Seal Your Garage, Protect Your Home
Replacing your Wayne Dalton garage door bottom seal is more than a maintenance chore—it’s an investment in comfort, energy savings, and property protection. By following this detailed guide on how to replace bottom seal on Wayne Dalton garage door, you’ve taken control of a critical barrier against weather, pests, and wasted utility dollars. The satisfaction of a perfectly sealed garage, achieved through your own hands, is unmatched.
Did this guide help you conquer your garage door seal project? Share your success story or tag us on social media! Post your before-and-after photos on Facebook, Instagram, or Pinterest using #WayneDaltonDIY
Leave a Reply