Is your garage turning into an oven in the summer or a freezer in the winter? You are not alone. Many homeowners struggle with extreme temperatures in their attached garages, which can affect the comfort of adjacent living spaces and increase energy bills. Finding the right Garage Door Insulation Kit 2-Car Garage Product Info And Reviews is the first step toward creating a more stable, efficient, and comfortable home environment.
In this comprehensive guide, we will break down everything you need to know about insulating your double-wide garage door. From material types to top-rated products and step-by-step installation instructions, we have got you covered.
Why Should You Insulate Your 2-Car Garage Door?
Before diving into specific products, it is essential to understand why insulation matters. A standard uninsulated garage door has an R-value (a measure of thermal resistance) of nearly zero. This means heat transfers freely between your garage and the outside world.
Key Benefits of Insulation
- Energy Savings: If your garage shares a wall with your home, insulating the door helps maintain indoor temperatures, reducing HVAC load.
- Noise Reduction: Insulation acts as a sound barrier, dampening street noise or the sound of tools and machinery inside the garage.
- Durability: Insulated panels can add rigidity to thin metal doors, preventing dents and extending the door’s lifespan.
- Comfort: Whether you use your garage as a workshop, gym, or storage space, a tempered environment is far more enjoyable.
According to the U.S. Department of Energy, proper air sealing and insulation can save homeowners up to 15% on heating and cooling costs. While the garage door is just one part of the equation, it is often the largest untreated surface area in the structure.
Types of Garage Door Insulation Materials
Not all insulation kits are created equal. The material you choose depends on your budget, climate, and DIY comfort level. Here are the three most common types found in Garage Door Insulation Kit 2-Car Garage Product Info And Reviews.
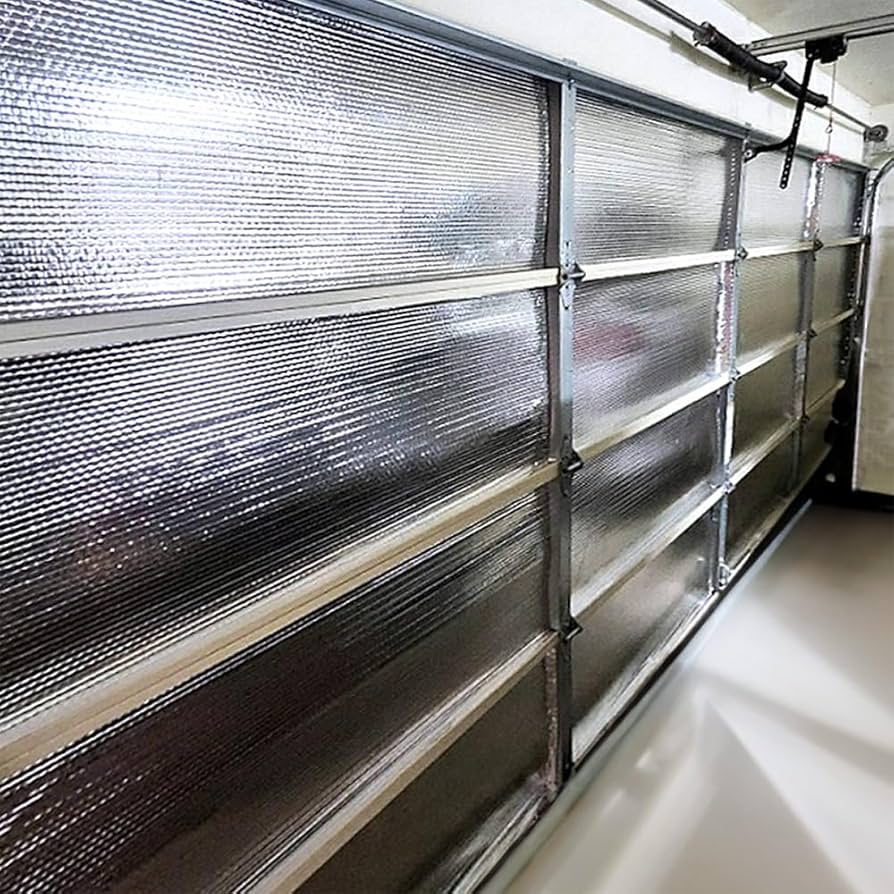
1. Reflective Foil (Radiant Barrier)
This is the most affordable and easiest option to install. It consists of a layer of foam sandwiched between two sheets of reflective foil.
- Best For: Hot climates where reflecting solar heat is the priority.
- R-Value: Typically low (R-3 to R-4).
- Pros: Lightweight, easy to cut, inexpensive.
- Cons: Less effective in cold climates; does not provide significant soundproofing.
2. Polystyrene Foam Boards
These are rigid panels made from expanded polystyrene (EPS). They are often sold in pre-cut sizes to fit standard garage door sections.
- Best For: Moderate climates and homeowners seeking a balance between cost and performance.
- R-Value: Moderate (R-4 to R-8 depending on thickness).
- Pros: More durable than foil, better thermal resistance.
- Cons: Can be brittle; requires precise cutting if not pre-sized.
3. Polyurethane Foam Panels
Polyurethane is denser and offers higher insulating power per inch. Some high-end kits come with foam injected between steel skins, but retrofit kits usually involve adhering rigid polyurethane boards.
- Best For: Cold climates and maximum energy efficiency.
- R-Value: High (R-8 to R-12+).
- Pros: Superior insulation, excellent sound dampening, adds structural strength.
- Cons: More expensive, heavier, harder to cut.
Top-Rated Garage Door Insulation Kits for 2-Car Garages
Based on market analysis, user feedback, and performance metrics, here are three top contenders for your 2-car garage.
| Product Name | Material Type | Approx. R-Value | Ease of Installation | Best Feature |
|---|---|---|---|---|
| Matador Garage Door Insulation Kit | Reflective Foil | R-4 | Very Easy | Complete kit with tape and clips |
| Owens Corning FOAMULAR | Polystyrene Board | R-5 to R-7 | Moderate | Moisture resistant, rigid structure |
| SmartGARAGE Insulation Panel | Polyurethane | R-8+ | Hard | Highest thermal performance |
1. Matador Garage Door Insulation Kit
The Matador kit is a favorite among DIY beginners. It comes with everything needed for a standard 2-car door, including adhesive tabs and reflective tape. Users praise its clean appearance and the fact that it does not add significant weight to the door springs.
2. Owens Corning FOAMULAR Garage Door Insulation
For those who prefer rigid boards, Owens Corning offers pre-cut panels that fit most sectional doors. These panels are known for their durability and moisture resistance, making them ideal for humid environments. Note that you may need to purchase additional adhesive separately.
3. SmartGARAGE Premium Polyurethane Panels
If budget is less of a concern than performance, SmartGARAGE provides high-density polyurethane panels. These offer the highest R-value in the retrofit market. Installation is more labor-intensive due to the weight and density of the material, but the long-term energy savings can justify the cost.
Step-by-Step Installation Guide
Installing a Garage Door Insulation Kit 2-Car Garage is a manageable weekend project. Follow these steps for a professional finish.
Tools Needed:
- Utility knife or box cutter
- Measuring tape
- Straight edge or ruler
- Clean cloth and mild detergent
- Adhesive (if not included in the kit)
- Safety glasses and gloves
Step 1: Measure and Prepare
Close the garage door completely. Measure the width and height of each individual panel section. Most 2-car garage doors have 4 to 5 horizontal sections. Write down these dimensions.
Step 2: Clean the Surface
Use a cloth dipped in mild soapy water to clean the interior side of the garage door panels. Remove any dust, grease, or rust. Allow the surface to dry completely. Adhesion will fail if the surface is dirty or wet.
Step 3: Cut the Insulation
If using reflective foil, unroll the material and cut it to match the dimensions of each panel. Leave a small margin (about 1/2 inch) to prevent the material from interfering with the door’s hinges or tracks. For rigid boards, score the foam with a utility knife and snap it along the line for a clean edge.
Step 4: Apply Adhesive
Apply adhesive tabs or spray adhesive to the back of the insulation material. If using a kit like Matador, peel the backing off the pre-applied tabs. Place four tabs per panel: one in each corner.
Step 5: Attach the Insulation
Press the insulation firmly onto the center of the garage door panel. Smooth it out from the center toward the edges to remove air bubbles. Ensure the edges are secure but not touching the moving parts of the door.
Step 6: Seal the Edges
Use reflective foil tape to seal the seams between panels if desired. This creates a continuous radiant barrier and improves the aesthetic look.
Important Considerations Before You Buy
Weight and Spring Balance
Adding insulation adds weight to your garage door. A typical 2-car door might gain 20–40 pounds after insulation. Check your spring tension. If the door feels heavy or does not stay open halfway, you may need a professional to adjust the torsion springs. Ignoring this can lead to premature opener failure.
Fire Safety
Ensure that any insulation material you choose is fire-rated. Most reputable brands meet local building codes, but it is always wise to verify. For more information on building material standards, you can refer to general safety guidelines on Wikipedia.
Ventilation
Insulating your garage door does not mean you should seal the garage entirely. Proper ventilation is still necessary to prevent moisture buildup and fume accumulation, especially if you store chemicals or run vehicles inside.
FAQ Section
Q1: Will insulating my garage door really lower my energy bills?
A: Yes, but the impact depends on your home’s layout. If your garage is attached to your house and shares walls with living spaces, insulation can significantly reduce heat transfer. In detached garages, the benefit is mostly comfort-related rather than financial.
Q2: Can I install insulation on an old garage door?
A: Absolutely. Retrofit kits are designed specifically for existing doors. However, if your door is severely damaged or warped, it may be better to replace the door with a factory-insulated model.
Q3: How long does a garage door insulation kit last?
A: High-quality insulation can last 10–20 years. Reflective foil may degrade faster if exposed to direct sunlight through windows, but since it is installed on the interior, it generally holds up well. Rigid foam boards are very durable unless physically damaged.
Q4: Do I need a professional to install it?
A: No. Most kits are designed for DIY installation. As long as you can measure, cut, and stick adhesive, you can do it yourself. Professional help is only recommended if you need to adjust the door springs due to added weight.
Q5: What is the best R-value for a 2-car garage?
A: For most residential applications, an R-value between R-4 and R-8 is sufficient. Higher R-values (R-10+) are beneficial in extreme cold climates but come with higher costs and installation difficulty.
Leave a Reply