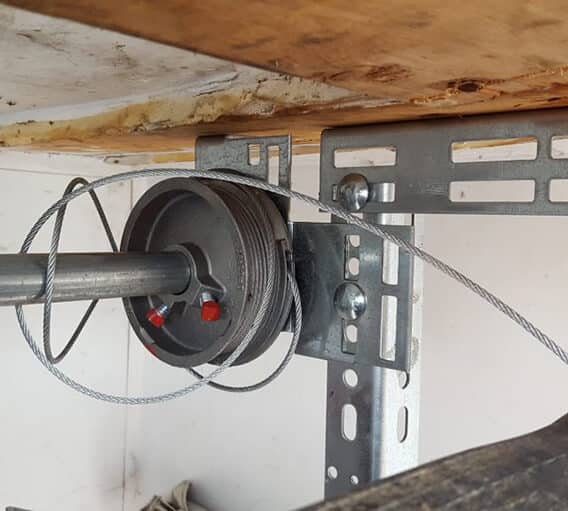
Is your garage door stuck, making strange noises, or hanging unevenly? A broken or frayed cable might be the culprit, and knowing how to replace a cable on a garage door can save you hundreds of dollars in professional service fees. While this task involves high-tension springs that require caution, many homeowners successfully complete this repair with the right tools and safety precautions.
Garage door cables are critical components that work in tandem with the torsion or extension springs to lift and lower your door smoothly. When these cables wear out, snap, or become detached, your garage door becomes inoperable and potentially dangerous. This comprehensive guide will walk you through the entire process, from safety preparations to final testing, ensuring you can tackle this repair with confidence.
Why Do Garage Door Cables Break?
Understanding why cables fail helps prevent future issues and determines whether replacement is truly necessary. Garage door cables typically last between 7-15 years, depending on usage frequency, weather conditions, and maintenance practices.
Common Causes of Cable Failure
- Normal Wear and Tear: Daily operation causes friction against pulleys and drums, gradually weakening the steel strands
- Corrosion: Exposure to moisture, humidity, and road salt accelerates rust formation, especially in coastal areas
- Poor Installation: Incorrectly wound cables or improper tension during initial installation creates stress points
- Lack of Lubrication: Unlubricated moving parts increase friction and strain on cables
- Spring Failure: When springs break, cables suddenly bear excessive weight, often causing them to snap
According to the International Door Association, proper maintenance can extend garage door component life by up to 50%. Regular inspections every six months help identify early warning signs like fraying, rust spots, or loose strands before complete failure occurs.
Safety Precautions Before You Begin
Warning: Garage door springs store enormous amounts of energy—enough to cause serious injury or death if released improperly. If you feel uncomfortable at any point, stop immediately and call a professional.
Essential Safety Equipment
Before starting, gather these safety items:
- Safety glasses: Protect eyes from snapping cables or spring fragments
- Work gloves: Heavy-duty leather gloves protect hands from sharp cable ends
- Steel-toed boots: Prevent foot injuries if heavy components fall
- Clamps or locking pliers: Secure the door in place during repair
Critical Safety Steps
- Disconnect the opener: Unplug the garage door opener or pull the emergency release cord
- Secure the door: Use C-clamps or vice grips on the tracks below the bottom rollers to prevent accidental movement
- Release spring tension: This is the most dangerous step. For torsion springs, use winding bars specifically designed for this purpose. Never use screwdrivers or makeshift tools
- Work with a partner: Having someone assist improves safety and makes handling heavy components easier
Tools and Materials Needed
Having the right equipment ready prevents mid-repair trips to the hardware store. Here’s what you’ll need:
| Tool/Material | Purpose | Estimated Cost |
|---|---|---|
| Winding bars (2) | Safely release torsion spring tension | $15-25 |
| Socket wrench set | Remove bolts and adjust hardware | $20-40 |
| Locking pliers | Secure door and hold components | $10-15 |
| New garage door cables | Replacement cables (pair) | $15-30 |
| Cable lubricant | Reduce friction on new cables | $5-10 |
| Ladder | Access upper track and drum area | Already owned |
| Measuring tape | Ensure proper cable length | Already owned |
Pro Tip: Purchase cables specifically rated for your door’s weight and size. Check your existing cable specifications or consult your door manufacturer’s manual. Using incorrect cables compromises safety and performance.
Step-by-Step Cable Replacement Process
Follow these detailed instructions carefully. Rushing or skipping steps increases risk and may damage other components.
Step 1: Document the Current Setup
Before disassembling anything, take clear photos of:
- How cables attach to the bottom brackets
- Cable routing through pulleys
- How cables wrap around the drum
- Spring configuration and winding direction
These reference images prove invaluable during reassembly, especially if you’re tackling this project for the first time.
Step 2: Release Spring Tension
For Torsion Springs (mounted above door):
- Insert winding bars into the holes on the winding cone
- Slowly unwind the spring counterclockwise (typically 1/4 turn at a time)
- Alternate between the two winding bars to maintain control
- Continue until all tension is released and bars move freely
For Extension Springs (mounted along tracks):
- Secure the door firmly with clamps
- Carefully disconnect the safety cable running through the spring
- Unhook the spring from the pulley system
- Allow gradual tension release while maintaining control
Step 3: Remove the Old Cable
- Locate where the cable attaches to the bottom bracket near the door’s lowest panel
- Loosen the set screw or bolt securing the cable end
- Carefully unwind the cable from the drum at the top
- Thread the cable out through any pulleys or guides
- Remove completely and inspect surrounding components for damage
Inspection Point: While the cable is removed, check pulleys for cracks, bearings for smooth rotation, and brackets for rust or bending. Replace any worn components now to avoid future repairs.
Step 4: Install the New Cable
- Thread through pulleys: Follow the exact path of the old cable through all guides and pulleys
- Attach to drum: Insert the cable end into the drum hole and secure with the set screw. Ensure it seats properly in the drum groove
- Wind onto drum: Manually wind the cable onto the drum, keeping tension consistent and preventing overlaps or gaps
- Connect to bottom bracket: Attach the cable end to the bottom bracket, leaving slight slack for adjustment
- Repeat for second cable: Complete the same process on the opposite side
Step 5: Restore Spring Tension
This step reverses the tension release process:
- Insert winding bars into the winding cone
- Wind the spring clockwise (opposite of unwinding direction)
- Count the exact number of turns—the standard is typically 7-8 quarter turns per foot of door height
- Apply tension gradually and evenly
- Remove winding bars carefully once proper tension is achieved
Critical: Both springs must have identical tension. Uneven tension causes the door to operate crookedly and strains components prematurely.
Step 6: Test and Adjust
- Remove all clamps and securing devices
- Manually lift the door halfway—it should stay in place without support
- Lower and raise the door several times manually, watching for smooth operation
- Check cable alignment on drums—they should wind evenly without overlapping
- Reconnect the garage door opener and test automatic operation
- Listen for unusual noises and watch for jerky movements
If the door doesn’t balance properly or cables appear misaligned, minor adjustments to tension or cable seating may be necessary.
When to Call a Professional
While many homeowners successfully replace garage door cables, certain situations warrant professional assistance:
- Broken torsion springs: These require specialized tools and expertise
- Damaged tracks or rollers: Additional repairs complicate the process
- Uncertainty about spring type or tension: Incorrect tension creates safety hazards
- Previous unsuccessful attempts: If something feels wrong, don’t force it
- Heavy or oversized doors: Commercial-style doors present greater risks
Professional garage door technicians typically charge $150-350 for cable replacement, including labor and parts. While DIY saves money, prioritize safety over cost savings.
Frequently Asked Questions
How long does it take to replace a garage door cable?
For experienced DIYers, the process takes 2-3 hours. First-timers should allocate 4-6 hours to work carefully and safely. Rushing increases accident risk significantly.
Can I replace just one cable or should I replace both?
Always replace both cables simultaneously. Even if only one appears damaged, the other has experienced identical wear and likely needs replacement soon. Matching cables ensure balanced operation and prevent premature failure.
What type of cable should I use for my garage door?
Use aircraft-grade galvanized steel cables specifically rated for garage doors. Common sizes include 1/8-inch, 5/32-inch, and 3/16-inch diameter. Match the length and specification to your original cables or consult your door manufacturer’s recommendations.
How often should garage door cables be inspected?
Inspect cables every six months during routine maintenance. Look for fraying, rust, loose strands, or unusual wear patterns. Annual professional inspections provide additional peace of mind and catch issues homeowners might miss.
Is it dangerous to replace garage door cables myself?
Yes, there are inherent risks due to high-tension springs. However, following proper safety protocols, using correct tools, and working methodically significantly reduces danger. If you lack confidence or experience with mechanical repairs, hiring a professional is the safer choice.
What happens if garage door cables break while the door is operating?
A broken cable causes immediate imbalance, potentially damaging tracks, rollers, and panels. The door may crash down unexpectedly, creating safety hazards. This is why regular inspection and timely replacement matter greatly.
Conclusion
Learning how to replace a cable on a garage door empowers you to handle common maintenance issues while saving significant money. By following proper safety procedures, using quality materials, and working methodically through each step, you can restore smooth, reliable operation to your garage door.
Remember that patience and attention to detail matter more than speed. Take photos, double-check measurements, and never compromise on safety equipment. If uncertainty arises at any point, contacting a professional technician protects both your investment and your wellbeing.
Did this guide help you successfully replace your garage door cable? Share your experience on social media to help other homeowners tackle this repair confidently. Your success story might inspire someone else to take on their own DIY project!
Leave a Reply