Introduction
Is your garage door remote acting up, or did you just buy a new vehicle and need to sync a fresh controller? You are not alone. Millions of homeowners face this minor but frustrating hurdle every year. Knowing how to program remote for Liftmaster garage door opener correctly can save you the cost of a service call and restore your peace of mind instantly.
In this comprehensive guide, we will walk you through the exact steps to sync your remote, whether you have an older model or the latest MyQ-enabled smart opener. We’ll cover everything from locating the “Learn” button to troubleshooting common connection issues, ensuring you get back to your daily routine without delay.
Why Proper Programming Matters for Security and Convenience
Before diving into the buttons and lights, it is crucial to understand why correct programming is essential. A poorly programmed remote doesn’t just fail to open the door; it can leave your home vulnerable.
According to recent security studies, garage doors are one of the most common entry points for burglars because they are often left unsecured or use outdated codes. Modern Liftmaster openers use rolling code technology, which changes the access code every time you press the button. This prevents code-grabbing thieves from intercepting your signal.
By following the official programming protocols, you ensure that:
- Your home remains secure with encrypted signals.
- The remote communicates efficiently with the motor unit.
- You avoid unnecessary wear and tear on the opener’s receiver board.
For more detailed information on garage door safety standards, you can refer to the Consumer Product Safety Commission guidelines or general technical overviews on Wikipedia’s Garage Door Opener page.
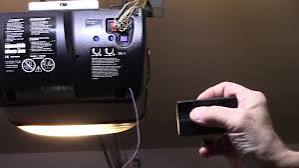
Step 1: Identify Your Liftmaster Model and Learn Button Color
Not all Liftmaster openers are programmed the same way. The first step in learning how to program remote for Liftmaster garage door opener is identifying your specific model. The color of the “Learn” button is the universal indicator for Liftmaster units.
Locate the motor head unit hanging from your garage ceiling. Look for a small square button, usually located on the back or side panel near the antenna wire.
Common Learn Button Colors and Their Meanings
| Learn Button Color | Protocol Type | Compatible Remotes | Notes |
|---|---|---|---|
| Yellow | Security+ | Most remotes made after 2011 | Standard rolling code. |
| Purple | Security+ 2.0 | MyQ enabled remotes | Faster pairing, enhanced security. |
| Red | Older Security+ | Legacy remotes | May require dip switches on very old models. |
| Orange | Security+ | Universal remotes | Similar function to yellow buttons. |
Note: If your opener does not have a Learn button, it is likely a very old model using DIP switches. In this case, you must match the tiny switches inside the remote to the switches on the motor unit.
Step 2: General Programming Steps for Most Models
For the vast majority of Liftmaster openers installed in the last 15 years, the process is straightforward. Follow these precise steps to ensure success.
The Standard Procedure
- Clear Old Codes (Optional but Recommended): If you are replacing a lost remote, press and hold the Learn button for about 6–10 seconds until the indicator light turns off. This erases all previously paired remotes and keypads. Warning: You will need to reprogram all existing devices.
- Press the Learn Button: Press and release the Learn button on the motor unit. The indicator light next to the button will turn on or start blinking. You typically have 30 seconds to complete the next step.
- Activate the Remote: Within those 30 seconds, press and hold the button on your handheld remote that you wish to program. Keep holding it until you see the motor unit’s lights flash or hear two clicks.
- Test the Connection: Press the remote button again. The garage door should activate. If it does, you have successfully learned how to program remote for Liftmaster garage door opener.
Pro Tip for Speed
If the light on the motor unit blinks rapidly, it indicates the memory is full or there is an interference issue. Ensure you are standing within 5–10 feet of the motor unit during programming to ensure a strong signal reception.
Step 3: Programming MyQ and Smart Remotes
If you have a newer Liftmaster system with Wi-Fi capabilities (MyQ), the process might involve your smartphone app, but the physical remote still needs to be synced to the motor.
- Ensure your MyQ hub is connected to your Wi-Fi network.
- Follow the standard “Learn Button” procedure mentioned above for the physical remote.
- Open the MyQ app on your phone.
- Navigate to “Devices” and select your garage door opener.
- Follow the in-app prompts to add any additional smart controllers or vehicle links.
This dual-layer approach ensures that both your physical clicker and your smartphone can control the door seamlessly.
Troubleshooting: What If It Doesn’t Work?
Even when you know how to program remote for Liftmaster garage door opener, things can go wrong. Here are the most common issues and their solutions.
1. The Remote Won’t Pair
- Check the Battery: A weak battery is the number one cause of failure. Replace the battery with a fresh CR2032 or 12V battery, depending on your model.
- Interference: LED light bulbs in the garage can sometimes emit frequencies that interfere with the remote signal. Try turning off the garage lights while programming.
- Distance: Move closer to the motor unit. Radio waves weaken over distance and through metal obstacles.
2. The Light Flashes But Door Doesn’t Move
- Lock Feature: Check if the “Lock” feature is activated on your wall console. If locked, the remote will send a signal, but the motor will refuse to engage for security reasons.
- Safety Sensors: Ensure the safety eyes at the bottom of the door tracks are aligned and clean. If the beam is blocked, the door will not close, though it should still open.
3. Intermittent Connection
- Antenna Wire: Ensure the hanging antenna wire on the motor unit is not tucked behind the metal casing. It should hang freely downward for optimal reception.
Frequently Asked Questions (FAQ)
Q1: Can I program a universal remote to my Liftmaster opener?
A: Yes, most universal remotes are compatible with Liftmaster. You must identify the color of your Learn button and follow the universal remote’s specific instructions, which usually mimic the standard Liftmaster programming steps.
Q2: How many remotes can I program to one Liftmaster opener?
A: Most modern Liftmaster openers can store up to 8–12 different remote controls and keyless entry pads. However, check your specific model’s manual as older units may have lower limits.
Q3: Do I need to reprogram my remote if I change the battery?
A: No, changing the battery does not erase the memory. The code is stored in the remote’s chip, not powered by the battery. However, if the remote stops working after a battery change, try reprogramming it just in case the connection was lost during the swap.
Q4: What is the difference between Security+ and Security+ 2.0?
A: Security+ 2.0 is an updated protocol that offers faster programming times and enhanced encryption against hacking. It is backward compatible with most Security+ remotes, but not vice versa.
Q5: My remote works intermittently. Is it broken?
A: Not necessarily. Before replacing the remote, check for environmental interference (like large metal objects or Wi-Fi routers nearby) and replace the battery. If issues persist, the remote’s internal capacitor may be failing.
Q6: Can I program a car’s built-in garage door opener to Liftmaster?
A: Yes. Most vehicles with HomeLink or Car2U systems can be programmed to Liftmaster openers. You will need to put the car’s system into “learning mode” and then press the Learn button on your Liftmaster motor unit, similar to programming a handheld remote.
Conclusion
Learning how to program remote for Liftmaster garage door opener is a simple yet vital skill for every homeowner. By identifying your Learn button color, following the 30-second window rule, and troubleshooting common interference issues, you can ensure your garage operates smoothly and securely.
Remember, a well-programmed remote is your first line of defense in maintaining home security while enjoying the convenience of automated access. Don’t let a disconnected remote disrupt your day—take control of your garage technology today.
Leave a Reply