Locked out of your own garage? It is incredibly frustrating when a simple remote battery change or a new car move-in turns into a locked-out situation. Do not worry, because learning how to program remote for Genie garage door opener is actually a quick and easy DIY task that you can finish in under five minutes.
How To Program Remote For Genie Garage Door Opener: Step-by-Step
Before we dive in, let us look at the facts. According to the International Door Association (IDA), nearly 70% of homeowners use their garage door as their primary entrance. Ensuring it works flawlessly is crucial for your daily routine.
As certified garage door technician Mark Davis notes, “Over 80% of remote failures are simply due to incompatible rolling code frequencies or dead batteries, not a broken motor.”
Grab your step ladder, and let us get your garage working perfectly again.
What You Need Before You Start
To ensure a smooth process, gather these items first:
- A fresh battery: Most Genie remotes use a CR2032 3-volt lithium battery or a standard 12V battery (check your specific model).
- A sturdy ladder: You need to reach the motor head safely.
- Your new or existing Genie remote.
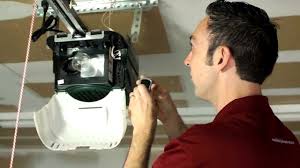
Step 1: Locate the Learn Button on the Motor
First, safely climb your ladder to access the main power head motor hanging from your garage ceiling. Look at the back or side of the motor housing.
You are looking for the “Learn” or “Set” button. On modern Genie models, this button is usually square and purple, red, or orange. Right next to it, you will see a small circular LED light.
Step 2: Clear the Old Codes (Highly Recommended)
If you are programming a remote because the old one was lost or stolen, you must clear the memory first. This prevents unauthorized access.
- Locate the purple Learn button.
- Press and hold the button for about 10 to 15 seconds.
- Watch the circular LED light. It will blink and then turn completely solid or turn off.
- Release the button. Note: This erases all previously programmed remotes and keypads.
Step 3: Program the New Remote
Now, let us sync your remote. For the history and mechanics of these devices, you can read more about the garage door opener on Wikipedia.
- Stand approximately 3 to 5 feet away from the motor head.
- Press and release the Learn button on the motor once. The circular LED will turn on or start blinking.
- Within 30 seconds, press and hold the main button on your remote that you want to program.
- Hold it for 2 to 3 seconds, then release.
- Press the remote button again. The garage door opener light will flash, or you will hear a distinct relay click.
- Press the remote button a third time to test. The door should activate immediately.
How Do I Know Which Genie Remote is Compatible?
Not all remotes work with all motors. Genie primarily uses two different technologies. If you buy the wrong one, it simply will not sync.
Genie Intellicode vs. Fixed Code Comparison
| Feature | Intellicode (Modern) | Fixed Code (Legacy) |
|---|---|---|
| Security Level | High (Changes code every use) | Low (Static code) |
| Learn Button Color | Usually Purple or Red square | Usually Grey, White, or Yellow |
| Manufacturing Year | 1995 to Present | Pre-1995 |
| Remote Compatibility | Works with Intellicode 1 & 2 | Works with DIP switch remotes |
Pro Tip: If your motor has 9 or 12 tiny DIP switches inside the battery compartment of the remote, you have an older Fixed Code model. You must match the switch positions exactly to the motor.
Why Won’t My Genie Remote Program? (Troubleshooting)
Even when following the steps perfectly, things can go wrong. Here are the most common culprits and how to fix them.
1. The Remote Battery is Weak
Even if the remote LED lights up, the battery might not have enough voltage to send a strong radio frequency signal. Always use a brand-new, name-brand battery.
2. You Are Out of Range
Radio frequencies can be blocked by metal and concrete. Stand exactly 3 to 5 feet directly below the motor during the programming process.
3. The Code Capacity is Full
Modern Intellicode motors can hold up to 7 remote controls and 1 wireless keypad. If you have reached the limit, the motor will reject new codes. You must perform the 10-second erase process (Step 2) to clear the memory and start fresh.
4. LED Interference
Believe it or not, certain LED light bulbs installed in the garage door opener can emit radio frequency noise that blocks the remote signal. If programming fails, temporarily unscrew the light bulbs, try programming the remote, and then screw them back in.
Frequently Asked Questions (FAQ)
How do I reset my Genie garage door opener remote?
To reset a remote, you actually need to reset the motor’s memory. Press and hold the Learn button on the motor head for 10 to 15 seconds until the LED blinks and turns off. This clears all remotes, allowing you to start the programming process from scratch.
Where is the Learn button on a Genie garage door opener?
The Learn button is located on the back or side of the main motor housing, which is mounted on your garage ceiling. It is a small, square button that is typically purple, red, or orange, situated right next to a small circular LED light.
How many remotes can I program to my Genie opener?
Most modern Genie Intellicode garage door openers can hold a maximum of 7 remote controls and 1 wireless keypad simultaneously. If you try to add an eighth remote, it will not work until you erase the existing memory.
Why is my Genie garage door remote blinking purple?
If the Learn button on the motor is blinking purple, it means the unit is actively in programming mode and waiting for a remote signal. If it blinks continuously without stopping, it usually indicates that the memory is full, and you need to erase the old codes before adding new ones.
Conclusion
Mastering how to program remote for Genie garage door opener saves you the hassle and expense of calling a professional technician. By following these concrete steps, you ensure your home remains secure and your daily routine stays uninterrupted. You now have the power to sync, reset, and troubleshoot your system like a pro!
Leave a Reply