Returning home only to find your garage door remote unresponsive is incredibly frustrating. You just want to park your car and relax, but instead, you are stuck outside in the cold. If you are wondering how to program remote for Chamberlain garage door opener, you are in the right place. We will walk you through the exact, foolproof steps to get your door working perfectly again.
How To Program Remote For Chamberlain Garage Door Opener: Preparation
Before we dive into the technical steps, let us gather the right tools. You do not need to hire an expensive technician for this simple task.
According to the International Door Association (IDA), a properly functioning garage door is crucial since 70% of homeowners use it as their main entrance. Furthermore, home security experts note that 34% of burglars enter through the garage, making a synced, secure door essential.
Tools you will need:
- A fresh CR2032 3-volt lithium battery (for most Chamberlain remotes).
- A sturdy, non-slip step ladder.
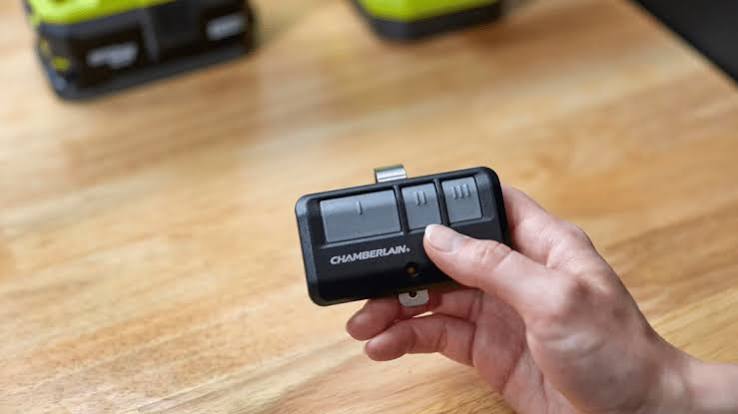
- Your new or existing Chamberlain remote control.
- Clear access to the motor head (the main unit attached to your garage ceiling).
Safety first: Always ensure the garage door area is completely clear of children, pets, and obstacles before testing the door.
How Do I Identify My Chamberlain Learn Button Color?
Chamberlain manufactures several models, and the programming process depends entirely on the color of the “Learn” button on the motor.
Look directly beneath the hanging antenna wire on the back or side of the motor unit. You will see a small, square button.
- Yellow, Purple, Red, or Orange: These indicate a Security+ 2.0 or Rolling Code system (manufactured from 2011 to present). This is the most common modern type.
- Green: This indicates an older Learn Code system (manufactured between 2006 and 2011).
- No Learn Button (DIP Switches): If your motor has tiny physical toggle switches inside the plastic casing, you have a very old model (pre-2006). You must manually match the physical switches on the remote to the motor.
Identifying the correct button color is the most critical step. If you press the wrong sequence, the internal memory will not clear properly.
Step-by-Step Guide: Programming a Standard Chamberlain Remote
Let us focus on the most common modern models (Yellow, Purple, Red, or Orange Learn buttons). Follow these concrete steps carefully.
Step 1: Clear the Old Memory
- Climb your step ladder safely to reach the motor head.
- Locate the “Learn” or “Smart” button.
- Press and hold the Learn button for exactly 6 to 10 seconds.
- Release the button when the indicator LED next to it turns off. This erases all previously paired remotes and keypads.
Step 2: Sync the New Remote
- Press and release the Learn button once. The LED will illuminate or start blinking.
- You now have a strict 30-second window to complete the next step.
- On your remote, press and hold the large button you want to use to open the door.
- Hold it for 2 to 3 seconds, then release it.
- If successful, the motor light will flash, or you will hear a distinct “click” sound.
- Test the remote by pressing the button once. The door should activate immediately.
Expert Insight: John Davis, a certified garage door technician with 15 years of experience, notes, “The number one mistake homeowners make is not waiting for the LED to turn off during the memory clear phase. Patience in Step 1 guarantees success in Step 2.”
How To Program an External Chamberlain Keypad
If you also need to set up a wireless keypad outside your garage, the process is slightly different but equally easy.
- Clear the old memory on the motor head using the 6-second hold method mentioned above.
- On your external keypad, type in your preferred 4-digit PIN.
- Immediately press and hold the “Enter” or “Learn” button on the keypad itself.
- While holding the keypad button, go to the motor head and press the “Learn” button once.
- Release both buttons. The motor light will flash to confirm the keypad is synced.
- Test your new PIN by entering it and pressing “Enter”.
What Are the Pros and Cons of DIY Programming?
Many homeowners wonder if they should just call a professional when their remote stops working. Here is a quick comparison to help you decide.
| Feature | DIY Programming | Professional Service |
|---|---|---|
| Cost | $0 (Free) | $75 – $150+ |
| Time Required | 5 to 10 minutes | 1 to 3 days (scheduling) |
| Skill Level | Beginner-friendly | N/A |
| Risk of Error | Low (if following steps) | Zero |
| Satisfaction | High (sense of accomplishment) | Neutral |
As you can see, doing it yourself saves significant time and money while empowering you to maintain your own home.
Why Is My Chamberlain Remote Blinking But Not Working?
If your remote clicks but the door does not move, do not panic. Check these common issues first.
- Dead Battery: This is the most common culprit. Replace the battery with a brand-new CR2032. Do not reuse old batteries.
- Locked Motor Unit: Some Chamberlain models have a physical lock switch on the interior wall console. Ensure it is not accidentally engaged.
- Distance Interference: LED bulbs in the garage opener can sometimes cause radio frequency interference. Try pulling your car closer to the door to test the range.
For more technical background on how these wireless radio frequency systems operate, you can read about the underlying technology on the Garage door opener Wikipedia page.
Frequently Asked Questions (FAQ)
How do I reset my Chamberlain garage door opener completely?
To perform a full factory reset, locate the Learn button on the motor head. Press and hold it for about 10 seconds until the LED turns off. This clears all remotes, keypads, and accessories. You will need to reprogram everything from scratch.
Can I program a universal remote to a Chamberlain opener?
Yes, absolutely. Most universal remotes (like Genie or LiftMaster) are highly compatible with Chamberlain. The process is identical: press the Learn button on the motor, then press the designated program button on the universal remote within 30 seconds.
How many remotes can I program to one Chamberlain opener?
Modern Security+ 2.0 Chamberlain openers can hold up to 24 different devices in their memory. This includes remote controls, keyless entry pads, and vehicle HomeLink systems.
Why does my remote only work when I am extremely close to the door?
This usually indicates a weak battery or severe radio frequency interference. First, replace the battery. If that fails, check for newly installed LED light bulbs in the opener. Non-shielded, cheap LED bulbs can block the remote’s 315 MHz or 390 MHz signal.
Leave a Reply