Is your new garage system acting up, leaving you stuck outside in the rain? Dealing with unresponsive remotes is a common headache for many US homeowners trying to secure their property. If you are asking yourself, “how do you set a Chamberlain garage door opener,” this comprehensive guide will help you sync your devices in minutes. Let’s get your home secure and accessible!
Understanding Your Chamberlain Garage Door System
Before we dive into the setup, it is essential to understand how your device works. Automatic openers have evolved significantly over the years. According to the International Door Association (IDA), over 70% of US homes rely on automatic systems for daily convenience and security.
Modern Chamberlain units utilize rolling code technology. This means the access code changes every time you use the remote. This prevents thieves from intercepting your signal and breaking into your home. The mechanics behind these security systems are fascinating and highly effective (learn more about Garage door openers on Wikipedia).
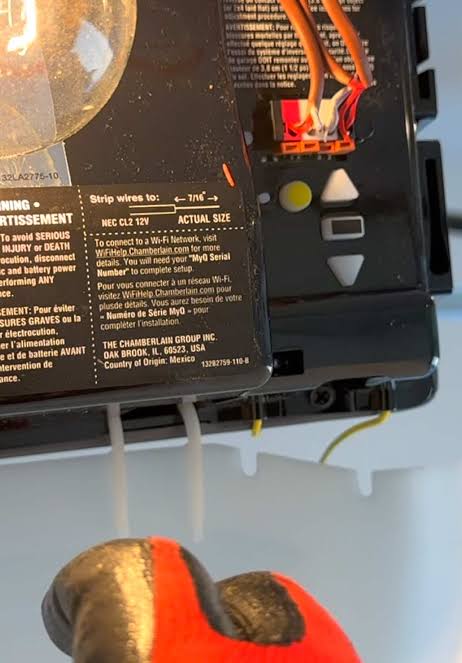
Knowing your model’s “Learn” button color is the first crucial step. The color indicates the radio frequency your unit uses.
- Yellow: 315 MHz (2011+)
- Purple: 315 MHz (2006-2014)
- Red/Orange: 390 MHz (1997-2005)
- Green: 390 MHz (1993-1996)
Prerequisite: Aligning the Safety Sensors
Before programming anything, your door must be physically safe to close. Chamberlain openers use infrared safety sensors located near the floor.
- Check the LEDs: Both sensors should have a solid light. Usually, the sending sensor has an amber light, and the receiving sensor has a green light.
- Adjust the brackets: If the green light is blinking or off, the sensors are misaligned. Gently bend the metal bracket or adjust the sensor wingnut until the green light turns solid.
- Clear the path: Ensure no tools, boxes, or large cobwebs are blocking the invisible infrared beam between the two lenses.
How Do You Set A Chamberlain Garage Door Opener: Step-by-Step Guide
Now, let’s get your remotes and keypads connected. Make sure your garage door is closed and the motor unit is plugged into a working power outlet.
Step 1: Locate the “Learn” Button
Look at the motorhead of your garage door opener. You will find a square or circular button labeled “Learn” or “Program.” It is usually located on the back or the left side panel. You might need to use a step ladder to reach it safely.
Note: If your unit has a light lens covering the button, gently squeeze the sides of the lens to unhook it and remove it.
Step 2: Program the Remote Control
Programming your primary remote takes less than a minute. Follow these exact steps:
- Press and release the Learn button on the motor unit. The indicator LED will light up brightly.
- Within 30 seconds, press and hold the button on your remote that you wish to program.
- Keep holding the remote button until the motor unit’s LED blinks or you hear two distinct clicks.
- Release the remote button.
- Press the remote button once more to test if the door operates.
Step 3: Set Up the Wireless Exterior Keypad
The exterior keypad is perfect for kids coming home from school or when you are out for a jog.
- Press and release the Learn button on the motor unit.
- Within 30 seconds, type in a 4-digit PIN of your choice on the exterior keypad.
- Press and hold the ENTER button.
- Release the ENTER button when the motor unit lights blink.
- Test your new PIN by entering it and pressing ENTER.
Setting Physical Travel Limits and Force Adjustments
If you just installed the entire system, programming the remotes is not enough. You must also set the physical travel limits. This tells the motor exactly where to stop when opening and closing.
Adjusting the Up and Down Limits
Modern Chamberlain openers have limit adjustment screws on the side of the motor unit.
- Locate the screws: Find the “Up” and “Down” limit adjustment screws.
- Test the door: Use your remote to open and close the door.
- Adjust: If the door stops too early, turn the “Up” screw clockwise. Use a flathead screwdriver. One full turn equals about two inches of door travel.
- Fine-tune the down limit: If the door doesn’t close fully or reverses before hitting the floor, turn the “Down” screw clockwise.
Adjusting the Force Settings
The force setting dictates how much power the motor uses to move the door. If the force is too high, it becomes a safety hazard.
- Find the force adjustment screws next to the limit screws.
- If the door reverses before hitting the floor, slightly increase the down force by turning the screw clockwise.
- Safety test: Place a 2×4 piece of wood flat on the ground under the door. Close the door. Upon hitting the wood, the door must automatically reverse. If it doesn’t, decrease the down force until it does.
Upgrading to Smart Control: myQ App Setup
Most modern Chamberlain openers are Wi-Fi enabled. Connecting your system to the myQ app allows you to control your garage from anywhere in the world.
- Download the app: Get the myQ app from the Apple App Store or Google Play Store.
- Create an account: Sign up using your email address.
- Prepare your Wi-Fi: Ensure your smartphone is connected to a 2.4 GHz Wi-Fi network. The opener will not connect to a 5 GHz network.
- Connect the hardware: Press the Wi-Fi or Learn button on your motor unit until the LED starts blinking rapidly.
- Follow in-app prompts: The app will detect the opener and prompt you to enter your Wi-Fi password.
- Confirmation: Wait for the LED on the motor unit to turn solid. You are now connected!
Quick Comparison: Chamberlain Setup Methods
To help you decide which access method suits your lifestyle best, here is a quick comparison of the different ways you can operate your door.
| Access Method | Setup Time | Best Use Case | Pros | Cons |
|---|---|---|---|---|
| Standard Remote | 30 Seconds | Everyday driving access | Fast, reliable, kept in car | Can be lost or stolen from vehicle |
| Wireless Keypad | 1 Minute | Walk-ins, kids, guests | No remote needed, secure PIN | Exposed to weather, battery dies |
| myQ Smartphone App | 5 Minutes | Remote monitoring, deliveries | Monitor from anywhere, alerts | Requires strong home Wi-Fi |
Expert Tips for a Secure Garage Setup
Setting up your opener is only half the battle. Maintaining security is equally important. We spoke with certified garage door technicians to get their top advice.
“Always change your default PIN and use rolling-code remotes to prevent signal interception,” says Mark Stevens, a certified garage door technician with over 15 years of field experience. “Additionally, never leave your standard remote visibly hanging from your car’s rearview mirror. Thieves often break into cars just to steal the remote and gain access to the house.”
Pro Tip: Regularly inspect your safety sensors. They are located near the floor on both sides of the door track. Ensure they are perfectly aligned and free of spider webs or dirt. If the LED lights on the sensors are blinking, the door will not close.
Troubleshooting Common Setup Issues
Even with the best instructions, technology can be finicky. Here is how to solve common problems during the setup process.
- Door Reverses When Closing: This is almost always caused by misaligned safety sensors or incorrect down-force limits. Realign the sensors and slightly adjust the force screw.
- Remote Works Only Up Close: Your remote battery is likely dying. A weak battery cannot push the 315 MHz or 390 MHz signal across a long distance. It may also indicate metal interference near the motor antenna. Ensure the thin wire antenna is hanging straight down.
- myQ App Offline: If your smart opener drops offline, check your router. Chamberlain openers strictly require a 2.4 GHz Wi-Fi band. Many modern mesh routers separate 2.4 GHz and 5 GHz networks. You may need to log into your router settings to combine them or specifically connect the opener to the 2.4 GHz SSID.
FAQ: Frequently Asked Questions
Why won’t my Chamberlain remote program?
If your remote refuses to program, the most common culprit is a dead battery. Replace the remote battery with a fresh one. Additionally, ensure you are pressing the remote button within the 30-second window after pressing the Learn button. Finally, check if the remote’s frequency matches your opener’s Learn button color.
How do I reset my Chamberlain garage door opener?
To wipe all remotes and keypads from the system’s memory, locate the Learn button on the motor unit. Press and hold the button for about 6 to 10 seconds. Release it when the indicator LED turns off. You will need to reprogram all your devices afterward.
Can I use an old remote with a new Chamberlain opener?
It depends on the age of the remote. If your new opener has a yellow Learn button, it requires remotes manufactured after 2011. Older remotes (with red or green buttons) will not communicate with newer security protocols. You may need to purchase a universal Chamberlain remote or an adapter.
How do I sync my car’s built-in garage door opener (HomeLink)?
To program a HomeLink system in your vehicle:
- Clear the HomeLink buttons by holding the two outside buttons until the LED flashes.
- Hold your Chamberlain remote 1-3 inches from the HomeLink button.
- Simultaneously press the remote button and your chosen HomeLink button.
- Hold until the HomeLink LED changes from a slow blink to a rapid flash.
- Go to the garage motor unit, press the Learn button, and then press your new HomeLink button three times within 30 seconds.
What does it mean if the Learn button is blinking?
If the Learn button is blinking continuously, it usually indicates that the system is in programming mode or the lock feature on your wall console is activated. Check your multi-function wall control panel and ensure the lock button is not engaged. If it is not the lock feature, a power surge might have caused an error, requiring a system reset.
Leave a Reply