Introduction
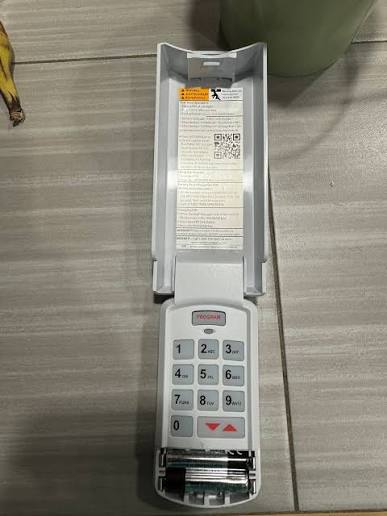
There are few things more frustrating than standing in your driveway, staring at a blank keypad, and wondering, “How do I actually get this thing to work?” Whether you have just installed a new wireless entry system or simply forgot your old code, figuring out how to program my keypad for my garage door opener is an essential skill for modern homeowners. This guide will walk you through the process safely and efficiently, turning that confusion into confidence so you can secure your home without calling a technician.
Understanding Your Garage Door Keypad System
Before pressing any buttons, it is vital to understand that not all keypads communicate with openers in the same way. The programming method depends entirely on the age and brand of your garage door opener motor unit. Generally, systems fall into two categories: those with a “Learn” button (manufactured after 1993) and older DIP switch systems.
According to industry safety standards outlined by the Consumer Product Safety Commission, proper programming also ensures that your safety reversal sensors remain functional. Never bypass safety features during programming. Taking five minutes to identify your opener type will save you hours of trial and error.
Identifying Your Opener’s Learn Button Color
The color of the learn button on your motor unit dictates the frequency and coding protocol. Check the back or side panel of your overhead motor:
- Yellow Learn Button: Security+ 2.0 technology (post-2011). Uses rolling codes for maximum security.
- Purple Learn Button: Security+ technology (2006–2014).
- Orange/Red Learn Button: Older Security+ systems (1997–2005).
- Green Learn Button: Very early models or specific commercial units.
Expert Tip: If you cannot locate the learn button, check the light lens cover. Many manufacturers hide the programming controls behind the plastic dome to prevent accidental resets.
Step-by-Step: How To Program My Keypad For My Garage Door Opener
This universal tutorial covers the vast majority of modern rolling-code openers (Chamberlain, LiftMaster, Craftsman, Genie). Always prioritize safety: ensure the garage door area is clear of people and pets before testing.
Step 1: Clear the Area and Prepare
Ensure nothing is obstructing the door’s path. Have a stepladder ready if your motor unit is mounted high. Write down your desired 4-digit PIN beforehand. Avoid using easily guessable codes like birth years or sequential numbers (e.g., 1234).
Step 2: Locate and Press the Learn Button
Find the colored learn button on your garage door opener motor unit. Press and release it firmly. You should see an LED indicator light turn on or begin blinking. You typically have 30 seconds to complete the next step before the system times out. If the light goes off, simply press the button again.
Step 3: Enter Your New PIN
Go to your exterior keypad. Type in your chosen 4-digit code clearly and deliberately. After entering the fourth digit, press and hold the ENTER button. Do not release it yet.
Step 4: Confirm the Programming Link
While holding ENTER, watch the motor unit lights. The LED should flash, or the overhead light bulbs should blink twice. You may also hear a distinct click from the logic board. Once you see/hear this confirmation, release the ENTER button. This signal confirms the keypad has successfully synced with the opener’s receiver.
Step 5: Test the System Thoroughly
Wait at least five seconds after releasing the button. Enter your new PIN and press ENTER. The door should activate immediately. Test it three times to ensure consistency. If the door does not respond on the first try but works on subsequent tries, re-program following the steps above, as the initial sync may have been incomplete.
Troubleshooting Common Programming Failures
Even professionals encounter hiccups. If your keypad refuses to pair, consult this diagnostic table before assuming hardware failure.
| Symptom | Probable Cause | Recommended Solution |
|---|---|---|
| Light blinks but door won’t move | Weak keypad battery | Replace with fresh 9V alkaline battery |
| No response at all | Out of range/signal interference | Reposition keypad; avoid metal obstructions |
| Works intermittently | Failing logic board capacitor | Professional inspection recommended |
| Code accepted then rejected | Rolling code desync | Clear all codes and reprogram from scratch |
| LED never illuminates | Dead battery or corroded contacts | Clean terminals; replace battery |
Note on Battery Life: Most wireless keypads require a 9V battery replaced every 12–18 months. Cold weather can temporarily reduce voltage output, causing programming failures in winter months. Always use premium alkaline batteries rather than rechargeable ones, as their lower nominal voltage (7.2V vs 9V) often fails to trigger the transmitter.
Security Best Practices After Programming
Successfully learning how to program my keypad for my garage door opener is only half the battle; maintaining security is equally important. Treat your garage keypad with the same vigilance as your front door lock.
- Change Codes Annually: Update your PIN at least once per year or immediately after moving into a new home. Previous owners, contractors, or neighbors may retain old codes.
- Avoid Shared Codes: Never give your primary entry code to service workers. Use temporary or guest codes if your keypad supports them.
- Inspect Physical Mounting: Ensure the keypad is securely fastened and shows no signs of tampering. Loose wiring or cracked housings can expose internal circuits to moisture damage.
- Disable Unused Remotes: Periodically clear all learned devices from your opener’s memory and re-add only active users. This eliminates orphaned access points.
Frequently Asked Questions (FAQ)
Can I program multiple PINs on a single keypad?
Most standard wireless keypads support only one active PIN at a time. However, premium models and smart garage controllers allow individual user codes. Check your specific model’s manual. If you need multi-user access, consider upgrading to a Wi-Fi-enabled keypad that integrates with smartphone apps for granular permission management.
Why did my programmed code stop working suddenly?
Sudden code failure usually indicates battery depletion, signal interference from new electronics, or an accidental factory reset of the opener. Power outages can also corrupt stored codes in older units. Start by replacing the battery, then reprogram. If problems persist, inspect the antenna wire on the motor unit for damage or disconnection.
Is it safe to program the keypad myself, or should I hire a pro?
DIY programming is completely safe and intended by manufacturers. No electrical work is involved since keypads are battery-operated and communicate wirelessly. However, if your opener lacks safety sensors, makes grinding noises, or has damaged springs, hire a certified technician. Programming should never be attempted on mechanically compromised systems.
How do I erase all existing codes before reprogramming?
Locate the learn button on your motor unit and hold it down for 6–10 seconds until the LED turns off completely. This wipes all paired remotes and keypads from memory. You must then reprogram every device you wish to keep. This is critical when moving into a previously owned home to eliminate unauthorized access.
Will programming a new keypad affect my existing remotes?
Standard programming adds a new device without disturbing existing ones. Only performing a full memory clear (long-press reset) will erase remotes. If you are simply adding a keypad via the normal learn-button sequence, your car visor remotes and interior wall consoles will continue functioning normally.
What if my opener doesn’t have a learn button?
Openers manufactured before 1993 use DIP switches instead of learn buttons. These require matching tiny toggle switch positions inside both the keypad and motor unit. Due to severe security vulnerabilities (fixed codes can be cloned), experts strongly recommend upgrading to a modern rolling-code system rather than continuing to use DIP-switch technology.
Conclusion
Mastering how to program my keypad for my garage door opener empowers you to maintain both convenience and security at your property. By correctly identifying your system type, following precise programming steps, and adhering to ongoing security practices, you transform a potentially confusing task into a simple maintenance routine. Remember that a well-programmed keypad is your first line of defense against unauthorized garage access.
Did this guide help you regain entry to your garage? Share this article on Facebook, X (Twitter), or Pinterest to help fellow homeowners avoid the frustration of being locked out. Your share could save someone a costly service call and restore their peace of mind today!
Leave a Reply