Introduction
There are few things more frustrating than pulling into your driveway in the rain, only to realize you still have to fumble with a clunky visor clip or wait for a passenger to open the door. If you are wondering how to program my car to the garage door opener, you are not alone; this is one of the most common automotive convenience questions searched today. Fortunately, syncing your vehicle’s built-in transmitter to your garage system is usually a simple process that takes less than ten minutes, restoring both security and seamless access to your home.
Understanding Your System Before You Start
Before pressing any buttons, it is vital to identify which technology your vehicle and garage door opener utilize. Not all systems communicate on the same frequency or protocol. According to Wikipedia, modern garage door openers typically operate using radio frequencies between 300 MHz and 400 MHz, though newer models use rolling code technology for enhanced security against signal interception.
Identifying Your Car’s Transmitter Type
Most vehicles manufactured after 2000 feature one of two integrated systems:
- HomeLink: The industry standard found in over 90% of new vehicles in the US. It usually consists of three buttons located on the rearview mirror, overhead console, or center stack.
- Car2U / X10: An older, less common system found in some early 2000s vehicles. These often require a different programming sequence and may not be compatible with newer rolling-code openers without an external adapter.
Checking Your Garage Door Opener Compatibility
Locate the “Learn” or “Smart” button on your garage door motor unit (usually hanging from the ceiling). The color of this button often indicates the frequency and coding type:
- Yellow/Orange: Typically Security+ 2.0 (newer rolling code).
- Purple: Security+ (older rolling code).
- Red/Orange: DIP switch or fixed code (pre-1996).
- Green: Older fixed code systems.
Expert Tip: Always check the manufacture date on your garage motor. If your opener was made before 1993, it likely lacks photo-eye safety sensors. Programming a car to these units is possible but upgrading the opener is strongly recommended for safety compliance.
Step-by-Step: How to Program My Car to the Garage Door Opener (HomeLink)
This tutorial covers the universal HomeLink method, which applies to the vast majority of US drivers. Ensure your car is parked outside the garage during programming to prevent accidental door movement.
Phase 1: Clear Previous Codes
If your vehicle is used or previously programmed, start fresh to avoid conflicts.
- Locate the two outer HomeLink buttons.
- Press and hold both simultaneously for 10–20 seconds.
- Watch the indicator light; when it changes from solid to rapidly flashing, release the buttons. The memory is now cleared.
Phase 2: Train the Vehicle Button
- Choose which of the three HomeLink buttons you wish to assign to your garage door.
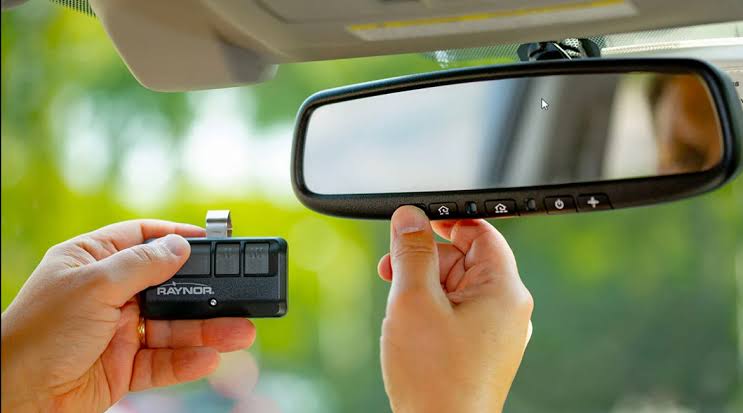
- Hold your original handheld garage remote 1–3 inches away from the HomeLink buttons.
- Simultaneously press and hold the chosen HomeLink button and your handheld remote button.
- Observe the HomeLink indicator light. It will flash slowly at first, then rapidly once it captures the signal. This can take anywhere from 5 to 30 seconds.
- Release both buttons once the rapid flash occurs.
Phase 3: Sync with Rolling Code Openers (Crucial Step)
If your garage opener has a “Learn” button, Phase 2 alone will not work. You must complete this handshake:
- Go to your garage door motor unit.
- Press the “Learn” or “Smart” button firmly. You typically have 30 seconds to complete the next step before the unit exits learning mode.
- Return to your vehicle and press the newly programmed HomeLink button firmly for 2 seconds, then release.
- Repeat the press-hold-release cycle up to three times. Some brands (like LiftMaster or Chamberlain) require multiple presses to finalize the rolling code sync.
- Test the button. The door should activate immediately.
Troubleshooting Common Programming Failures
Even with perfect execution, issues arise. Here is a data-driven breakdown of why programming fails and how to fix it.
| Symptom | Probable Cause | Solution |
|---|---|---|
| Light flashes rapidly but door doesn’t move | Rolling code sync incomplete | Re-do Phase 3; ensure you press within 30-second window |
| No light response during training | Dead remote battery or wrong frequency | Replace CR2032 battery in handheld remote; verify compatibility |
| Works intermittently | Signal interference or range issue | Reposition vehicle during programming; check for LED bulb interference |
| Programs but stops working after days | Capacitor failure in opener logic board | Professional diagnostic required; board may need replacement |
| HomeLink light never flashes | Module malfunction or fuse blown | Check vehicle fuse box; consult dealer for module reset |
The LED Bulb Interference Factor
A frequently overlooked issue involves LED lighting. Cheap or non-shielded LED bulbs installed in garage fixtures can emit RF noise that jams the 315/390 MHz spectrum. If your programming worked yesterday but fails today after changing a bulb, swap back to an incandescent or a garage-door-rated LED to test. Studies from major opener manufacturers indicate that up to 15% of intermittent signal issues stem from unshielded lighting.
Alternative Methods for Older Vehicles
If your car lacks HomeLink, you still have options for integrating how to program my car to the garage door opener functionality:
- Universal Visor Clips: These aftermarket remotes ($15–$25) mount permanently to your visor and mimic factory integration. They support both fixed and rolling codes.
- Smart Garage Controllers: Devices like myQ or Tailwind bypass car programming entirely. Instead, they connect your existing opener to Wi-Fi, allowing control via smartphone app or voice assistant. This is often superior for older cars because it adds remote monitoring and auto-close features that traditional car programming cannot offer.
- Dealer Retrofit Kits: Some manufacturers sell OEM-integrated HomeLink modules as accessories. Installation costs average $200–$400 but provides a factory-clean aesthetic.
Frequently Asked Questions (FAQ)
1. Can I program my car to the garage door opener without the original remote?
Yes, but only if your garage door opener has a functional “Learn” button on the motor unit. You can press the Learn button to put the opener in pairing mode, then follow the vehicle’s direct-to-opener programming sequence outlined in your owner’s manual. However, if neither the remote nor the Learn button works, you will need to replace the opener’s receiver or the entire unit.
2. Why does my HomeLink work for my garage but not my gate?
Gates often use different frequencies or proprietary protocols (like Linear Multi-Code) that differ from residential garage standards. Additionally, gates sometimes require a separate external antenna or relay module to interface with HomeLink. Check your gate operator’s manual specifically for “HomeLink compatibility” rather than assuming universal support.
3. Will programming my car erase my existing garage door remotes?
No. Programming a vehicle adds a new device to the opener’s memory; it does not delete others. Most modern openers store between 10 and 30 unique codes. However, if you perform a factory reset on the garage motor itself (holding the Learn button until the light goes out), that will erase all devices including your car.
4. How do I know if my car uses HomeLink or Car2U?
Check your owner’s manual or look for branding near the buttons. HomeLink is explicitly labeled. Car2U buttons are typically unlabeled or marked with generic icons. You can also visit the HomeLink compatibility checker online by entering your vehicle’s year, make, and model for definitive confirmation.
5. Is it safe to program my car while the garage door is closed?
It is safer to program with the door open or while parked outside. Accidental activation during the training phase can cause the door to reverse unexpectedly or strain the motor. Always keep people and pets clear of the door path during the entire programming process.
6. My car says “Training Complete” but the door won’t open. What now?
This almost always means you skipped the rolling code synchronization step (Phase 3 above). Fixed-code openers work immediately after training; rolling-code openers require the additional Learn-button handshake. Return to the motor unit and complete that step within the 30-second window. If it still fails, your vehicle may require a firmware update available through your dealership.
Conclusion
Learning how to program my car to the garage door opener transforms daily convenience and eliminates the clutter of extra remotes. By correctly identifying your system type, following the precise three-phase programming sequence, and understanding rolling code requirements, you can achieve reliable integration in under fifteen minutes. Remember that safety comes first—always program outdoors, verify sensor function, and don’t hesitate to consult a professional if electrical components seem faulty.
Found this guide helpful? Share it on Facebook, X (Twitter), or Pinterest to help fellow homeowners reclaim their driveway convenience! Tag a friend who’s still using that broken visor clip—they’ll thank you later. Safe driving and happy programming!
Leave a Reply