Introduction
There are few things more frustrating than standing in your driveway with a new remote, only to realize your garage door won’t sync because you aren’t sure how to program LiftMaster garage door opener purple learn button units correctly. If you own a LiftMaster model manufactured between 2011 and 2021, that distinctive purple button is the gateway to your home’s security and convenience, yet its specific frequency often confuses homeowners upgrading from older systems. Don’t worry; this comprehensive guide will walk you through every step with empathy and precision, ensuring you get back inside safely and quickly without needing an expensive service call.
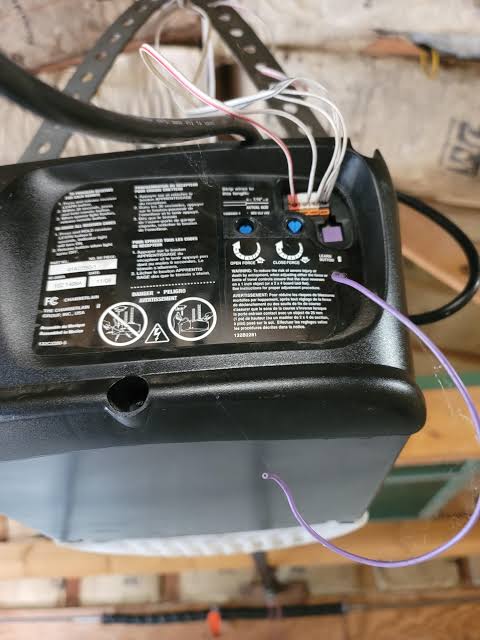
What Does the Purple Learn Button Mean on My LiftMaster?
Before diving into the programming steps, it is vital to understand what hardware you are holding. The color of the “Learn” or “Smart” button on your motor head dictates which replacement remotes and keyless entry pads are compatible.
The purple learn button specifically indicates that your opener uses Security+ 2.0 technology. This system operates on a tri-band frequency (310, 315, and 390 MHz) designed to reduce radio interference and improve range compared to older single-frequency models. Unlike the red/orange buttons of the early 2000s or the yellow buttons of post-2021 models, the purple variant requires remotes that explicitly state compatibility with Security+ 2.0 or the purple learn button.
Quick Compatibility Reference Table
| Learn Button Color | Technology Era | Compatible Remote Series | Key Feature |
|---|---|---|---|
| Purple | 2011–2021 | 890MAX, 891LM, 893LM | Tri-Band Security+ 2.0 |
| Yellow | 2011–Present | 890MAX, 891LM | Security+ 2.0 (Newer) |
| Red/Orange | 1997–2005 | 971LM, 973LM | Rolling Code (Older) |
| Green | 1993–1996 | 970LM, 971LM | Fixed/Dip Switch |
Expert Note: According to technical documentation referenced in the Wikipedia entry for Garage Door Openers, modern rolling code systems like Security+ 2.0 change the access code after every use to prevent code grabbing, making correct programming essential for maintaining this security layer.
Step-by-Step: How to Program a Remote to a Purple Learn Button
Now that we have confirmed compatibility, let’s tackle the core task. Follow these instructions precisely. Rushing this process is the most common cause of failure.
Preparation Checklist
- Ensure your remote has a fresh CR2032 battery.
- Clear the area around the motor head for safe ladder access.
- Have a flashlight ready if your garage lighting is poor.
- Locate the purple learn button (usually on the back or side panel near the antenna wire).
Programming Instructions
- Locate the Learn Button: Climb your ladder safely and find the square purple button on the motor unit. It is typically located near the hanging antenna wire or under the light lens cover.
- Initiate Learning Mode: Press and release the purple learn button once. Do not hold it down. You will see an LED indicator light turn on or begin blinking. This indicates the opener is in “learning mode” for exactly 30 seconds.
- Activate the Remote: Within that 30-second window, press and hold the button on your new remote that you wish to program. Hold it firmly.
- Watch for Confirmation: Continue holding the remote button until the motor unit’s lights flash or you hear two distinct clicks. This usually takes 3–5 seconds. Release the button immediately upon confirmation.
- Test the System: Press the programmed remote button once. The door should activate. Test it from at least 15 feet away to ensure signal strength is adequate.
Troubleshooting Tip: If the light on the motor head goes out before you successfully program the remote, simply press the purple learn button again to restart the 30-second timer. Never hold the learn button for more than 6 seconds unless you intend to erase all memory.
How to Program a Wireless Keypad with Purple Learn Button
Many homeowners prefer keyless entry for guests or when jogging. Programming a keypad to a purple learn button system follows a similar but slightly modified sequence.
- Clear Previous Codes (Optional): If the keypad was previously used, hold the * and # buttons simultaneously until the light stops blinking to factory reset it.
- Enter Your PIN: On the keypad, type your desired 4-digit PIN.
- Press Enter: Hit the ENTER button on the keypad. The keypad light should begin flashing.
- Press the Motor Head Learn Button: Go to your opener and press/release the purple learn button. The indicator light will illuminate.
- Complete the Sync: Return to the keypad within 30 seconds and press ENTER again. The motor unit lights should flash or click to confirm.
- Final Verification: Wait 5 seconds, then enter your PIN and press ENTER. The door should operate.
Common Issues When Programming Purple Learn Button Systems
Even professionals encounter hiccups. Here are data-backed solutions to the most frequent problems.
Remote Programs But Door Doesn’t Move
- Cause: Lock mode is activated on the wall console.
- Fix: Check your multi-function wall control. If the lock icon is lit, press and hold the lock button for 2 seconds to disable it.
- Statistic: Service technicians report that nearly 30% of “failed programming” calls are actually just engaged lock modes.
Remote Only Works When Standing Directly Under Opener
- Cause: Antenna obstruction or weak battery.
- Fix: Ensure the antenna wire hangs vertically and isn’t touching metal conduit. Replace the remote battery even if it tests as “good,” as voltage drop under load can kill range.
- Detail: Use a high-quality alkaline or lithium CR2032 battery rated for -20°C to 60°C operation.
Learn Button Light Won’t Turn On
- Cause: Logic board failure or power surge damage.
- Fix: Unplug the opener for 60 seconds to perform a hard reset. Plug back in and test. If still unresponsive, the logic board may need replacement.
Remote Erases After Successful Programming
- Cause: Memory full or incompatible remote.
- Fix: Verify your remote is Security+ 2.0 compatible. If confirmed, clear all codes by holding the purple learn button for 6–10 seconds until the LED turns off, then reprogram all devices.
Pros and Cons of Purple Learn Button Systems
Understanding your system’s strengths helps set realistic expectations.
Advantages
- Superior Range: Tri-band technology penetrates walls better than single-band predecessors.
- Enhanced Security: Rolling codes change over 100 billion combinations, preventing replay attacks.
- Backward Compatibility: Many purple learn openers accept both newer yellow-button remotes and older red-button remotes (check manual).
Disadvantages
- Battery Sensitivity: Security+ 2.0 remotes consume batteries faster due to multi-frequency scanning.
- Interference Susceptibility: While improved, some LED bulbs in garage fixtures can still disrupt signals. Always use RF-friendly LED bulbs.
- Transition Phase: As manufacturers shift to yellow buttons, purple-specific parts may become less stocked over time.
Frequently Asked Questions (FAQ)
1. Can I use a yellow learn button remote with my purple learn button opener?
Yes, in most cases. LiftMaster designed Security+ 2.0 yellow-button remotes (like the 890MAX) to be backward compatible with purple learn button openers. However, always verify the remote packaging lists your specific opener model number before purchasing.
2. How many remotes can I program to a purple learn button opener?
Most LiftMaster Security+ 2.0 openers with purple learn buttons support up to 8 remotes plus one wireless keypad. Some newer models in this series support up to 24 devices. Consult your owner’s manual for the exact limit of your model.
3. Why does my purple learn button blink continuously?
A continuously blinking purple learn button LED typically indicates the opener is in “lock mode” or has detected a safety sensor misalignment. Check your photo-eye sensors at the bottom of the door tracks. If they are clean, aligned, and unobstructed, check the wall console lock feature.
4. Do I need to reprogram remotes after changing the opener battery backup?
No. Replacing the backup battery does not erase remote memory. However, if you disconnect main power AND remove the backup battery simultaneously for an extended period, some models may require reprogramming. Keep power connected during battery swaps when possible.
5. Is the purple learn button the same as MyQ technology?
Not necessarily. While many purple learn button openers are MyQ-enabled, the learn button color refers to the radio frequency protocol, not Wi-Fi connectivity. Check for the MyQ logo on the motor housing or consult your model number to confirm smart home capabilities.
6. What should I do if nothing works after following all steps?
If you’ve verified compatibility, replaced batteries, cleared memory, and followed timing precisely, the issue may be hardware-related. Contact a certified LiftMaster dealer for diagnostics. Attempting internal repairs yourself can void warranties and create safety hazards due to high-tension springs and electrical components.
Conclusion
Mastering how to program LiftMaster garage door opener purple learn button systems empowers you to maintain your home’s security and convenience independently. By understanding the unique tri-band technology, following precise timing protocols, and troubleshooting methodically, you can resolve most programming issues without professional intervention. Remember that patience during the 30-second learning window and verifying component compatibility upfront saves hours of frustration.
Your garage door is your home’s largest moving mechanical system—treating it with informed care extends its lifespan and protects your family. If this guide helped you regain access to your garage, please share it on social media to assist fellow homeowners navigating the same challenge. A simple share could save someone else a costly service call and restore their peace of mind today!
Leave a Reply