Introduction
There is nothing quite as frustrating as pulling into your driveway after a long day, only to realize you still have to fumble for a plastic remote or manually enter a keypad code. If you are a new owner wondering how to program garage door opener in Tesla Model S, you are not alone; many drivers find the transition from traditional remotes to the integrated touchscreen interface slightly confusing at first. Fortunately, Tesla’s Homelink system is designed to streamline your entry experience, and with the right guidance, you can sync your vehicle to your home automation system safely and quickly.
Understanding Tesla Homelink Technology
Before diving into the programming steps, it is essential to understand what makes the Tesla system unique compared to legacy vehicles. Unlike older cars that use physical buttons on the rearview mirror, the Tesla Model S utilizes a software-based Homelink interface integrated directly into the central touchscreen. This system acts as a universal transceiver, capable of communicating with most modern garage door openers, gates, and even some smart lighting systems.
According to technical documentation and general automotive standards outlined by Wikipedia, Homelink technology supports three primary types of signals: fixed-code, rolling-code, and smart synchronization. The Tesla Model S is equipped with hardware that supports all three, making it compatible with over 95% of garage door openers manufactured in the last two decades. However, because there is no physical button to press during setup, the entire process relies on precise touchscreen navigation and timing.
Why Your Model S Might Not Have Homelink
It is worth noting that not every Tesla Model S comes with Homelink pre-installed. Vehicles produced before late 2019 often required an aftermarket retrofit kit. If you navigate to Controls > Homelink and do not see the option, your vehicle may require a service center installation. Always verify your hardware status before attempting to purchase additional accessories.
Step-by-Step: How to Program Garage Door Opener in Tesla Model S
This tutorial assumes your vehicle is parked outside the garage with the front bumper aligned within 6–12 inches of the garage door motor. Safety first: ensure no people or pets are near the moving door mechanism during testing.
Step 1: Prepare Your Equipment
Gather the following items before starting:
- Your existing handheld garage door remote (with fresh batteries).
- A ladder or step stool to reach the “Learn” button on the garage motor unit.
- Your Tesla Model S key card or phone key to maintain power/access.
- The user manual for your specific garage door opener brand (LiftMaster, Chamberlain, Genie, etc.).
Step 2: Access the Homelink Menu
Sit in the driver’s seat and turn on the vehicle. On the central touchscreen:
- Tap the Car Icon (Controls) at the bottom left.
- Select Homelink from the menu list.
- Tap Create New Homelink Device.
- Enter a recognizable name (e.g., “Home Garage,” “Office Gate”) and tap Create.
Step 3: Choose Your Programming Mode
The screen will present three options. Selecting the correct one is critical for success:
| Mode | Best For | Key Characteristic |
|---|---|---|
| Standard | Most modern openers with a “Learn” button | Uses rolling code security; requires pressing motor learn button |
| D-Mode / UR-Mode | Older European/Asian gates or DIP switches | Fixed code; uses remote-to-car signal transfer |
| Smart Controller | Internet-connected smart openers | Wi-Fi integration; no RF programming needed |
For 90% of US homeowners, Standard Mode is the correct choice.
Step 4: Execute Standard Mode Programming
If you selected Standard Mode, follow these precise actions:
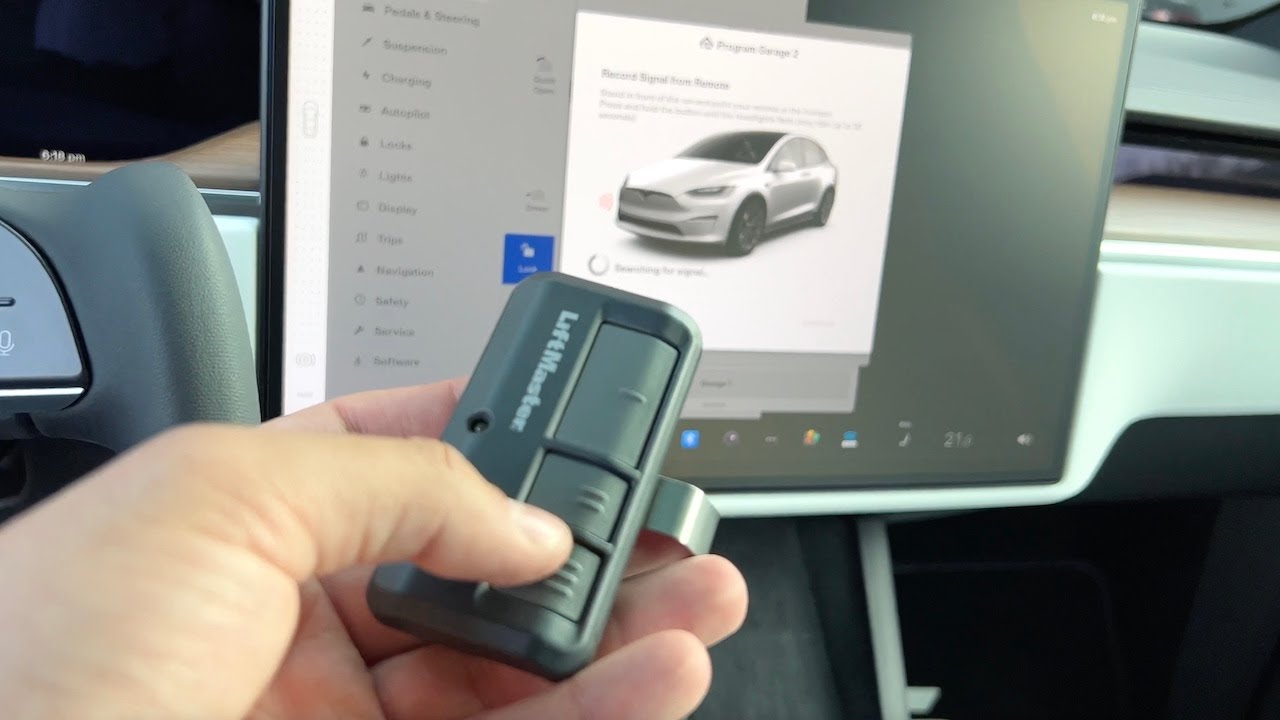
- Press and Hold the button on your original handheld remote while pointing it at the front bumper of the Tesla. Keep holding until the Tesla screen indicates it has detected the signal (usually 2–5 seconds).
- Immediately walk to your garage motor unit and locate the “Learn” or “Smart” button. This is typically yellow, purple, orange, or red and located on the back or side panel.
- Press and release the Learn button once. The indicator light on the motor should begin blinking or turn solid.
- Return to the Tesla within 30 seconds. Tap Continue on the touchscreen.
- Test the system by tapping the newly created Homelink icon on your screen. The door should activate.
Pro Tip: If the door does not respond on the first try, repeat Step 4 but hold the original remote closer to the center of the front bumper, as the receiver antenna location varies slightly between Model S refresh years.
Step 5: Configure Auto-Open and Auto-Close Features
One of the greatest advantages of learning how to program garage door opener in Tesla Model S is enabling geofencing automation. After successful programming:
- Go back to the Homelink menu.
- Toggle Auto-Open when Arriving and set your preferred distance (typically 10–20 feet).
- Toggle Auto-Close when Leaving to ensure security.
- Enable Fold Mirrors if you want your side mirrors to tuck automatically upon arrival.
Safety Warning: Only enable Auto-Close if your garage door opener has functional safety sensors and obstruction detection. Never rely solely on GPS auto-close if children or pets frequently play near the driveway.
Troubleshooting Common Programming Failures
Even experienced technicians encounter hiccups. Here are data-backed solutions for the most frequent issues:
- Signal Not Detected: The Tesla’s receiver is located behind the front bumper. Ensure you are within 6 inches of the bumper center. Replace the battery in your original remote; weak batteries cause 40% of initial programming failures.
- Door Opens but Won’t Close via Auto-Close: This is usually a safety sensor misalignment. Check that the photo-eye sensors at the base of your garage tracks are clean and perfectly aligned. Modern openers disable remote closing if sensors detect faults.
- Homelink Works Intermittently: Radio frequency interference from LED bulbs, solar inverters, or nearby cell towers can disrupt signals. Try replacing garage LED bulbs with RF-shielded models rated for garage door compatibility.
- Rolling Code Desync: If the system worked previously but suddenly stopped, the rolling codes may be out of sync. Perform a full reset by deleting the device in Tesla settings and reprogramming from scratch using Step 4 above.
FAQ: Programming Garage Door Openers in Tesla Model S
Can I program my Tesla Model S without the original garage remote?
In most cases, no. Standard mode programming requires the original remote to transmit the rolling code seed to the vehicle. However, if your opener supports Wi-Fi smart controllers (like MyQ or Tailwind), you can integrate via the Smart Controller mode without a physical remote. Alternatively, a professional locksmith or garage technician can clone your existing transmitter.
How many devices can the Tesla Model S Homelink store?
The Tesla Model S can store up to three distinct Homelink devices. This allows you to program your home garage, office parking gate, and a vacation property simultaneously. Each device operates independently with its own geofence settings.
Is it safe to use Auto-Close when leaving home?
Yes, provided your garage door opener was manufactured after 1993 and has functioning safety reversal sensors. Tesla includes multiple confirmation prompts and audible warnings before auto-closing. However, experts recommend disabling this feature if your driveway slopes steeply or if GPS accuracy in your area is inconsistent.
Will programming Homelink void my Tesla warranty?
Absolutely not. Homelink is either factory-installed equipment or an official Tesla-approved accessory. Using the built-in programming features as described in the owner’s manual is fully covered under warranty. Only unauthorized electrical modifications would risk coverage.
Why does my Homelink work manually but not with Auto-Open?
GPS-based automation requires a strong satellite signal and accurate saved coordinates. If you recently moved or updated firmware, delete the existing Homelink device and recreate it to refresh the geofence coordinates. Also, ensure Location Services are enabled for the Tesla app and vehicle.
Can I program community gate access cards to my Tesla?
Generally, no. Community gates often use RFID card readers or proprietary encrypted frequencies that differ from standard residential garage door protocols. Some newer Tesla models support specific RFID integrations, but most community gates require a separate transponder sticker placed on your windshield.
Conclusion
Mastering how to program garage door opener in Tesla Model S transforms your daily routine from a multi-step chore into a seamless, automated experience. By understanding the difference between Standard and D-Mode programming, positioning your vehicle correctly during setup, and leveraging smart geofencing features responsibly, you unlock the full convenience of Tesla ownership. Remember to always prioritize safety sensor verification and keep your original remote as a backup during the learning curve.
Now that your garage is synced, why stop there? Share this guide with fellow Tesla owners in your community who might still be reaching for that old plastic remote! Tag us on social media with your Homelink setup success stories, and help others discover the effortless entry experience they deserve. Safe driving and happy automating!
Leave a Reply