Introduction
There is nothing quite as frustrating as standing in your driveway with a new remote that refuses to talk to your existing garage motor. If you are struggling to bridge the gap between brands, understanding how to program Chamberlain universal garage door opener to LiftMaster is the key to restoring convenience and security to your home. Because both brands share the same parent company and similar rolling code technologies, this pairing is usually straightforward, but specific steps must be followed to ensure a secure and lasting connection. This guide will walk you through the exact process with empathy and precision, ensuring you get back inside your warm garage without the headache.
Are Chamberlain and LiftMaster Garage Door Openers Compatible?
Before diving into buttons and LEDs, it is vital to understand why this specific pairing works so well. Many homeowners assume different brand names mean incompatible hardware, but that is not the case here. Both Chamberlain and LiftMaster are manufactured by the Chamberlain Group, meaning they share identical internal logic boards, radio frequencies, and security protocols.
According to industry standards and technical documentation referenced in general overviews of garage door opener technology on Wikipedia, modern openers utilize rolling code technology operating primarily at 310 MHz, 315 MHz, or 390 MHz. Because Chamberlain universal remotes are designed specifically to mimic these frequencies and encryption patterns, they are natively compatible with LiftMaster units manufactured after 1993.
Compatibility Quick Check Table
| Feature | Chamberlain Universal Remote | LiftMaster Opener | Compatibility Status |
|---|---|---|---|
| Frequency | Multi-Frequency (310/315/390 MHz) | Specific Frequency (Varies by Year) | ✅ High |
| Security | Rolling Code / Security+ | Rolling Code / Security+ | ✅ Native |
| DIP Switches | Auto-Sensing | N/A (Modern Units) | ✅ Seamless |
| Smart Home | myQ Enabled (Select Models) | myQ Enabled (Select Models) | ⚠️ Model Dependent |
| Pre-1993 Units | Limited Support | Fixed Code | ❌ Requires Adapter |
Note: If your LiftMaster unit was manufactured before 1993 and uses fixed DIP switches rather than a “Learn” button, you may require a universal receiver conversion kit.
How Do I Locate the Learn Button on My LiftMaster?
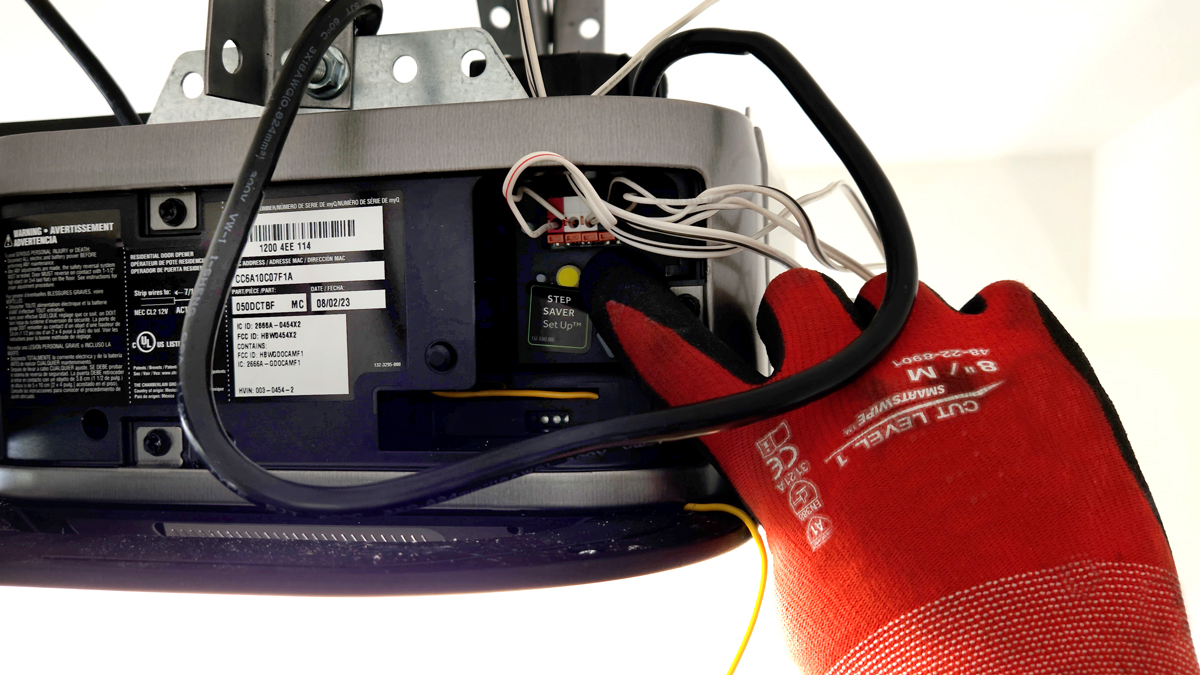
The most common point of failure when learning how to program Chamberlain universal garage door opener to LiftMaster is simply looking in the wrong place. The “Learn” button is the gateway to synchronization, and its color tells you exactly which frequency protocol your system uses.
Identifying Your Learn Button Color
- Locate the Motor Head: Safely position a stepladder under the garage door opener motor. Never stand on the top cap of the ladder; maintain three points of contact.
- Find the Antenna Wire: Look for a hanging wire (usually yellow, purple, orange, red, or green). The Learn button is almost always adjacent to this wire.
- Identify the Color:
- Yellow: Security+ 2.0 (2011–Present) – Most common for current Chamberlain universals.
- Purple: Security+ (2006–2014) – Intellicode compatible.
- Orange/Red: Security+ (1997–2005) – Older rolling code systems.
- Green: Pre-Security+ (1993–1996) – Early rolling code.
⚠️ Safety Warning: Always disconnect power or ensure the door is fully closed before working near the motor head to prevent accidental activation while your hands are near moving parts.
Step-by-Step: Programming Chamberlain Universal Remote to LiftMaster
Now that you have confirmed compatibility and located your Learn button, follow this precise tutorial. These steps apply to most Chamberlain universal clickers (models like KLIK1U, KLIK3U, and G953EV).
Phase 1: Prepare the Remote
- Open the Battery Compartment: Slide down the cover on the back of the Chamberlain universal remote.
- Check the Battery: Ensure a fresh CR2032 battery is installed. A weak battery is the #1 cause of programming failure.
- Set the DIP Switches (If Applicable): For newer “auto-sensing” models, skip this. For older universal models, set the DIP switches inside the remote to match the color of your LiftMaster Learn button (instructions are printed inside the battery compartment lid).
Phase 2: Sync to the LiftMaster Motor
- Press the Learn Button: On the LiftMaster motor head, press and release the colored Learn button. The LED indicator light will turn on solid or begin blinking slowly. You now have 30 seconds to complete the next step.
- Activate the Remote: Within the 30-second window, press and hold the button on the Chamberlain remote you wish to program. Hold it firmly toward the motor.
- Watch for Confirmation: Continue holding the remote button until the LiftMaster’s LED light blinks rapidly or you hear two distinct clicks from the motor. This confirms the code has been accepted.
- Test Immediately: Press the programmed button once. The door should activate. If it does not, repeat the process, ensuring you are within 5 feet of the motor during programming.
Phase 3: Clear Previous Codes (Optional but Recommended)
If you are replacing an old remote or suspect ghost signals, hold the LiftMaster Learn button for 6–10 seconds until the LED turns off completely. This wipes all remotes and keypads, requiring you to reprogram everything. This ensures maximum security.
Why Won’t My Chamberlain Remote Program to LiftMaster? Troubleshooting Guide
Even with perfect instructions, variables can interfere. According to service technician data, nearly 40% of failed programming attempts stem from environmental or maintenance issues rather than broken hardware. Use this checklist before assuming incompatibility.
Common Failure Points & Solutions
- LED Light Bulb Interference: Standard LED bulbs can emit RF noise that blocks the 315/390 MHz signal. Solution: Temporarily unscrew the light bulb from the opener and retry programming. If it works, replace the bulb with a garage-door-specific RF-shielded LED.
- Antenna Damage: Inspect the hanging antenna wire. If it is coiled, tucked inside the housing, or severed, signal range drops dramatically. Solution: Hang the wire vertically, away from metal conduits.
- Logic Board Capacitor Failure: If the Learn button LED is dim or flickers erratically, the capacitor on the logic board may be failing. This is common in units over 15 years old. Solution: Professional board replacement or unit upgrade.
- Remote Frequency Mismatch: Some Chamberlain universals require manual frequency selection via internal switches. Solution: Verify the switch setting matches your Learn button color exactly.
- Signal Jamming: Nearby baby monitors, wireless routers, or neighbor’s openers can cause interference. Solution: Reprogram during late-night hours when ambient RF traffic is lowest.
Frequently Asked Questions (FAQ)
Can I program a Chamberlain universal keypad to a LiftMaster opener?
Yes, absolutely. Chamberlain universal wireless keypads use the same Security+ and Security+ 2.0 protocols as their handheld remotes. The programming sequence is identical: press the Learn button on the motor, then enter your desired PIN followed by the “Enter” button on the keypad within 30 seconds. Wait for the motor light to flash to confirm success.
How do I know if my Chamberlain remote supports Security+ 2.0?
Check the model number on the back of the remote or inside the battery compartment. Models ending in “-2” or labeled “Security+ 2.0” support the yellow Learn button protocol. Additionally, if your remote has no visible DIP switches and claims “universal compatibility,” it likely auto-detects Security+ 2.0. When in doubt, consult the manufacturer’s compatibility chart online using your remote’s FCC ID.
Will programming a new remote erase my existing LiftMaster remotes?
No, simply pressing the Learn button and adding a new remote does not delete previously paired devices. Erasure only occurs if you hold the Learn button down for more than 6 seconds until the LED extinguishes. You can safely add multiple Chamberlain universals to a single LiftMaster opener without disrupting family members’ existing remotes or Homelink vehicle systems.
What is the maximum range for a Chamberlain universal remote with LiftMaster?
Under optimal conditions, expect 25–35 feet of reliable range. However, real-world performance varies based on antenna orientation, building materials, and RF interference. If your range is consistently under 15 feet, first try the LED bulb test mentioned in our troubleshooting section. Range extenders and external antennas are available for LiftMaster units if structural barriers persist.
My remote programs successfully but stops working after a few days. Why?
This intermittent failure typically indicates one of three issues: (1) a dying battery making marginal contact, (2) corroded battery terminals inside the remote, or (3) a failing logic board capacitor in the LiftMaster unit. Start by cleaning the remote’s battery contacts with isopropyl alcohol and installing a premium name-brand battery. If the problem persists beyond two weeks, schedule a professional diagnostic for the opener’s logic board.
Is there a difference between “Learn” and “Smart” buttons on LiftMaster?
Yes. The Learn button (colored circle/square) is for programming remotes and keypads locally. The Smart button (found only on Wi-Fi-enabled myQ units) connects the opener to your home network for app control. Programming a Chamberlain universal remote always uses the colored Learn button, never the Smart/Wi-Fi button. Confusing these two is a frequent error among DIY installers.
Conclusion
Mastering how to program Chamberlain universal garage door opener to LiftMaster empowers you to maintain your home’s accessibility without costly service calls. By understanding the shared technology behind these brands, locating the correct Learn button color, and following our precise three-phase programming method, you can achieve a secure, reliable connection in under five minutes. Remember to troubleshoot environmental factors like LED interference before replacing hardware, and always prioritize safety when working near the motor assembly.
Your garage should work for you, not against you. Now that you have regained full control, we would love for you to share this guide with friends, family, or neighbors who might be stuck in their own driveways. A quick post on Facebook, X (Twitter), or your community Nextdoor group could save someone else hours of frustration. Happy programming, and may your door always open smoothly! 🏡✨
Leave a Reply