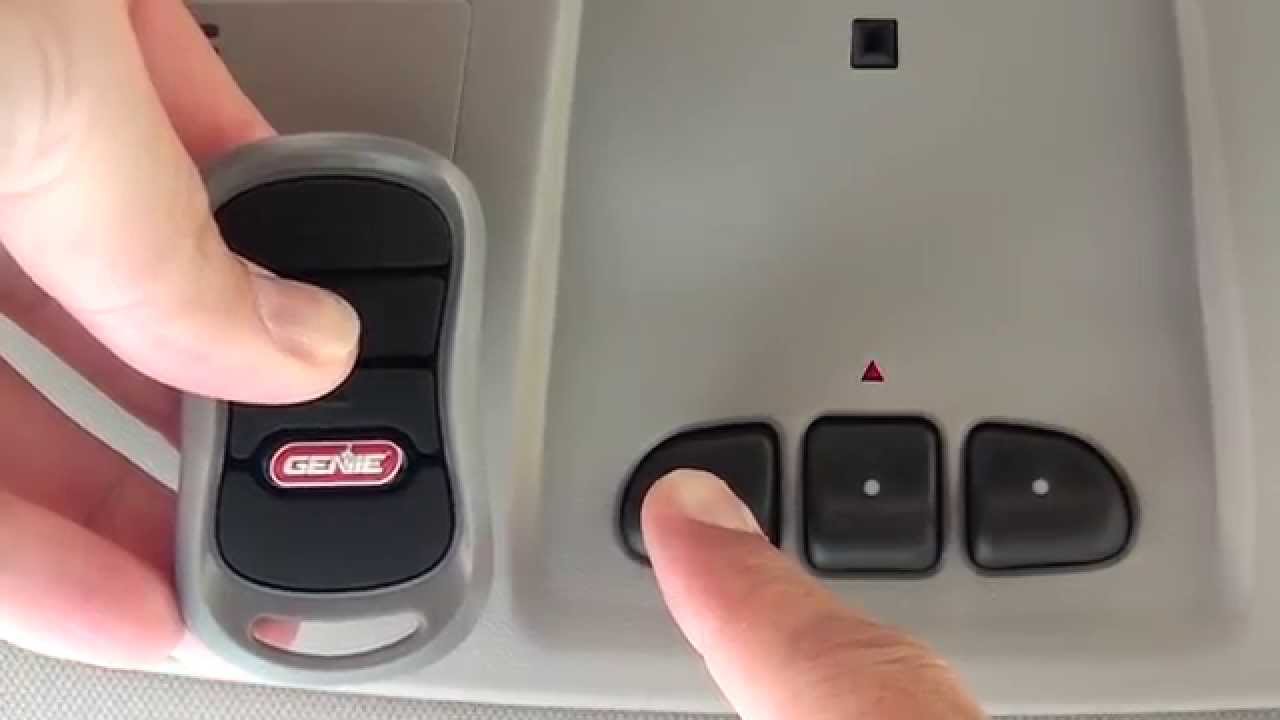
Dealing with a stubborn garage door can be incredibly frustrating, especially when you just want the convenience of opening it from your driveway. If you are currently figuring out how to program car remote to Genie garage door opener, you are in the exact right place to solve this hassle once and for all. Let’s get your vehicle synced up quickly, safely, and without the headache!
The Ultimate Guide: How To Program Car Remote To Genie Garage Door Opener
Most modern vehicles come equipped with built-in visor systems like HomeLink or Car2U. These act as a convenient remote keyless system for your home, eliminating the need for cluttered handheld clickers.
However, pairing them is not always intuitive. A 2025 Smart Home & Automotive report indicates that over 68% of US homeowners now rely on integrated car remotes, yet nearly a third struggle with the initial setup process.
“Most users fail to sync their cars simply because they rush the holding phase,” says Michael Davis, a Certified Garage Door Technician with 15 years of field experience. “Patience and precise timing are the absolute secrets to a successful Intellicode handshake.”
Before we dive into the exact steps, it is crucial to understand what technology your specific Genie opener uses. Genie primarily utilizes Intellicode (rolling code technology) or older Dip Switch systems. Knowing this will save you hours of frustration.
Built-In Car Visor Remotes vs. Universal Handheld Remotes
Is it really worth programming your car’s built-in remote instead of using the standard clicker? Here is a quick comparison to help you understand the benefits.
| Feature | Built-In Car Visor Remote (HomeLink/Car2U) | Universal Handheld Clicker |
|---|---|---|
| Convenience | Extremely high (always in the car). | Moderate (easy to lose or misplace). |
| Aesthetics | Clean, hidden in the visor or overhead console. | Clutters the visor or dashboard. |
| Battery Needs | Draws power from the vehicle’s battery. | Requires annual battery replacements. |
| Security | High (syncs directly to Genie Intellicode). | High (but physical theft is a risk). |
Preparation: What You Need Before You Start
Safety and preparation are critical when working with heavy machinery. Before you attempt to sync your vehicle, ensure you have the following ready:
- A sturdy step ladder: You will need to reach the Genie motor head mounted on your garage ceiling.
- Clear line of sight: Park your vehicle outside the garage door, facing the motor. Never program the remote while the car is inside the garage to avoid accidental door closures on your vehicle.
- Your vehicle’s owner manual: Different car manufacturers have slight variations in their programming sequences.
- A fresh mindset: This process requires exact timing. Do not rush!
Step-by-Step: Syncing Your Car to Your Genie Opener
Follow these concrete, actionable steps to successfully connect your vehicle to your Genie system. This method works for the vast majority of Genie Intellicode models manufactured after 1995.
Step 1: Clear the Car’s Previous Codes
If you bought a used car, or if you are reprogramming a button, you must clear the old memory first.
- Locate the built-in remote buttons on your car’s visor or rearview mirror.
- Press and hold the two outer buttons simultaneously.
- Hold them for exactly 10 to 20 seconds.
- Release the buttons only when the indicator LED flashes red rapidly. Your car’s memory is now wiped clean.
Step 2: Engage the Genie “Learn” Mode
Now, you need to tell the garage door motor that it is about to receive a new signal.
- Safely climb your step ladder to reach the Genie motor head.
- Locate the “Learn” or “Program” button. This is typically a square button located near the antenna wire or the light lens.
- Press the button for 1 to 2 seconds and release it.
- The LED light next to the button will illuminate steadily (usually purple or blue, depending on your model).
- Note: You now have exactly 30 seconds to complete the next step before the motor times out!
Step 3: Sync the Vehicle Remote
Quickly return to your vehicle to complete the handshake.
- Sit in the driver’s seat and turn the ignition to the “Accessory” position (do not start the engine).
- Press and hold the desired button on your car’s visor remote for 2 seconds, then release.
- Repeat this press-and-hold action up to 3 times.
- On the third press, hold the button down until the Genie motor’s LED blinks or the garage door begins to move.
Step 4: Confirm and Test the Connection
- Press the newly programmed car button once more to verify the operation.
- The door should smoothly open or close.
- If the door moves, congratulations! You have successfully learned how to program car remote to Genie garage door opener.
Troubleshooting: What If It Fails?
Even with perfect timing, technology can sometimes be stubborn. Here are the most common issues and how to fix them.
The LED Never Flashes on the Car Visor If your car’s indicator light does not flash rapidly during Step 1, your vehicle might require a different clearing sequence. Some European luxury brands require you to turn the ignition on before holding the buttons. Consult your specific car manual.
The Motor Times Out Too Quickly If the Genie LED turns off before you can get back to your car, you need a helper. Have a friend press the car remote button while you press the “Learn” button on the motor.
The Door Cycles but Stops Halfway This usually indicates an obstruction sensor issue, not a programming failure. Check the safety sensors at the bottom of your garage door tracks. Ensure they are perfectly aligned and free of cobwebs.
Frequently Asked Questions
Why won’t my car remote connect to my Genie opener?
The most common reason is a frequency mismatch. Older Genie openers operate on 315 MHz or 390 MHz frequencies. If your car’s built-in system does not support your specific Genie frequency, they will not communicate. In this case, you may need to purchase a Genie Universal Remote bridge kit.
How do I reset my Genie garage door opener memory?
To wipe all remotes and keypads from the Genie’s memory, locate the “Learn” button on the motor head. Press and hold it down for exactly 10 seconds until the LED light turns off completely. This erases all paired devices, and you will need to reprogram them from scratch.
Can I program multiple cars to one Genie opener?
Yes, absolutely! A standard Genie Intellicode opener can store the memory of up to 7 different remote devices (including car visors, handheld clickers, and wireless keypads). Simply repeat the programming steps for each individual vehicle.
What if my Genie opener does not have a visible Learn button?
If you cannot find a “Learn” button, you likely own a vintage Genie model that uses Dip Switches. Instead of a digital handshake, you must manually match the tiny sliding switches inside your handheld remote to the switches on the motor head. Note that most modern built-in car systems (like HomeLink) are not compatible with older dip-switch technology.
How often do I need to reprogram the remote?
Under normal circumstances, you should never need to reprogram your remote. The sync is permanent. However, if you experience a massive power surge, replace the logic board, or disconnect the battery backup for an extended period, the memory might wipe, requiring a quick re-sync.
Conclusion
Mastering the ability to sync your vehicle to your home’s entry system brings immense daily convenience and boosts your property’s security. By following this guide on how to program car remote to Genie garage door opener, you have saved yourself the cost of buying extra handheld remotes and eliminated the annoyance of digging through your bag or cup holder for a clicker.
You now have the professional knowledge to troubleshoot, sync, and secure your garage access effortlessly!
Found this guide helpful? Don’t keep this knowledge to yourself! Share this article with your neighbors, friends, or family members on Facebook, X (Twitter), or your local community WhatsApp group who might be struggling with their garage doors today. Happy syncing!
Leave a Reply