Introduction
There are few things more frustrating than standing in your driveway with groceries in hand, only to realize your garage door remote has stopped working. If you own an older system, figuring out how to program a Legacy Overhead Door garage door opener can feel like solving a complex puzzle without the instruction manual. We understand that dealing with aging technology is stressful, but restoring access to your home doesn’t have to be a headache. This comprehensive guide will walk you through the exact steps to get your system running smoothly again, ensuring you regain secure and reliable entry to your garage.
Understanding Your Legacy Overhead Door System
Before grabbing a ladder, it is vital to identify exactly which generation of opener you possess. “Legacy” in the Overhead Door ecosystem typically refers to models manufactured between the late 1990s and the mid-2010s, specifically those utilizing CodeDodger security technology rather than modern Wi-Fi-enabled smart systems.
According to industry standards documented on Wikipedia, rolling code technology became mandatory in North America after 1996 to prevent unauthorized access via code grabbing. Most Legacy Overhead Door openers use either CodeDodger 1 (315 MHz) or CodeDodger 2 (315/390 MHz dual-frequency). Identifying this distinction is crucial because the programming sequences differ slightly between the two. Check the motor head unit for a label indicating “CodeDodger,” “Series II,” or specific model numbers like the 450, 550, or 696 series.
Why Identification Matters
- Safety Sensors: Post-1993 models require functional photo-eye sensors to program successfully.
- Frequency Compatibility: Using a 390 MHz remote on a 315 MHz-only receiver will fail.
- Button Configuration: Older units may have three buttons (Learn, Up, Down), while newer legacy models often feature a single square “Program” button.
Safety First: Pre-Programming Checklist
Programming involves moving mechanical parts and working near electricity. Never bypass safety protocols.
- Clear the Area: Ensure no people, pets, or objects are in the path of the door.
- Test Manual Operation: Disconnect the opener and lift the door manually. It should move smoothly with minimal effort. If it is heavy or sticks, do not program; call a technician for spring or track repair first.
- Check Sensor Alignment: The LED lights on the bottom sensors should be solid (not blinking). Blinking lights indicate misalignment or wiring issues that will block programming.
- Fresh Batteries: Always install new batteries in your remote before starting. Weak signals are the #1 cause of failed programming attempts.
Step-by-Step: How to Program a Legacy Overhead Door Garage Door Opener Remote
This section covers the most common method for CodeDodger-equipped Legacy openers with a dedicated “Learn” or “Program” button.
Step 1: Locate the Learn Button
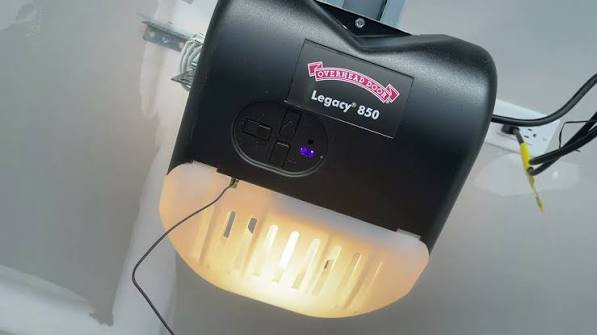
Find the square or round button on the back or side of the motor head. It is usually labeled “LEARN,” “PROGRAM,” or indicated by a small LED light. On some Series II models, this may be behind the lens cover.
Step 2: Initiate Learning Mode
Press and release the Learn button. The indicator LED will begin to blink (usually purple or red, depending on the model). You now have 30 seconds to complete the next step before the system times out.
Step 3: Transmit the Signal
Hold your remote 6–12 inches from the antenna wire. Press and hold the button you wish to program. Watch the motor head LED:
- Solid Light: Indicates successful programming.
- Rapid Flashing: Confirms signal reception.
- No Change: Try fresh batteries or verify frequency compatibility.
Step 4: Verify Operation
Press the programmed button once. The door should activate. Test from increasing distances (10 ft, 20 ft, 50 ft) to ensure range is adequate.
Expert Tip: If programming multiple remotes, repeat Steps 2–3 for each device within the 30-second window. Do not press the Learn button again between remotes, as this clears previously stored codes on some older firmware versions.
Programming Wireless Keyless Entry Pads
Keypads add convenience but require a separate sequence. Here is the standard protocol for Legacy Overhead Door wireless keypads (Model O3T-BX or similar):
- Press the Learn button on the motor head until the LED blinks.
- Enter your desired 4-digit PIN on the keypad.
- Press and hold the “Send” or “Enter” button on the keypad.
- Release when the motor head LED stops blinking or flashes confirmation.
- Test by entering your PIN and pressing Send.
Troubleshooting Keypad Failures
| Symptom | Likely Cause | Solution |
|---|---|---|
| No response at all | Dead battery or wrong frequency | Replace 9V battery; verify keypad is CodeDodger compatible |
| LED blinks but door won’t move | Safety sensor obstruction | Clear sensor path; realign photo-eyes |
| Works intermittently | RF interference | Relocate antenna wire away from metal conduit or LED bulbs |
| Accepts any code | Memory corruption | Perform full factory reset and reprogram all devices |
When to Reset vs. Reprogram
Sometimes adding a new remote fails because the opener’s memory is full (typically 8–12 devices max) or corrupted. A factory reset clears all stored codes and restores default settings.
How to Factory Reset a Legacy Opener
- Press and hold the Learn/Program button for 10–15 seconds.
- Wait for the LED to turn off completely, then release.
- All remotes and keypads are now erased.
- Reprogram every device using the steps above.
Warning: After a factory reset, your car’s built-in HomeLink system will also stop working. You must retrain HomeLink separately following your vehicle manufacturer’s instructions.
Common Mistakes That Prevent Successful Programming
Even experienced DIYers stumble on these overlooked details:
- Using Incompatible Remotes: Not all Overhead Door remotes work with all Legacy openers. Universal remotes often fail with proprietary CodeDodger systems. Always check the compatibility chart on the remote packaging.
- LED Bulb Interference: Cheap LED garage lights emit radio frequency noise that blocks remote signals. If programming works near the motor but fails at distance, swap to RF-shielded LED bulbs rated for garage door openers.
- Antenna Position: The hanging antenna wire must be fully extended and perpendicular to the floor. Coiling or taping it to the motor housing reduces range by up to 70%.
- Ignoring Capacitor Issues: On openers over 15 years old, failing capacitors can cause intermittent logic board behavior. If programming succeeds but the door operates erratically, professional capacitor replacement may be needed.
FAQ: Your Top Questions Answered
How do I know if my Legacy Overhead Door opener uses CodeDodger 1 or 2?
Check the manufacture date and label. CodeDodger 1 (1996–2011) operates solely at 315 MHz. CodeDodger 2 (2011–present) uses dual-frequency 315/390 MHz. The model number plate on the motor head will specify which version you have. When in doubt, purchase a dual-frequency remote for backward compatibility.
Can I program a universal remote to my Legacy Overhead Door opener?
Possibly, but success varies. Only universal remotes explicitly listing “Overhead Door CodeDodger” compatibility will work reliably. Generic universals designed for Chamberlain/LiftMaster often cannot replicate Overhead Door’s proprietary rolling code algorithm. OEM remotes are always the safest bet.
Why does my remote work close up but not from my car?
This almost always indicates RF interference or antenna issues. First, extend the antenna wire fully. Second, replace any non-shielded LED bulbs in the garage. Third, check for nearby transformers, HVAC units, or wireless routers that may emit competing frequencies. Moving the antenna wire 6–12 inches can sometimes resolve dead zones.
How many remotes can a Legacy Overhead Door opener store?
Most CodeDodger Legacy models support 8 to 12 devices total, including remotes, keypads, and HomeLink systems. If you exceed this limit, the oldest device may be overwritten, or new programming attempts will fail silently. Perform a factory reset if you suspect memory saturation.
My opener has no visible Learn button. What should I do?
Some early CodeDodger models (pre-2000) use DIP switches instead of a Learn button. Open both the remote and motor head covers to reveal tiny toggle switches. Match the switch positions exactly between remote and opener. If your unit has neither DIP switches nor a Learn button, it likely predates rolling code technology and should be upgraded for security reasons.
Is it worth repairing a Legacy opener or should I replace it?
If the motor runs smoothly and safety sensors function correctly, reprogramming is cost-effective. However, if the unit lacks auto-reverse safety features, makes grinding noises, or is over 20 years old, replacement is safer and more economical long-term. Modern openers offer battery backup, Wi-Fi integration, and quieter operation for $250–$400 installed.
Conclusion
Learning how to program a Legacy Overhead Door garage door opener empowers you to maintain one of your home’s most critical access points without unnecessary service calls. By correctly identifying your system, following precise programming sequences, and troubleshooting methodically, you can restore reliable operation in under 30 minutes. Remember: safety always comes first, and when in doubt, consulting a certified Overhead Door dealer protects both your property and your peace of mind.
Found this guide helpful? Share it with friends, family, or neighbors who might be struggling with their own Legacy garage door opener! Tag us on social media or drop a comment below with your model number and any unique challenges you encountered — your experience could help someone else solve their problem faster. Safe programming, and welcome home! 🏡
Leave a Reply