Introduction
There are few things more frustrating than standing in your driveway with groceries in hand, only to realize your garage door remote isn’t syncing with your opener. If you have recently installed a new unit or replaced a battery, knowing how to program a Genie Model 7055 garage door opener is essential for restoring convenience and security to your home. This guide provides clear, empathetic, and manufacturer-aligned instructions to get your system running smoothly without the need for an expensive service call.
Understanding the Genie Model 7055 System
Before diving into button sequences, it is vital to understand what makes the Model 7055 unique. This unit typically utilizes Genie’s Intellicode rolling code technology, which changes the access code every time the remote is used to prevent unauthorized entry. Unlike older dip-switch models, the 7055 relies on digital synchronization between the motor head and the transmitter.
According to industry standards for automated entry systems, proper programming ensures not only functionality but also safety compliance. For a broader understanding of how these rolling code technologies evolved to secure modern homes, you can refer to the historical context of garage door openers on Wikipedia. Understanding this baseline helps explain why specific timing and LED indicators matter during the pairing process.
How Do I Program a Remote to My Genie 7055?
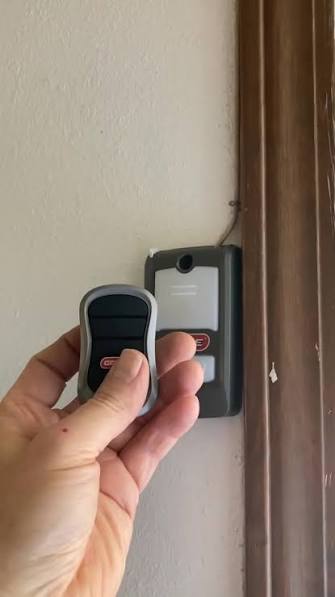
Programming a standard handheld remote is the most common task for homeowners. The Genie 7055 features a dedicated “Learn” button located on the motor head, usually near the light lens or under the cover.
Step-by-Step Remote Programming
- Locate the Learn Button: Find the square or round learn button on the back or side of the powerhead. The LED indicator next to it should be off initially.
- Initiate Learn Mode: Press and release the learn button. The LED will illuminate solid blue (or purple, depending on the specific board revision) and remain lit for approximately 30 seconds. This indicates the unit is ready to receive a signal.
- Transmit the Signal: Within that 30-second window, press and hold the button on your remote that you wish to program. Hold it for 2–3 seconds until the LED on the motor head flashes.
- Confirm Sync: Release the remote button. The LED on the motor head should turn off or flash rapidly to confirm successful programming.
- Test Functionality: Press the remote button again to operate the door. If the door activates, the process is complete.
Note: If the LED turns red or does not respond, repeat the process ensuring you are within 3 feet of the motor head during programming.
How To Program a Wireless Keypad to Genie 7055
Many users prefer keyless entry for family members or guests. Programming a wireless keypad follows a similar logic but requires entering a PIN sequence.
| Feature | Handheld Remote | Wireless Keypad |
|---|---|---|
| Primary Use | Daily vehicle entry | Guest/child access |
| Programming Trigger | Single button press | PIN + Send button |
| Battery Type | CR2032 Coin Cell | AAA or 9V |
| Range | Up to 50 ft | Up to 30 ft |
| Security Level | Rolling Code | Rolling Code + PIN |
Keypad Setup Instructions
- Enter Learn Mode: Press the learn button on the Genie 7055 motor head until the LED illuminates.
- Activate Keypad: On your wireless keypad, enter your desired 4-digit PIN.
- Send Signal: Immediately after entering the PIN, press and hold the “Send” or “Program” button on the keypad.
- Watch the Indicator: Keep holding the button until the motor head LED flashes or turns off. This may take up to 5 seconds.
- Finalize: Enter your PIN one last time and press send to test operation.
Why Is My Genie 7055 Not Programming Correctly?
Troubleshooting is often part of learning how to program a Genie Model 7055 garage door opener. If the steps above fail, consider these technical variables before calling a professional.
Common Failure Points
- LED Color Indicators: A solid blue light means “ready.” A flashing blue light often means “processing.” A red light typically indicates an error or memory full condition. Consult your manual for specific blink codes.
- Memory Capacity: The Genie 7055 generally supports up to 7 transmitters. If you have exceeded this limit, you must clear the memory by holding the learn button for 10+ seconds until the LED goes out, then reprogram all devices.
- Battery Voltage: Even if a remote works intermittently, low voltage can prevent the high-power burst needed for programming. Replace batteries with fresh, name-brand alkaline cells.
- Frequency Interference: LED bulbs in the garage can sometimes interfere with radio signals. Ensure you are using Genie-approved LED bulbs or temporarily unscrew them during programming.
- Antenna Position: Verify the antenna wire hanging from the motor head is fully extended and not touching metal surfaces or drywall screws.
Safety First: Checking Sensors Before Programming
Never attempt to program or adjust travel limits while the safety sensors are misaligned. The Genie 7055 uses Safe-T-Beam infrared sensors located at the bottom of the door tracks. If the sensor LEDs are blinking or unlit, the opener will refuse to close regardless of programming status. Always ensure both sensors show a steady red (sender) and green (receiver) light before testing your newly programmed remotes.
Frequently Asked Questions (FAQ)
1. Can I program a universal remote to the Genie Model 7055?
Yes, most modern universal remotes are compatible with Genie Intellicode systems. However, you must follow the universal remote manufacturer’s specific instructions for selecting the “Genie” frequency before pressing the learn button on the 7055 motor head. Compatibility varies by brand, so check packaging for “Intellicode” support.
2. How do I erase all remotes from my Genie 7055?
To clear the entire memory, locate the learn button on the powerhead and press and hold it for approximately 10 seconds. The LED will turn on, then turn off completely. Once the light is out, all previously programmed remotes and keypads have been erased. You will need to reprogram every device individually.
3. Does the Genie 7055 support HomeLink in-car systems?
Most Genie 7055 units are HomeLink compatible. To program, first clear your car’s HomeLink buttons. Then, simultaneously press the HomeLink button and your Genie remote button until the car indicator flashes. Finally, press the learn button on the 7055 motor head and return to the car to press the HomeLink button twice to complete the handshake.
4. What does a flashing red LED mean during programming?
A flashing red LED usually indicates that the receiver did not recognize the signal or that the memory is full. Try replacing the remote battery first. If the issue persists, perform a factory reset of the opener’s memory and attempt programming again. Persistent red lights may indicate a faulty logic board.
5. How often should I reprogram my garage door opener?
You do not need to reprogram regularly. Reprogramming is only necessary when adding new devices, replacing batteries in certain older models, experiencing interference, or moving into a new home for security purposes. The rolling code system maintains security automatically without user intervention.
6. Can I program the Genie 7055 without a ladder?
Unfortunately, no. The learn button is physically located on the motor head mounted to the ceiling. While some newer models offer app-based programming via Aladdin Connect, the initial hardware pairing for the 7055 typically requires physical access to the unit. Always use a stable ladder and have a spotter when working overhead.
Conclusion
Mastering how to program a Genie Model 7055 garage door opener empowers you to maintain your home’s security and convenience independently. By following the precise LED indicators, respecting safety protocols, and understanding the difference between remote and keypad synchronization, you can resolve most access issues in under ten minutes. Remember that patience during the 30-second learn window is often the difference between success and frustration.
If this guide helped you regain access to your garage, please share it on social media to help other homeowners avoid unnecessary service fees. Your friends and neighbors will appreciate the practical, step-by-step advice that keeps their homes safe and accessible. Happy programming!
Leave a Reply