Introduction
There are few things more frustrating than pulling into your driveway in the rain, only to realize you still have to fumble for a clunky remote or punch in a keypad code. If you have been searching for how to pair my garage door opener to my car, you are not alone; millions of homeowners upgrade to built-in vehicle transmitters every year for seamless, secure entry. This comprehensive guide will walk you through the exact steps to sync your car’s built-in system safely and correctly, regardless of whether you drive a newer model with smart tech or an older vehicle with legacy buttons.
Understanding Your Vehicle’s Transmitter System
Before pressing any buttons, it is vital to identify which technology your vehicle uses. Not all cars communicate with garage doors in the same way. Misidentifying your system is the number one reason pairing attempts fail.
Most modern vehicles use one of three primary systems:
- HomeLink: The industry standard found in over 90% of new vehicles sold in North America. It typically features three buttons on the overhead console, visor, or rearview mirror.
- Car2U: A less common system found primarily in certain Chrysler, Dodge, Jeep, and Nissan models from the late 2000s to mid-2010s. These often lack indicator lights during programming.
- Universal/Aftermarket Modules: Older vehicles or those without factory-installed transmitters may use aftermarket visor clips that mimic factory functionality.
Expert Insight: According to automotive technicians, approximately 70% of “failed” programming attempts occur because the user tries to program a rolling-code opener using fixed-code instructions. Always verify your opener’s security protocol first.
For a deeper technical understanding of radio frequency protocols used in these systems, you can refer to the Wikipedia page on Garage Door Openers, which details the evolution from dip switches to modern rolling-code encryption.
Safety First: Critical Pre-Pairing Checklist
Programming involves moving mechanical parts. Before you begin learning how to pair my garage door opener to my car, complete this safety audit:
- Clear the Zone: Ensure no people, pets, or objects are near the door path.
- Check Sensors: Verify the photo-eye sensors at the bottom of the tracks are aligned and unobstructed.
- Battery Health: Replace the battery in your handheld remote before starting. Weak signals cause incomplete programming.
- Ladder Safety: If your learn button is high up, use a stable stepladder—never stand on chairs or buckets.
- Disconnect Power (Optional): For added safety when accessing the motor head, unplug the unit or turn off the circuit breaker.
Step-by-Step: Programming HomeLink Systems
HomeLink is the most prevalent system. Follow these precise steps for rolling-code openers (manufactured after 1996):
Phase 1: Clear Previous Codes
- Press and hold the two outer HomeLink buttons simultaneously for 10–20 seconds.
- Wait until the indicator light flashes rapidly (usually amber or red).
- Release both buttons. Your system is now reset.
Phase 2: Train the Vehicle Button
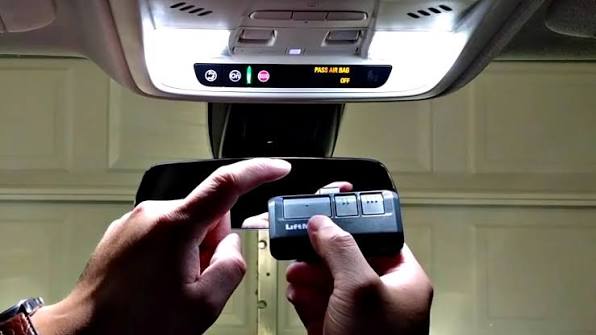
- Hold your handheld garage remote 1–3 inches away from the HomeLink button you wish to program.
- Simultaneously press and hold both the handheld remote button AND the chosen HomeLink button.
- Watch the HomeLink indicator light. It will flash slowly, then rapidly (solid or fast blink) when trained. This takes 5–30 seconds.
- Release both buttons once the rapid flash occurs.
Phase 3: Sync with the Garage Motor (Rolling Code Only)
- Locate the “Learn” or “Smart” button on your garage door motor unit (usually yellow, purple, orange, or red).
- Press and release the Learn button. You have exactly 30 seconds to complete the next step.
- Return to your vehicle and press the programmed HomeLink button firmly for 2 seconds, release, then press again for 2 seconds. Repeat up to 3 times.
- Test by pressing the HomeLink button once. The door should activate.
Note for Fixed-Code Openers (Pre-1996): Skip Phase 3. If the door operates after Phase 2, you have a fixed-code system. Consider upgrading to a rolling-code opener for enhanced security against signal theft.
Alternative Methods: Car2U and Universal Remotes
Not every vehicle uses HomeLink. Here is how to handle alternatives:
Car2U Programming Protocol
Car2U systems do not use indicator lights during training, making timing critical:
- Press and hold the two outer Car2U buttons for 20 seconds until all LEDs flash.
- Release, then press the desired button briefly.
- Hold your handheld remote 1–3 inches away and press its button.
- Hold the Car2U button for 2 seconds, release for 2 seconds, and repeat this cycle for up to 30 seconds.
- Complete the rolling-code sync at the motor unit identically to HomeLink Phase 3.
Aftermarket Universal Visor Clips
If your car lacks built-in transmitters:
| Feature | Factory HomeLink | Aftermarket Universal Clip |
|---|---|---|
| Installation | Pre-installed | Clips to visor, wires to 12V |
| Compatibility | 95%+ of openers | ~80% of openers |
| Aesthetics | Seamless/OEM | Visible add-on |
| Cost | Included with vehicle | $25–$60 USD |
| Programming | Vehicle-specific | Generic instructions |
Troubleshooting: When Pairing Fails
Even professionals encounter hiccups. Use this diagnostic table before calling a technician:
| Symptom | Likely Cause | Solution |
|---|---|---|
| Light never flashes rapidly | Incompatible frequency or dead remote battery | Replace remote battery; verify opener brand compatibility online |
| Flashes but door won’t move | Rolling-code sync incomplete | Re-do Phase 3 within 30-second window; ensure firm button presses |
| Works intermittently | Signal interference or weak transmitter | Reposition vehicle during programming; check for LED bulb interference |
| Programs but resets after driving | Capacitor failure in older HomeLink modules | Module replacement required; consult dealership |
| All buttons stop working | System overload or power surge | Full factory reset; check GFCI outlet and circuit breaker |
LED Bulb Warning: Many homeowners unknowingly install non-compatible LED bulbs in their garage fixtures. Cheap LEDs emit RF noise that blocks transmitter signals. If pairing suddenly fails, test with the garage lights turned OFF. If it works, replace bulbs with RF-shielded garage-door-rated LEDs.
Frequently Asked Questions (FAQ)
1. Can I program multiple garage doors to one car?
Yes. Most HomeLink and Car2U systems support 3 independent channels. Simply repeat the programming process for each button, assigning one per door or gate. Each channel operates independently and can be reprogrammed without affecting others.
2. Why does my garage door opener work with the handheld remote but not my car?
This almost always indicates an incomplete rolling-code synchronization (Phase 3). The vehicle learned the signal, but the motor hasn’t accepted it. Re-perform the learn-button sequence at the motor unit, ensuring you complete the vehicle button presses within the 30-second window. Also verify your handheld remote battery isn’t masking a weaker vehicle transmitter signal.
3. Is it safe to program my car myself, or should I hire a professional?
DIY programming is completely safe and manufacturer-intended. No electrical work is required beyond pressing buttons. However, if your opener is malfunctioning, makes grinding noises, or has broken springs, hire a certified technician before attempting programming. Mechanical issues pose serious injury risks unrelated to transmitter syncing.
4. Will programming my car erase my existing handheld remotes?
No. Adding a vehicle transmitter does not delete previously programmed remotes or keypads. The only exception is if you press the motor’s Learn button and hold it for 10+ seconds (factory reset), which wipes ALL devices. Normal single-press learn-button activation adds devices without removing existing ones.
5. My car is a 2024 model but HomeLink won’t program. What’s wrong?
Newer vehicles sometimes require a HomeLink Bridge or firmware update for compatibility with specific opener brands like LiftMaster’s Security+ 2.0 or Genie Aladdin Connect. Check your vehicle owner’s manual supplement or the HomeLink compatibility checker online. Some manufacturers released service bulletins addressing 2022–2025 model year programming issues.
6. How often should I reprogram my garage door opener to my car?
Under normal conditions, never. Programming is permanent unless manually cleared. However, reprogram if you replace the garage motor, change opener logic boards, experience persistent signal loss after troubleshooting, or purchase a used vehicle where previous owner codes weren’t cleared (always clear inherited codes immediately for security).
Conclusion
Learning how to pair my garage door opener to my car transforms daily convenience and enhances home security through modern rolling-code encryption. By identifying your transmitter type, following safety protocols, and executing the correct programming sequence, you can achieve reliable, hands-free access in under 15 minutes. Remember to clear old codes when buying used vehicles, use compatible LED bulbs, and always complete the rolling-code sync step for post-1996 openers.
Your garage should welcome you home effortlessly—not frustrate you at the threshold. Take control of your entry experience today.
Found this guide helpful? Share it with friends, family, or neighbors who are still fumbling for remotes! Tag us on social media with your successful pairing story, and help others discover the simplicity of integrated garage access. Safe driving and smooth entries ahead! 🏠🚗
Leave a Reply