Introduction
There is nothing quite as frustrating as pressing your garage door remote only to be met with silence, especially when you are rushing to work or returning home in bad weather. If your system relies on a backup power source or if your remote has died, knowing how to open LiftMaster garage door opener to change battery components is an essential homeowner skill. This guide will walk you through the process safely and efficiently, ensuring your garage access is restored without the need for an expensive service call.
Understanding Your LiftMaster Power Sources
Before grabbing a screwdriver, it is vital to understand that “changing the battery” can refer to two very different components within the LiftMaster ecosystem. Misidentifying the power source is the most common reason DIY attempts fail.
- The Backup Battery: A large 12V sealed lead-acid battery located inside the main motor unit. This powers the door during electrical outages.
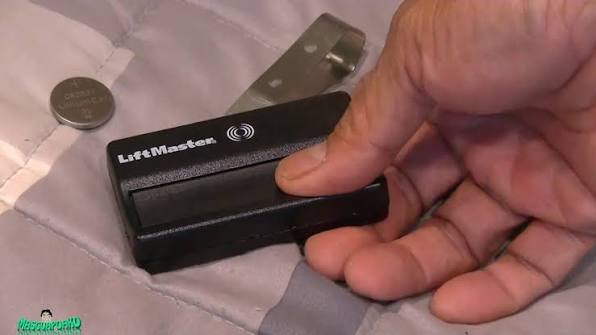
- The Remote/Keypad Battery: Small coin-cell or alkaline batteries located in your handheld transmitter or exterior keypad.
According to industry standards referenced in general garage door opener documentation, regular maintenance of these power sources extends the lifespan of the entire automation system. Below, we break down the replacement process for both scenarios.
When Should You Replace the LiftMaster Backup Battery?
Most modern LiftMaster openers with battery backup systems will alert you when power is low. However, proactive replacement prevents emergency failures.
Signs of a Failing Backup Battery
- Audible Beeping: The unit emits a steady beep every 30 seconds.
- LED Indicators: The battery status light on the motor head turns yellow or flashes red.
- Slower Operation: The door moves noticeably slower when running on battery power.
- Age: The battery is older than 2–3 years, regardless of performance.
Expert Insight: “Sealed lead-acid batteries degrade over time even if never used. We recommend testing the backup system annually by unplugging the opener and operating the door once to verify capacity.” — Certified Garage Door Technician
Step-by-Step: How to Open LiftMaster Garage Door Opener To Change Battery (Backup Unit)
This tutorial applies to popular models like the LiftMaster 8550WLB, 8500W, and similar belt/belt-drive units with integrated battery backup. Always prioritize safety.
Tools Required
- Flathead screwdriver
- Phillips head screwdriver
- Replacement 12V Sealed Lead-Acid Battery (Model 485LM or compatible)
- Safety glasses
- Work gloves
The Replacement Process
- Disconnect AC Power: Unplug the garage door opener from the ceiling outlet. This is non-negotiable. Working on a live unit risks electric shock or accidental activation.
- Locate the Battery Compartment: On most LiftMaster wall-mount or trolley-style openers, the battery cover is located on the side or bottom of the motor housing. Look for a plastic panel labeled “Battery.”
- Remove the Cover: Use your flathead screwdriver to gently pry the tab or unscrew the retaining screw. Slide the cover off to expose the battery.
- Disconnect the Wires: Carefully pull the red (positive) and black (negative) spade connectors from the old battery terminals. Do not pull by the wires themselves; grip the connector body to avoid damaging the harness.
- Extract the Old Battery: Lift the battery straight out. Note its orientation for reinstallation.
- Install the New Battery: Place the new 12V battery in the compartment, matching the original orientation. Reconnect the red wire to the positive (+) terminal and the black wire to the negative (-) terminal. Ensure connections are snug.
- Replace the Cover: Snap or screw the battery cover back into place securely.
- Restore Power and Test: Plug the opener back into the AC outlet. Press the battery test button (if equipped) or unplug the unit again to verify the door operates on battery power. The status LED should turn green after a brief charging cycle.
Safety Checklist Table
| Safety Step | Risk If Ignored | Verification Method |
|---|---|---|
| Unplug AC Power | Electric shock, gear damage | Visual confirmation of disconnected plug |
| Wear Gloves | Acid exposure, pinched fingers | Proper PPE donned before handling |
| Match Polarity | Short circuit, board failure | Red-to-Red, Black-to-Black verification |
| Secure Cover | Dust ingress, accidental contact | Audible click or tight screw check |
Changing Batteries in LiftMaster Remotes and Keypads
If your main unit has power but the door won’t respond, the issue likely lies with the transmitter. Here is how to open LiftMaster garage door opener to change battery in the peripheral devices.
Standard 3-Button Remote (e.g., 893MAX)
- Locate the small notch or slot on the edge of the remote casing.
- Insert a flathead screwdriver or coin and twist gently to separate the two halves.
- Remove the old CR2032 coin cell battery.
- Insert the new battery with the positive (+) side facing up.
- Snap the case back together until you hear a click.
Exterior Wireless Keypad (e.g., 877MAX)
- Open the battery cover at the bottom of the keypad (usually slides down or requires a small screw removal).
- Remove the old 9V or CR2032 battery depending on your model.
- Insert the fresh battery, observing polarity markings.
- Close the cover and test by entering your PIN.
Pro Tip: Always replace remote batteries in pairs if your device uses multiple cells, and never mix old and new batteries. This ensures consistent voltage delivery and prevents premature failure.
Troubleshooting: What If the New Battery Doesn’t Work?
Even after correctly learning how to open LiftMaster garage door opener to change battery, issues can persist. Consider these diagnostics:
- Check the Fuse: Some models have an inline fuse on the battery harness. Inspect it for continuity.
- Inspect Terminals: Corrosion on battery contacts can prevent charging. Clean with a baking soda solution and a wire brush if needed.
- Verify Battery Type: Using a standard automotive battery instead of a sealed lead-acid (SLA) battery can damage the charging circuit. Only use manufacturer-specified replacements.
- Reset the Logic Board: After battery replacement, some units require a factory reset to recognize the new power source. Consult your specific model’s manual.
- Charging Circuit Failure: If the new battery drains within days, the internal charger may be faulty, requiring professional board replacement.
Frequently Asked Questions (FAQ)
Q1: How often should I replace my LiftMaster backup battery?
Under normal residential use, the backup battery should be replaced every 2 to 3 years. However, if you experience frequent power outages or live in extreme temperatures, annual replacement is advisable. The unit’s LED indicator is your best real-time gauge.
Q2: Can I use any 12V battery for my LiftMaster opener?
No. You must use a 12V Sealed Lead-Acid (SLA) battery specifically rated for garage door openers, such as the LiftMaster 485LM. Standard car batteries or lithium-ion packs are incompatible and can cause fire hazards or permanent damage to the opener’s charging system.
Q3: Do I need to reprogram my remote after changing the battery?
Generally, no. Changing the battery in a remote or keypad does not erase its programming. However, if the battery was completely dead for an extended period, some older rolling-code remotes may lose synchronization and require re-pairing with the motor unit.
Q4: Is it safe to change the backup battery myself?
Yes, provided you disconnect AC power first and follow the steps outlined above. The backup battery itself is low-voltage (12V DC) and poses minimal shock risk. The primary danger comes from working near live AC components or moving mechanical parts, which is why unplugging the unit is mandatory.
Q5: Why does my LiftMaster beep after I changed the battery?
A brief beep sequence is normal as the system recognizes the new battery and begins charging. If beeping continues beyond 24 hours, the battery may not be seated correctly, the wiring harness could be loose, or the charging circuit may be malfunctioning. Re-check all connections before calling a technician.
Q6: Can extreme cold affect my LiftMaster battery life?
Absolutely. Sealed lead-acid batteries lose significant capacity below freezing. If your garage is unheated and temperatures regularly drop below 32°F (0°C), consider insulating the opener housing or upgrading to a cold-weather rated battery. Cold reduces available cranking amps and accelerates sulfation, shortening overall lifespan.
Conclusion
Mastering how to open LiftMaster garage door opener to change battery components empowers you to maintain reliable garage access and avoid unnecessary service fees. Whether you are swapping the 12V backup battery in the motor head or refreshing the coin cell in your remote, the key lies in correct identification, proper safety protocols, and using manufacturer-specified parts. Regular battery maintenance not only ensures operation during power outages but also protects your investment in home automation.
Found this guide helpful? Share it with fellow homeowners on Facebook, Pinterest, or Nextdoor so they too can keep their garages running smoothly. Have a unique LiftMaster model or troubleshooting tip? Drop a comment below—we’d love to hear from you! Stay safe and keep those doors opening effortlessly.
Leave a Reply