Introduction
There is nothing quite as jarring as the sound of a grinding, rattling, or excessively loose chain when you simply want to open your garage. If you are searching for how to move the chain on a garage door opener, you are likely dealing with annoying noise, uneven movement, or fear that the door might fail entirely. We understand the frustration; a malfunctioning opener disrupts your daily routine and raises valid safety concerns for your home and family.
Fortunately, adjusting or repositioning the chain is often a manageable DIY task that restores quiet, smooth operation without requiring a full system replacement. In this comprehensive guide, we will walk you through the exact steps to adjust tension, realign the sprocket, and ensure your opener meets current safety standards. Let’s get your garage door running silently and safely again.
Why Does My Garage Door Opener Chain Need Moving?
Before grabbing your wrenches, it is vital to understand why the chain requires adjustment. According to industry data from the International Door Association (IDA), over 70% of premature opener failures stem from neglected chain tension and lubrication. Chains do not typically “move” on their own; they stretch, wear, or become misaligned due to specific mechanical factors.
Common Causes of Chain Issues
- Natural Stretch: Over years of use, metal chains elongate. This creates slack that causes the chain to slap against the rail.
- Sprocket Wear: The teeth on the motor shaft sprocket can wear down, causing the chain to ride higher or slip.
- Improper Initial Installation: Many openers are installed with incorrect tension right out of the box.
- Temperature Fluctuations: Extreme cold can contract metal components, altering tension temporarily.
- Lack of Lubrication: Dry chains experience increased friction, leading to accelerated wear and stretching.
Understanding the root cause ensures you apply the correct fix rather than a temporary band-aid. For foundational knowledge on how these mechanical systems interact, referencing the Wikipedia page on Garage Door Openers provides excellent context on chain-drive versus belt-drive mechanics.
Safety First: Critical Precautions Before Adjustment
Adjusting a garage door chain involves working near high-tension springs and electrical components. Never skip these safety protocols.
- Disconnect Power: Unplug the opener unit from the ceiling outlet to prevent accidental activation.
- Release Tension Safely: Never attempt to adjust the chain while the door is under full spring tension. Close the door completely and engage the manual release lever to disconnect the trolley from the chain.
- Wear PPE: Use safety glasses and work gloves. Chain links can have sharp edges, and debris may fall during adjustment.
- Secure Ladder: Ensure your stepladder is stable and positioned directly beneath the work area. Never overreach.
- Check Spring Condition: If your torsion or extension springs show gaps, rust, or damage, stop immediately. Spring repair is not a DIY task and requires a certified professional.
Expert Note: “The most common injury we see in ER visits related to garage doors involves homeowners attempting to adjust chains without releasing the trolley first. Always disengage the carriage before touching the tension nut.” — Certified Door Technician, DASMA Member
Tools You Will Need
Gather these tools before starting to avoid mid-project interruptions:
| Tool | Purpose |
|---|---|
| Adjustable Wrench (or 9/16″ socket) | Adjusting the tension nut on the threaded rod |
| Flathead Screwdriver | Removing the chain guard/cap |
| White Lithium Grease or Chain Lube | Post-adjustment lubrication |
| Tape Measure | Verifying proper sag distance |
| Level | Checking rail alignment |
| Safety Glasses & Gloves | Personal protection |
| Stepladder | Safe access to the opener unit |
Step-by-Step: How To Move The Chain On A Garage Door Opener
Follow this precise tutorial to correctly adjust chain position and tension. These specifications align with manufacturer guidelines from major brands like LiftMaster, Chamberlain, and Genie.
Step 1: Inspect Current Chain Condition
With power disconnected and the door closed, visually inspect the entire chain length. Look for:
- Stiff or frozen links
- Visible rust or corrosion
- Worn sprocket teeth
- Excessive grease buildup mixed with metal shavings
If the chain shows significant wear or damaged links, replacement is necessary. Adjusting a damaged chain is unsafe and ineffective.
Step 2: Locate the Tension Adjustment Assembly
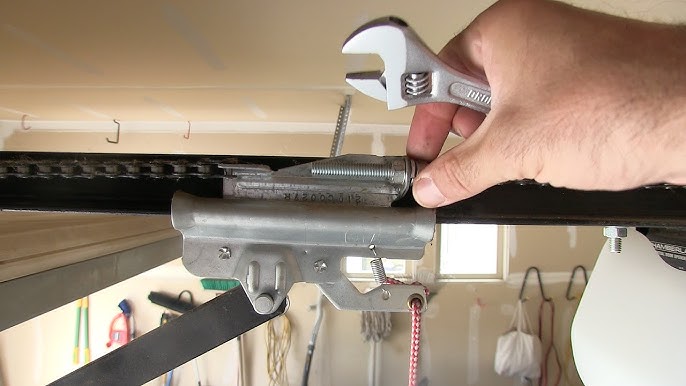
Find the threaded rod extending from the front of the opener rail (near the header bracket). You will see two nuts: an inner locknut and an outer adjustment nut. The chain connects to a master link or clevis pin at this assembly.
Step 3: Measure Existing Sag
Using your tape measure, check the chain’s midpoint between the sprocket and the idler pulley. Proper tension allows approximately 1/4 inch to 1/2 inch of vertical sag above the base of the rail when the door is closed. Record your current measurement.
Step 4: Loosen the Locknut
Using your adjustable wrench, loosen the inner locknut (closest to the motor) by turning it counterclockwise 2–3 turns. Do not remove it completely. This frees the adjustment nut for movement.
Step 5: Adjust the Chain Position
- To Tighten (Reduce Slack): Turn the outer adjustment nut clockwise. Make small increments—no more than 2 full turns at a time.
- To Loosen (If Over-Tightened): Turn the outer adjustment nut counterclockwise.
After each adjustment, re-measure the sag at the midpoint. Your target is consistent 1/4″–1/2″ clearance above the rail base along the entire horizontal run.
Step 6: Secure and Test Manually
Once proper tension is achieved, hold the adjustment nut stationary and tighten the inner locknut firmly against it. This prevents vibration from loosening the setting over time. Reconnect the trolley to the chain using the manual release lever. Manually lift and lower the door to verify smooth travel without binding or excessive resistance.
Step 7: Re-energize and Perform Safety Reversal Test
Plug the opener back in. Operate the door via remote/wall button. Then, test the auto-reverse safety feature: place a 2×4 board flat on the floor where the door closes. The door must reverse within 2 seconds of contacting the board. If it does not, adjust the force settings per your owner’s manual or call a professional. This test is non-negotiable for household safety.
Step 8: Lubricate Correctly
Apply white lithium grease or manufacturer-approved chain lubricant sparingly to the chain rollers and sprocket teeth. Avoid WD-40 or silicone spray, as these attract dust and degrade nylon components. Wipe excess lube to prevent drips onto vehicles or flooring.
Pros vs. Cons: Chain Adjustment vs. Full Replacement
Not sure if adjustment is enough? Use this comparison to decide:
| Factor | Chain Adjustment | Chain Replacement |
|---|---|---|
| Cost | $0–$15 (lube only) | $80–$150 (parts + labor) |
| Time Required | 30–45 minutes | 2–3 hours |
| Skill Level | Beginner-friendly | Intermediate/Advanced |
| Longevity Gain | 1–3 additional years | 10+ years new lifespan |
| Noise Reduction | Moderate improvement | Significant if upgrading to belt |
| Safety Risk | Low (with precautions) | Higher (spring interaction) |
When to Replace Instead: If the chain has stretched beyond 1 inch of total elongation, shows cracked side plates, or the sprocket teeth are visibly hooked/sharp, adjustment will not solve the problem. Invest in replacement.
Frequently Asked Questions (FAQ)
Q1: How often should I adjust my garage door opener chain?
Most manufacturers recommend checking chain tension every 6 months as part of routine maintenance. However, if you notice new noises, jerky movement, or visible slack, inspect immediately regardless of schedule. Seasonal temperature changes can also necessitate biannual checks.
Q2: Can overtightening the chain damage my opener?
Absolutely yes. An overtightened chain places excessive load on the motor bearings, sprocket shaft, and rail brackets. This accelerates wear, increases energy consumption, and can void your warranty. Always adhere to the 1/4″–1/2″ sag specification. When in doubt, err toward slightly looser rather than tighter.
Q3: Why does my chain keep getting loose after adjustment?
Recurring slack usually indicates one of three issues: (1) worn sprocket teeth that no longer grip properly, (2) a failing chain that has exceeded its elastic limit, or (3) loose mounting hardware allowing the rail to shift. Inspect all connection points and consider professional evaluation if adjustments don’t hold for more than a few weeks.
Q4: Is it normal for a new chain to stretch initially?
Yes. New chains undergo a “break-in period” of approximately 30–60 days where initial elongation occurs. Schedule a follow-up tension check 4–6 weeks after installation. After break-in, stretching should stabilize significantly.
Q5: Should I switch to a belt drive instead of adjusting my chain?
If noise is your primary concern and budget allows, upgrading to a belt drive offers superior quietness and reduced maintenance. However, if your current chain system functions well aside from tension, adjustment is cost-effective. Belt drives excel in attached garages where bedroom noise matters; chain drives remain reliable for detached structures.
Q6: What lubricant should I NEVER use on my garage door chain?
Avoid WD-40, silicone spray, grease guns with petroleum-based products, and cooking oils. These either attract abrasive contaminants, degrade plastic/nylon parts, or gum up over time. Stick to white lithium grease or lubricants specifically labeled for garage door chains.
Conclusion
Learning how to move the chain on a garage door opener empowers you to maintain one of your home’s most-used mechanical systems safely and effectively. By following proper safety protocols, measuring tension accurately, and performing regular maintenance, you extend your opener’s lifespan while ensuring quiet, reliable operation. Remember: when in doubt about spring tension or structural integrity, always consult a certified technician. Your safety outweighs any DIY savings.
Found this guide helpful? Share it with neighbors, friends, or family members who struggle with noisy garage doors! Tag us on social media with your before-and-after photos—we love seeing successful DIY fixes. Together, we can keep homes safer and quieter, one adjusted chain at a time. 🔧🏡
Leave a Reply