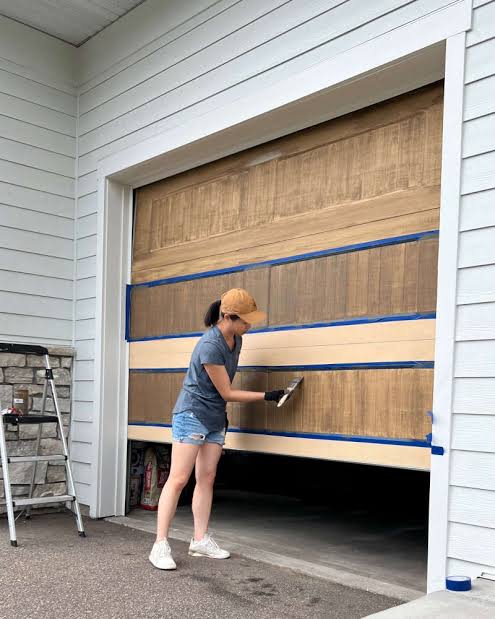
Introduction
Is your plain steel or aluminum garage door dragging down your home’s curb appeal? You’re not alone — millions of homeowners feel stuck with an industrial-looking door that clashes with the warmth of their exterior design. The good news is that you don’t need to spend thousands on a real wood replacement. In this guide, we’ll walk you through how to make your garage door look like wood using affordable materials, simple tools, and step-by-step techniques that even beginners can master in a single weekend.
Why Homeowners Want a Wood-Look Garage Door
Real wood garage doors are gorgeous, but they come with a steep price tag — often ranging from $2,500 to $10,000+ depending on the species and craftsmanship. Beyond cost, genuine wood requires ongoing maintenance: sealing, re-staining, and warping prevention. That’s why the faux wood trend has exploded in popularity over the last decade.
According to the National Association of Realtors (NAR) 2024 Remodeling Impact Report, garage door replacements consistently rank among the top three projects for return on investment, recouping up to 194% of costs at resale. A wood-look finish gives you that same high-end aesthetic without the premium expense or upkeep headaches.
“A well-executed faux wood finish can be virtually indistinguishable from real timber — even up close,” says Mike Reynolds, a decorative painter with over 18 years of experience in architectural finishes.
What Types of Garage Doors Can Be Transformed?
Before grabbing your paintbrush, it helps to know which door materials respond best to a wood-look treatment:
| Door Material | Suitability | Prep Required |
|---|---|---|
| Steel (embossed panels) | ★★★★★ Excellent | Light sanding + primer |
| Aluminum | ★★★★☆ Very Good | Degreasing + bonding primer |
| Fiberglass | ★★★★☆ Very Good | Light scuff-sanding |
| Vinyl | ★★★☆☆ Fair | Specialty adhesion primer |
| Real wood (refresh) | ★★★★★ Excellent | Strip old finish + sand |
Steel doors with raised-panel designs are the easiest to transform because the existing grooves and contours already mimic the framework of traditional carriage-house doors. If your door is flat, don’t worry — you can still achieve convincing results with the right grain-painting technique.
Materials and Tools You’ll Need
Gather everything before you start so the project flows smoothly. Here’s a comprehensive checklist:
Paints & Finishes:
- High-quality exterior acrylic latex primer (1 gallon)
- Exterior latex base coat in a warm tan or light oak shade (1–2 gallons)
- Gel stain or glaze in walnut, mahogany, or cherry tone (1 quart)
- Clear exterior polyurethane topcoat, satin or semi-gloss (1 quart)
Tools:
- 3-inch angled sash brush (for detail work)
- 9-inch roller with ⅜-inch nap cover
- Paint tray and liner
- Painter’s tape (1.5-inch width)
- Drop cloths or plastic sheeting
- Fine-grit sandpaper (220-grit)
- Clean rags or cheesecloth
- Wood-graining rocker tool (optional but highly recommended)
- Bucket of clean water and mild detergent
Estimated Total Cost: $80–$160 for a standard two-car garage door — a fraction of a real wood door.
Step-by-Step Guide: How To Make Your Garage Door Look Like Wood
Follow these detailed steps carefully. Patience during preparation is what separates a professional-looking result from a sloppy one.
Step 1: Clean the Door Thoroughly (Day 1, Morning)
Dirt, grease, and oxidation will prevent paint from adhering properly. Mix 2 tablespoons of trisodium phosphate (TSP) substitute into 1 gallon of warm water (approximately 22–28°C / 72–82°F). Scrub every panel with a stiff-bristle brush, then rinse with a garden hose. Allow the door to dry completely — ideally 24 hours in direct sunlight.
Step 2: Sand and Repair (Day 1, Afternoon)
Lightly sand all surfaces with 220-grit sandpaper to create a “tooth” for the primer. Focus on any rust spots on steel doors; treat them with a rust converter first. Fill dents or scratches with exterior-grade auto body filler, let it cure, and sand smooth. Wipe away all dust with a tack cloth.
Step 3: Apply Primer (Day 2, Morning)
Using your roller for flat areas and the angled brush for grooves and edges, apply one even coat of exterior bonding primer. This step is non-negotiable — skipping it is the number-one reason faux wood finishes peel within a year. Let the primer dry according to the manufacturer’s instructions, typically 2–4 hours at temperatures above 10°C (50°F).
Step 4: Paint the Base Coat (Day 2, Afternoon)
Roll on two coats of your chosen base color, allowing each coat to dry for at least 4 hours. Think of this as the “raw wood” layer beneath the grain. Popular base shades include:
- Light Oak: Warm beige (#D4B896)
- Maple: Soft golden tan (#C9A96E)
- Pine: Pale creamy yellow (#E8D5A3)
Pro tip: Choose a base color that’s 2–3 shades lighter than your final desired tone. The glaze you add next will darken it significantly.
Step 5: Create the Wood Grain Effect (Day 3, Morning)
This is where the magic happens. There are two main approaches:
Method A — Graining Tool Technique (Beginner-Friendly):
- Brush a thin, even layer of gel stain or tinted glaze over one panel section (work in areas no larger than 60 × 60 cm / 24 × 24 inches).
- While the glaze is still wet, drag a wood-graining rocker tool across the surface in long, slightly curved strokes to simulate natural growth rings.
- Use the pointed end of the tool to add occasional “knots.”
- Wipe excess glaze from raised areas with a clean rag to create depth contrast.
Method B — Freehand Ragging Technique (No Special Tools):
- Apply glaze to a small section.
- Crumple a piece of cheesecloth and lightly drag it vertically through the wet glaze.
- Vary pressure to create darker and lighter streaks that resemble natural grain patterns.
For a deeper understanding of wood anatomy and why grain patterns vary by species, you can explore the Wikipedia article on Wood, which provides excellent visual references for realistic grain replication.
Step 6: Seal with a Protective Topcoat (Day 3, Afternoon)
Once the grain layer is fully dry (minimum 6 hours), apply two coats of clear exterior polyurethane using a clean roller. This UV-resistant barrier prevents fading, chalking, and moisture damage. Satin sheen looks most natural; avoid high-gloss unless you want a lacquered appearance.
Step 7: Reattach Hardware and Admire (Day 4)
Reinstall handles, hinges, and decorative hardware. Consider adding faux wrought-iron strap hinges ($15–$40 per set) to complete the carriage-house illusion. Step back and enjoy your stunning transformation!
Faux Wood vs. Real Wood Garage Doors: Pros and Cons
| Factor | Faux Wood Finish | Real Wood Door |
|---|---|---|
| Cost | $80–$160 (DIY) | $2,500–$10,000+ |
| Installation Time | 2–3 days | Professional install, 1 day |
| Durability | 5–8 years before refresh | 15–30 years with care |
| Maintenance | Occasional touch-ups | Annual sealing/staining |
| Weight | No change to existing door | Heavier; may need new springs |
| Authenticity | Very convincing up close | Genuine texture and aroma |
| Resale Value Boost | Moderate | High |
Common Mistakes to Avoid
Even experienced DIYers stumble on these pitfalls:
- Painting in direct midday sun. Heat causes the glaze to dry too fast, making grain manipulation impossible. Work in early morning or late afternoon when surface temperatures stay below 32°C (90°F).
- Skipping the primer. Adhesion failure is almost guaranteed on bare metal without it.
- Overloading the graining tool. Too much glaze creates muddy, unrealistic patterns. Less is more.
- Ignoring weather forecasts. Rain within 24 hours of your topcoat application can ruin the finish. Check for a minimum 48-hour dry window.
- Using interior products outdoors. Always verify that every product label reads “exterior grade.”
Frequently Asked Questions (FAQ)
Q1: How long does a faux wood finish last on a garage door?
A properly sealed faux wood finish typically lasts 5 to 8 years before noticeable fading occurs. Doors facing south or west (heavy sun exposure) may need a fresh topcoat every 3–4 years. Using a UV-blocking polyurethane extends longevity significantly.
Q2: Can I make a white garage door look like wood?
Absolutely. White is actually an ideal starting canvas. Simply skip the stripping step, clean thoroughly, apply a bonding primer designed for glossy surfaces, and proceed with the base coat and graining steps outlined above. The key is ensuring the primer bonds well to the existing slick finish.
Q3: Do I need to remove the garage door from its tracks?
No. Most homeowners complete this project with the door fully installed. Simply close the door, lock it in place, and work panel by panel. Removing the door adds unnecessary complexity and risk of spring-related injury.
Q4: What is the best paint brand for a wood-look garage door?
Top-performing brands include Sherwin-Williams Duration, Benjamin Moore Aura Exterior, and Behr Marquee. For the glaze layer, General Finishes Gel Stain and Rust-Oleum Varathane Wood Grain Kit are crowd favorites. Invest in quality — cheap paint fades and peels within a single season.
Q5: Will this technique work on a fiberglass garage door?
Yes, fiberglass accepts paint beautifully. Use a fine-grit scuff sand (320-grit) rather than aggressive sanding, and apply a high-adhesion primer formulated for non-porous surfaces. The rest of the process remains identical.
Q6: Can I use spray paint instead of brushes and rollers?
Spray paint works for the base coat if you mask surrounding areas carefully, but do not spray the graining layer. The wood grain effect requires physical manipulation of wet glaze, which is impossible with aerosol application. A hybrid approach — spray the base, hand-paint the grain — is perfectly valid.
Conclusion
Learning how to make your garage door look like wood is one of the highest-impact, lowest-cost upgrades you can give your home’s exterior. With roughly $100 in materials and a free weekend, you can achieve a luxurious carriage-house aesthetic that boosts curb appeal and potentially increases your property value. The key takeaways? Prep meticulously, choose exterior-grade products, and take your time with the graining step — that’s where realism lives.
If this guide helped you envision your dream garage door transformation, share it with friends and family on Facebook, Pinterest, or Instagram who might be staring at their own boring steel doors right now. Tag us in your before-and-after photos — we’d love to see your results! 🏡✨
Leave a Reply