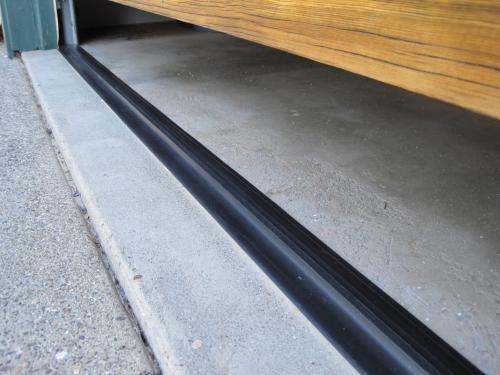
Dealing with a puddle-filled garage after a heavy rainstorm is incredibly frustrating and can lead to costly structural damage. If you are wondering how to keep water from going under garage door, you are definitely not alone. This comprehensive guide provides simple, proven, and budget-friendly solutions to protect your space and give you ultimate peace of mind.
How To Keep Water From Going Under Garage Door: Identifying the Root Causes
Before fixing the problem, it is crucial to understand why it happens. Water intrusion typically occurs due to a combination of worn-out components and environmental factors.
- Worn Weatherstripping: Over time, the rubber bottom seal degrades, cracks, or shrinks. This leaves gaps that invite moisture inside. According to industry standards, proper weatherstripping is essential to prevent rain and water from entering entirely or partially en.wikipedia.org.
- Poor Driveway Slope: If your driveway slopes toward the garage instead of away from it, gravity will naturally direct rainwater straight to your door threshold.
- Heavy Rain and Wind: Severe weather can drive water horizontally under even the tightest seals, overwhelming basic defenses.
- Uneven Garage Floor: Settling concrete over the years can create low spots where water pools right at the entrance.
Signs Your Garage Door Seal is Failing
Catching the problem early can save you hundreds of dollars in repairs. Watch out for these common warning signs:
- Visible Damage: Look for cracks, brittleness, or missing chunks in the rubber seal.
- Daylight Leaks: If you can see daylight from inside the closed garage, water can get in too.
- Musty Odors: A damp, earthy smell indicates trapped moisture and potential mold growth.
- Pest Intrusion: Insects and rodents often enter through the same gaps that allow water to seep in.
How To Keep Water From Going Under Garage Door: 5 Proven Methods
Here are the most effective, expert-approved strategies to stop garage door water leaks for good.
1. Replace the Garage Door Bottom Seal
The bottom seal is your first line of defense. If it is compromised, replacing it is the fastest and most budget-friendly fix.
- Estimated Cost: $20 to $50 for materials.
- Lifespan: Typically 5 to 7 years, depending on your local climate.
- Pro Tip: Choose a thick, dual-durometer EPDM rubber seal. It offers maximum flexibility and durability in both extreme heat and freezing cold.
2. Install a Garage Door Threshold Seal
A threshold seal is a heavy-duty rubber strip glued directly to the garage floor, right against the closed door. It creates a raised, active barrier that blocks water, debris, and pests.
- Effectiveness: Highly effective for driveways with minor slope issues or uneven concrete.
- Installation: Requires a meticulously clean, dry concrete surface and heavy-duty adhesive.
3. Improve Driveway Slope and Drainage
Sometimes, the best fix is located outside the garage. Ensuring your driveway has a positive slope (grading away from the garage) is critical for long-term prevention.
- Industry Standard: A slope of at least 1/4 inch per foot is recommended to direct water away from the structure.
- Action Plan: You may need to resurface the concrete or add a layer of asphalt near the entrance to correct the grade.
4. Add a French Drain or Trench Drain
For properties prone to heavy flooding, a dedicated drainage system is a game-changer. A trench drain installed just outside the garage door captures surface water before it ever reaches the threshold.
- Real-World Impact: Homeowners in flood-prone areas report up to a 90% reduction in garage water intrusion after installing a linear trench drain system.
- Maintenance: Requires occasional cleaning to remove leaves, dirt, and sediment buildup.
5. Apply Waterproof Sealant to the Garage Floor
While this does not stop water from entering, it protects your concrete from absorbing moisture. Unsealed concrete acts like a sponge, which can lead to mold and spalling.
- Recommended Product: Use a high-quality epoxy or polyurethane concrete sealer.
- Key Benefit: Makes cleaning up any minor leaks significantly easier and protects your stored items from dampness.
Step-by-Step Guide: Installing a Garage Door Threshold Seal
Installing a threshold seal is a highly effective DIY project. Follow these precise steps for a watertight, professional result:
- Measure and Cut: Measure the exact width of your garage door opening. Add 2 inches to the total length and cut the threshold seal using a sharp utility knife.
- Clean the Surface: Sweep the area thoroughly. Use a concrete degreaser and a stiff brush to remove all oil, dirt, and debris.
- Dry Completely: Ensure the concrete is 100% dry. Any residual moisture will prevent the adhesive from bonding properly.
- Apply Adhesive: Use a 1/4-inch bead of heavy-duty polyurethane construction adhesive along the bottom channel of the threshold seal.
- Position and Press: Align the seal flush against the closed garage door. Press down firmly along the entire length to ensure full contact.
- Cure Time: Keep the garage door closed. Allow the adhesive to cure for a full 24 hours at a temperature of 22–28°C (72–82°F) for optimal, permanent bonding.
Garage Door Bottom Seal vs. Threshold Seal: Which Is Better?
To help you decide which solution fits your needs, here is a quick, easy-to-read comparison:
| Feature | Garage Door Bottom Seal | Garage Door Threshold Seal |
|---|---|---|
| Location | Attached to the bottom of the door | Glued directly to the garage floor |
| Best For | Minor gaps, general maintenance | Active water pooling, uneven floors |
| Installation | Moderate (requires removing old retainer) | Easy (clean, apply adhesive, press) |
| Durability | 5–7 years (exposed to door friction) | 7–10 years (protected from direct friction) |
| Average Cost | $20 – $50 | $40 – $100 |
Frequently Asked Questions (FAQ)
Q1: Can I use a pool noodle to stop water under my garage door?
A: While it is a popular DIY hack, a pool noodle is only a temporary, short-term fix. It is not designed to withstand the weight of a garage door or resist harsh weather conditions. For a permanent solution, invest in a proper rubber threshold seal.
Q2: How often should I replace my garage door bottom seal?
A: You should inspect your bottom seal twice a year, ideally in the spring and fall. On average, it needs replacement every 5 to 7 years, but extreme weather conditions can accelerate wear and tear.
Q3: Will a threshold seal work on an uneven garage floor?
A: Yes, high-quality threshold seals are made from flexible, heavy-duty rubber designed to conform to minor cracks and uneven surfaces. However, for severe dips or slopes, combining a threshold seal with a drainage solution is highly recommended.
Q4: Is garage door water damage covered by homeowners insurance?
A: It depends on the cause. Sudden and accidental water damage (like a burst pipe) is typically covered. However, damage resulting from long-term neglect, poor maintenance, or gradual seeping under the door is usually excluded. Always check your specific policy.
Q5: Can I install a threshold seal in the winter?
A: It is not recommended. Most construction adhesives require a minimum temperature of 10°C (50°F) to cure properly. For the best, longest-lasting results, wait for a dry, mild day.
Q6: What is the best material for a garage door threshold seal?
A: EPDM (Ethylene Propylene Diene Monomer) rubber is widely considered the best material. It offers superior resistance to UV rays, extreme temperatures, and ozone degradation compared to standard vinyl or PVC alternatives.
Conclusion
Learning how to keep water from going under garage door is a vital step in protecting your home from costly water damage, mold growth, and pest infestations. Whether you choose to replace the bottom weatherstripping, install a robust threshold seal, or improve your driveway drainage, taking action now will save you significant time and money in the long run.
Do not wait for the next heavy storm to test your garage defenses. If you found this guide helpful, please share it with your friends, family, and neighbors on Facebook, Twitter, or Pinterest to help them protect their homes too!
Leave a Reply