Introduction
Are cold drafts, unexpected pests, or rising energy bills turning your garage into a frustrating space? You are not alone, and the solution is much simpler than you might think. Installing high-quality weather stripping for the bottom of a garage door creates an airtight seal, protecting your home from the elements while significantly boosting your overall energy efficiency. Let us dive into how you can solve this problem quickly and affordably.
Choosing the Best Weather Stripping For The Bottom Of A Garage Door
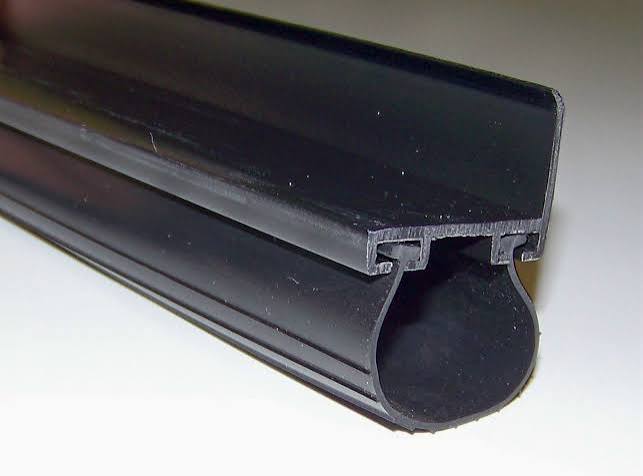
When it comes to sealing your garage, not all materials are created equal. The bottom seal is your garage’s first line of defense against rain, snow, wind, and unwelcome critters. According to the U.S. Department of Energy, proper air sealing can reduce heating and cooling costs by up to 15%, making this a high-ROI home improvement project.
There are three primary styles of bottom seals you will encounter:
- T-Style Seals: Named for their T-shaped profile, these slide into a matching channel at the bottom of the door. They are highly durable and offer excellent compression.
- U-Style (Bead) Seals: These feature a rounded bottom that fits into a U-shaped channel. They are the most common type found in modern residential garage doors.
- J-Style Seals: Less common, these are designed for specific older door models with a J-shaped retaining channel.
Expert Insight: “Homeowners often overlook the bottom seal until a major storm hits,” says Mark Davies, a certified garage door technician with over 15 years of field experience. “Upgrading to a thick EPDM rubber seal is the single most effective way to prevent water intrusion and thermal loss.”
Signs Your Garage Door Bottom Seal Needs Replacement
How do you know if it is time for an upgrade? Ignoring a worn-out seal can lead to costly structural damage over time. Watch for these clear warning signs:
- Visible Degradation: Look for cracks, brittleness, or pieces of rubber flaking off the existing strip.
- Daylight Peek-Through: If you can see sunlight shining under the closed door from inside the garage, air and water can get in, too.
- Water Pooling: After heavy rain, check for puddles forming just inside the garage threshold.
- Pest Intrusion: Finding insects, mice, or drafts near the floor level is a definitive red flag.
Weather Stripping Materials Compared: Pros vs. Cons
Choosing the right material is just as important as choosing the right style. Here is a quick comparison to help you decide:
| Material | Pros | Cons | Best For |
|---|---|---|---|
| EPDM Rubber | Highly durable, UV resistant, flexible in extreme cold. | Slightly higher upfront cost. | Most climates, especially areas with harsh winters. |
| Vinyl | Affordable, easy to find, lightweight. | Can become brittle and crack in freezing temperatures. | Mild climates and tight budgets. |
| Silicone | Exceptional temperature resistance, long lifespan. | Most expensive option, less impact resistance. | Extreme heat or specialized industrial doors. |
For most US homeowners, EPDM rubber is the gold standard. It maintains its flexibility in sub-zero temperatures and does not degrade quickly under intense summer sun. For a deeper understanding of how these materials function in building envelopes, you can explore the general principles of Weatherstripping on Wikipedia.
Step-by-Step Guide: How to Install Garage Door Bottom Weather Stripping
Replacing the seal is a highly rewarding DIY project. You do not need to be a handyman to complete this in under an hour. Follow these precise steps for a professional-grade finish.
Tools and Materials Needed:
- New weather stripping (measured to your door’s width)
- Tape measure
- Utility knife with a fresh blade
- Rubber mallet
- Flathead screwdriver or pry bar
- Cleaning supplies: Use 2 liters of warm soapy water, temperature 22–28°C, to effectively dissolve years of grime without damaging the metal.
Step 1: Measure the Door Width
Measure the exact width of your garage door from the inside edge to the inside edge. Standard single doors are usually 8 or 9 feet wide, while double doors are 16 or 18 feet. Buy a seal that is at least 2 inches longer than your measurement to allow for trimming.
Step 2: Remove the Old Seal
Open the garage door halfway. Locate the ends of the old weather stripping. Use a flathead screwdriver to gently pry the end out of the channel. Once an end is loose, pull the entire strip out steadily. If it is stubborn, tap the channel lightly with a rubber mallet to loosen the grip.
Step 3: Clean the Channel Thoroughly
This step is critical for a smooth installation. Pour your 2 liters of warm soapy water (22–28°C) into a bucket. Use a stiff brush to scrub the inside of the aluminum channel, removing all dirt, rust, and old adhesive residue. Dry it completely with a clean rag.
Step 4: Insert the New Weather Stripping
Start at one end of the door. Align the T-style or U-style bead of the new seal with the channel. Push it in by hand as far as it will go. For the final few feet, use a rubber mallet to gently tap the seal into place. Never use a steel hammer, as it will dent the aluminum channel.
Step 5: Trim the Excess
Once the seal is fully inserted and protruding slightly from the opposite end, use your utility knife to cut it flush with the edge of the door. Make sure the cut is straight and clean to ensure a tight fit against the door frame.
Step 6: Test the Seal
Close the garage door. Check from the inside to ensure there are no gaps. The seal should compress slightly against the concrete floor, creating a snug, uniform barrier.
Frequently Asked Questions (FAQ)
Q1: How often should I replace the weather stripping for the bottom of my garage door?
A: On average, you should inspect your seal annually and replace it every 3 to 5 years. However, if you live in an area with extreme temperature fluctuations or heavy UV exposure, you may need to replace it every 2 to 3 years to maintain optimal performance.
Q2: Can I install this myself, or do I need a professional?
A: This is a highly beginner-friendly DIY project. As long as you can safely measure, pull out the old strip, and tap in the new one with a rubber mallet, you do not need to hire a professional. You can save $100–$150 in labor costs by doing it yourself.
Q3: What is the difference between a bottom seal and a threshold seal?
A: The bottom seal attaches directly to the garage door and moves with it. A threshold seal is a rubber strip glued or nailed directly to the concrete floor, creating a secondary barrier. For maximum protection against heavy rain, using both is highly recommended.
Q4: Will new weather stripping stop water from flooding my garage?
A: It will stop rain, snowmelt, and wind-driven water from seeping under the door. However, it is not designed to hold back standing floodwater or major drainage issues. If your yard slopes toward the garage, you should also address your home’s exterior grading and gutter system.
Q5: Can I use adhesive-backed foam tape instead of a channel seal?
A: While adhesive foam tape is cheap and easy to apply, it is not recommended for the bottom of a garage door. The constant friction of the door opening and closing, combined with moisture, will cause the adhesive to fail within a few months. Always use a mechanical channel seal for longevity.
Conclusion
Upgrading the weather stripping for the bottom of a garage door is a small investment that yields massive returns. You will enjoy a cleaner, drier garage, fewer pest intrusions, and noticeable savings on your monthly energy bills. By choosing the right material, like durable EPDM rubber, and following a careful installation process, you can protect your home for years to come.
Did you find this guide helpful? Do not keep this valuable information to yourself! Share this article on Facebook, Twitter, or Pinterest to help your friends, family, and neighbors protect their homes from the elements this season.
Have a question or a pro tip of your own? Leave a comment below, and let us keep the conversation going!
Leave a Reply