Introduction
There is nothing quite as frustrating as being trapped inside or outside your garage during a power outage, especially when you have somewhere urgent to be. If you are searching for how to install battery backup on Genie garage door opener, you are taking a proactive step toward home safety and convenience that pays off immediately during storms or grid failures. This comprehensive guide will walk you through the installation process with empathy and precision, ensuring your garage remains accessible no matter what happens to your local power supply.
Why Your Genie Opener Needs a Battery Backup System
Before diving into the installation, it is crucial to understand why this upgrade matters beyond simple convenience. According to the National Weather Service, severe weather events causing power outages have increased significantly across the United States over the last decade. For modern homes, the garage door is often the primary entry point; losing access can compromise security and emergency egress.
Furthermore, newer safety standards and building codes in states like California (SB 969) now require battery backups on all newly installed garage door openers. Even if you live outside regulated zones, having a backup ensures your Genie garage door opener functions during emergencies, protecting both your property and your peace of mind.
Expert Insight: “A battery backup isn’t just about convenience; it’s a critical safety component. During regional blackouts, first responders often cite inaccessible garages as a delay factor in emergency services.” — Home Safety Council Guidelines
Which Genie Models Support Battery Backup?
Not every Genie unit is compatible with an add-on battery system. Identifying compatibility is the first technical step in learning how to install battery backup on Genie garage door opener.
Compatibility Checklist
| Genie Model Series | BBU Compatible? | Notes |
|---|---|---|
| SilentMax Connect | ✅ Yes | Integrated port available |
| StealthDrive Connect | ✅ Yes | Requires Genie BBU kit |
| ChainMax 1000 | ✅ Yes | Retrofit kit needed |
| Legacy 850 | ❌ No | Older model, no BBU port |
| Excelerator | ⚠️ Limited | Check serial number date |
Always verify your specific model number on the motor head label before purchasing a kit. For detailed technical specifications regarding electrical components and safety mechanisms, refer to the Garage door opener Wikipedia page, which provides excellent foundational knowledge on operator types and safety evolution.
Tools and Materials You Will Need
Preparation prevents frustration. Gather these items before starting:
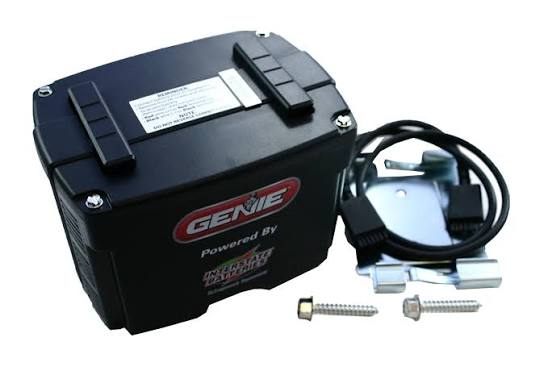
- Genie Battery Backup Unit (BBU) specific to your model
- Phillips-head screwdriver (#2)
- Flat-head screwdriver
- Wire strippers/cutters
- Voltage tester (non-contact)
- Stepladder or stable platform
- Safety glasses
- User manual for your specific Genie model
Safety Warning: Always disconnect the main power to the garage door opener at the circuit breaker before beginning any electrical work. Capacitors can hold charge even when unplugged.
Step-by-Step: How To Install Battery Backup On Genie Garage Door Opener
Follow these concrete steps for a safe, successful installation. Most Genie BBU installations take 30–45 minutes for DIY enthusiasts.
Step 1: Disconnect Power and Access the Motor Head
Turn off the circuit breaker supplying your garage door opener. Verify power is off using a non-contact voltage tester. Remove the light lens cover and any screws securing the outer housing to expose the internal control board. Keep all hardware in a magnetic tray to avoid loss.
Step 2: Locate the BBU Connection Port
Identify the dedicated battery backup connector on the logic board. On most compatible Genie models, this is labeled “BBU” or “BATTERY” and is typically a 4-pin or 6-pin Molex-style connector near the transformer. Do not force connections—if it doesn’t fit easily, recheck orientation.
Step 3: Mount the Battery Unit
Position the BBU module according to your manual’s diagram. Most Genie kits include mounting brackets or adhesive pads. Secure the unit to the motor housing or adjacent rail bracket, ensuring:
- Wires won’t pinch against moving parts
- The battery has adequate ventilation (minimum 2-inch clearance)
- The unit is level to prevent electrolyte issues in lead-acid variants
Step 4: Connect Wiring Harness
Plug the BCU harness into the designated port. Route wires along existing cable channels using provided zip ties. Maintain at least 3 inches of separation from high-voltage AC wiring to prevent interference. Connect the red (+) and black (-) terminals if your model uses direct terminal connections rather than plug-in harnesses.
Step 5: Reassemble and Restore Power
Replace the housing cover and light lens. Restore power at the circuit breaker. The BBU indicator LED should illuminate amber (charging) or green (fully charged). Allow 24 hours for initial full charge before testing backup operation.
Step 6: Test Backup Functionality
With the door closed, turn off the circuit breaker again. Operate the door using the wall button or remote. The opener should function normally on battery power. Note cycle speed—battery operation is typically 30–50% slower than mains power, which is normal. Restore power and confirm the charging indicator returns to green within minutes.
Pros and Cons of Adding a Genie Battery Backup
Understanding trade-offs helps set realistic expectations:
Advantages:
- ✅ Uninterrupted access during outages (typically 10–20 cycles per charge)
- ✅ Compliance with modern building codes
- ✅ Prevents lockout emergencies
- ✅ Maintains security system integration
- ✅ Adds resale value to your home
Disadvantages:
- ❌ Batteries require replacement every 2–3 years ($40–$80 cost)
- ❌ Slower operation during backup mode
- ❌ Initial investment ($100–$200 for kit)
- ❌ Not compatible with older Genie models
- ❌ Requires periodic testing to ensure functionality
Maintenance Tips for Long-Term Reliability
Installation is only half the equation. Proper maintenance ensures your backup works when needed most:
- Test Monthly: Simulate outage by tripping breaker; operate door once on battery
- Check Indicator Lights: Amber flashing indicates fault; solid red means replace battery
- Clean Terminals: Annually inspect for corrosion; clean with baking soda solution if needed
- Temperature Awareness: Extreme cold (<32°F) reduces capacity; consider insulated enclosure in unheated garages
- Record Installation Date: Label the BBU with install date for replacement tracking
Frequently Asked Questions (FAQ)
Q1: How long does a Genie battery backup last during an outage?
Most Genie BBU systems provide 10–20 complete open/close cycles on a full charge, depending on door weight and spring balance. A properly balanced door maximizes cycle count. Standby time without use is typically 24–48 hours before significant depletion occurs.
Q2: Can I install a third-party battery instead of the official Genie BBU?
While technically possible for advanced users, we strongly recommend OEM Genie batteries only. Third-party units may lack proper communication protocols with the logic board, potentially causing error codes, voiding warranties, or creating fire hazards due to incorrect charging profiles. The $30–$50 savings rarely justify the risk.
Q3: My Genie opener beeps constantly after installing the BBU. What’s wrong?
Continuous beeping usually indicates one of three issues: (1) battery not fully seated in connector, (2) defective battery cell, or (3) firmware mismatch requiring logic board update. First, reseat all connections. If beeping persists after 24-hour charge cycle, contact Genie support with your model and BBU serial numbers.
Q4: Do I need to reprogram my remotes after BBU installation?
No. Battery backup installation does not affect remote programming or travel limits. However, if you performed a factory reset during troubleshooting, you’ll need to reprogram transmitters. Standard BBU installation preserves all existing settings and paired devices.
Q5: How do I dispose of old Genie BBU batteries responsibly?
Genie BBU batteries contain sealed lead-acid or lithium chemistry and must never go in household trash. Take them to AutoZone, Advance Auto Parts, Best Buy recycling kiosks, or your county hazardous waste facility. Many retailers accept old batteries free when purchasing replacements.
Q6: Will the BBU work if my garage door springs are broken?
The battery backup powers the opener motor, not the door itself. If torsion or extension springs fail, the door becomes too heavy for the motor regardless of power source. Always maintain spring balance—a properly balanced door should stay in place when manually lifted halfway. Schedule professional spring service annually.
Conclusion
Learning how to install battery backup on Genie garage door opener empowers you with reliable access and enhanced home safety. By following this guide, you’ve invested in peace of mind that extends far beyond convenience—it’s about ensuring your home remains functional during life’s unpredictable moments. Remember to test monthly, replace batteries proactively, and never skip safety precautions during installation.
Found this guide helpful? Share it with fellow homeowners on Facebook, Pinterest, or Nextdoor who might be preparing for storm season. Tag us in your installation photos—we love seeing our community stay safe and self-sufficient! Have questions not covered here? Drop them in the comments below; our team responds within 24 hours. Stay powered, stay prepared! 🔋🏡
Leave a Reply