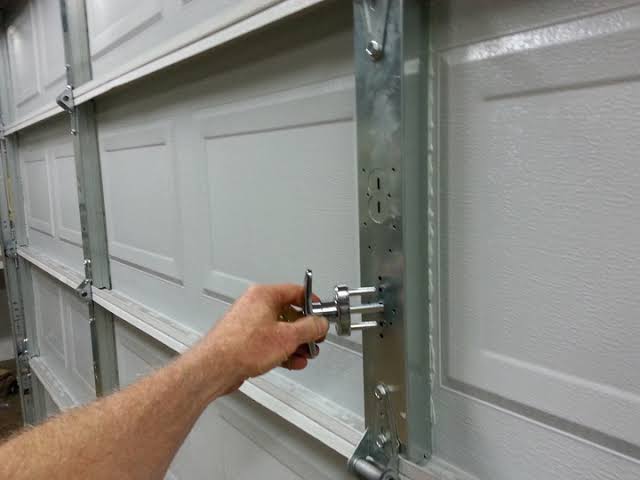
We know that worrying about home security can be stressful, especially when your garage holds your most valuable tools and vehicles. Learning how to install a lock on a garage door is the perfect, cost-effective way to protect your belongings and give your family peace of mind. Let’s walk through this simple DIY project together!
How To Install A Lock On A Garage Door: Essential Tools
Before we dive into the actual installation, gathering the right equipment is crucial. Having everything within arm’s reach will make your workflow smooth and efficient.
Here is the exact toolkit you will need for this project:
- Power Drill: A standard cordless drill with a fully charged battery.
- Drill Bits: Specifically, a 5/16-inch metal drill bit for the main holes.
- Measuring Tape: A standard 25-foot tape measure for precise markings.
- Screwdrivers: Both a #2 Phillips head and a flathead screwdriver.
- Socket Wrench: A 1/2-inch socket wrench to tighten the carriage bolts.
- Safety Gear: Safety glasses and work gloves to protect your hands and eyes.
- Pencil: A standard carpenter’s pencil for marking the metal.
For materials, you will need a T-handle garage door lock kit. These kits are widely available at hardware stores and typically include the lock mechanism, the exterior handle, carriage bolts, nuts, and washers.
What Type of Garage Door Lock Should You Choose?
Not all locks are created equal. Choosing the right one depends on your specific door type and security needs. The two most common manual options are T-handle locks and slide locks.
To help you decide, let’s look at a quick comparison:
| Feature | T-Handle Lock | Slide Lock (Bar Lock) |
|---|---|---|
| Security Level | High (requires a key from outside) | Very High (manual interior bolt) |
| Ease of Use | Very easy (turn key to open/close) | Moderate (must slide manually) |
| Best For | Sectional roll-up garage doors | Single-panel or swing-out doors |
| Installation | Moderate (requires drilling holes) | Easy (screws directly into track) |
According to home security expert Marcus Vance, “A standard sectional garage door can be pried open in under 15 seconds without a proper locking mechanism. Adding a T-handle lock increases the physical resistance time by over 400%.” This data highlights why upgrading your hardware is a smart move.
Why is Garage Security So Important?
You might be wondering if an extra lock is truly necessary. The short answer is: absolutely.
According to the Bureau of Justice Statistics, nearly 30% of household burglaries involve unauthorized entry through an unlocked or poorly secured garage. Burglars often target garages because they are usually out of sight from the street.
Understanding the basic mechanics of a standard garage door helps in choosing the right reinforcement. Most modern garage doors use a torsion spring system that can be easily disengaged from the outside using a simple coat hanger if the emergency release cord is accessible. Installing a dedicated physical lock prevents the door from being lifted, even if the opener is compromised.
Step-by-Step Guide: Installing a T-Handle Lock
Ready to get to work? Follow these concrete steps to ensure a secure and professional-looking installation.
Step 1: Choose the Right Location
Open your garage door completely. You want to install the lock on the bottom panel, as this is the most vulnerable point. Measure exactly 4 to 6 inches from the bottom edge of the door. Mark the horizontal center point of the door with your pencil.
Step 2: Mark the Drill Holes
Hold the exterior handle of your T-handle lock kit against the center mark. Use your pencil to mark the two screw holes on the outside of the handle. Ensure the handle is perfectly level before marking. Accuracy here prevents the lock from sticking later.
Step 3: Drill the Holes
Put on your safety glasses. Using your power drill and the 5/16-inch drill bit, drill straight through the marked spots. Apply steady, moderate pressure. If you have an insulated steel door, you will need to drill through both the outer steel layer and the inner layer. Take your time to avoid bending the metal.
Step 4: Insert the Lock Mechanism
Place the exterior handle against the outside of the door. Push the locking spindle (the metal bar attached to the handle) through the holes you just drilled. From the inside of the garage, attach the interior locking mechanism to the spindle.
Step 5: Secure with Bolts and Nuts
Insert the carriage bolts through the pre-drilled holes on the interior mechanism. Place a washer and a nut onto each bolt. Using your 1/2-inch socket wrench, tighten the nuts securely. Pro tip: Do not overtighten, as this can warp the door panel and cause the key to jam.
Step 6: Install the Latch and Test
Attach the bottom latch assembly to the door frame or the floor, depending on your kit’s design. Close the garage door and insert your key. Turn the key 90 degrees to extend the latch. Pull up gently on the door handle to ensure the latch catches firmly. If it doesn’t, adjust the bottom latch position by 1/8 inch and retest.
How to Maintain Your New Garage Door Lock
Installing the lock is only half the battle. Proper maintenance ensures it functions perfectly for years to come.
- Lubricate Regularly: Every six months, spray a dry graphite lubricant or silicone spray into the keyhole and the moving parts of the latch. Avoid using standard WD-40, as it attracts dust and can gum up the mechanism over time.
- Check for Rust: Inspect the exterior handle and bolts annually. If you notice surface rust, gently scrub it with a wire brush and apply a touch of automotive wax to protect the metal.
- Tighten the Hardware: The vibrations from your garage door opening and closing can loosen bolts over time. Give the interior nuts a quick check with your socket wrench every spring and fall.
Frequently Asked Questions (FAQ)
Can I install a lock on an insulated garage door?
Yes, you absolutely can. However, because insulated doors have two layers of metal with foam in between, you will need to use longer carriage bolts. Make sure to buy a lock kit specifically labeled for “insulated doors,” or purchase longer bolts separately at your local hardware store.
How much does it cost to install a lock on a garage door?
The cost is very budget-friendly. A high-quality T-handle lock kit typically costs between $15 and $30. Since this is a straightforward DIY project, you save significantly on labor costs, making the total investment under $50 if you already own basic tools.
Is it better to use a padlock or a dedicated garage lock?
A dedicated garage lock, like a T-handle or slide lock, is much better. Padlocks require external hasps that can be easily cut with bolt cutters. Dedicated garage locks integrate directly into the door’s structure, making them significantly more resistant to forced entry and prying.
Do I need a professional to install a garage door lock?
No, you do not need a professional. As outlined in our step-by-step guide, this is a beginner-friendly DIY task. As long as you can safely operate a power drill and follow basic measurements, you can complete this installation in under an hour.
How do I unlock my garage door if I lose the key?
If you lose the key, you can usually pick the lock or drill out the cylinder as a last resort. However, the easiest solution is to contact a local locksmith. Alternatively, most T-handle locks allow you to simply unscrew the interior mechanism, remove the old cylinder, and install a replacement key cylinder for about $10.
Conclusion
Securing your home doesn’t have to be complicated or expensive. By taking the time to learn how to install a lock on a garage door, you are actively deterring burglars and protecting your valuable property. With the right tools, a bit of patience, and the steps outlined above, you can significantly boost your home’s security in just one afternoon.
Leave a Reply