Tired of dealing with noisy ceiling-mounted openers that take up valuable overhead space? You’re not alone. Many homeowners are switching to sleeker, quieter alternatives that free up their garage ceilings for storage or other uses. If you’ve decided to upgrade, knowing how to install a Chamberlain wall mount garage door opener is the key to a smooth, professional-looking result without hiring an expensive technician.
This guide walks you through every step, from unboxing to final testing, ensuring your new opener works safely and efficiently. Whether you’re a seasoned DIYer or a first-timer, we’ll break down the process into manageable chunks so you can feel confident throughout the installation.
Why Choose a Wall Mount Garage Door Opener?
Before diving into the tools and steps, it’s helpful to understand why wall mount models like those from Chamberlain have become increasingly popular among U.S. homeowners.
Unlike traditional chain-drive or belt-drive openers mounted on the ceiling, wall mount units (also known as jackshaft openers) attach directly to the torsion bar above your garage door. This design offers several distinct advantages:
- Space Savings: By moving the motor to the side wall, you reclaim entire sections of your ceiling. This is ideal for storing kayaks, bikes, or overhead racks.
- Quieter Operation: Wall mounts typically use direct-drive technology, which eliminates the rattling chains and belts found in older models.
- Enhanced Security: These units often come with advanced encryption and battery backup systems, keeping your garage secure even during power outages.
According to industry reports, the smart home garage sector has grown by over 15% annually, with wall-mount systems leading the charge due to their compatibility with modern smart home ecosystems like MyQ®.
Tools and Materials You’ll Need
Proper preparation prevents poor performance. Before you start drilling, gather these essential tools. Having everything ready will cut your installation time in half.
| Tool/Material | Purpose |
|---|---|
| Power Drill & Bits | For mounting brackets and securing hardware. |
| Level | Ensures the rail and motor are perfectly aligned. |
| Socket Set | Tightening bolts on the torsion bar adapter. |
| Stepladder | Safe access to high mounting points. |
| Wire Strippers/Cutters | Preparing sensor and control wires. |
| Voltage Tester | Confirming power is off before wiring. |
| Chamberlain Wall Mount Kit | Includes motor, rail, brackets, and hardware. |
Pro Tip: Always check the specific model number of your Chamberlain opener (e.g., WLD1000EV or similar) against the manual included in the box. Requirements can vary slightly between generations.
Step 1: Prepare the Garage Door System
Safety is paramount when working with garage doors, which are under significant tension.
- Disconnect Power: Unplug your existing opener if you have one.
- Lock the Door: Close the garage door completely and engage the manual lock if available.
- Release Tension Carefully: If you are removing an old opener, follow the manufacturer’s instructions to release spring tension. Note: If you are unfamiliar with torsion springs, consider hiring a professional for this specific step, as improper handling can cause serious injury.
Ensure the door moves smoothly up and down manually. Any binding or resistance should be addressed before installing the new motor.
Step 2: Install the Header Bracket and Rail
The header bracket connects the rail to the wall above the garage door opening.
- Locate the Center: Find the center point of the garage door opening on the header wall.
- Mount the Bracket: Use the provided lag screws to secure the header bracket. Ensure it is level and firmly attached to a stud or structural support.
- Attach the Rail: Slide the rail into the header bracket. Do not tighten fully yet; leave some room for adjustment.
For wall mount systems, the rail extends horizontally from the wall to the torsion bar assembly. Precision here ensures the door opens evenly without jerking.
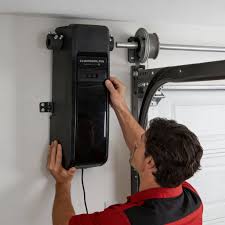
Step 3: Mount the Motor Unit to the Wall
This is the core of learning how to install a Chamberlain wall mount garage door opener. The motor unit houses the drive mechanism and electronics.
- Choose the Location: Select a spot on the side wall near the torsion bar, typically within 2–3 feet of the door’s centerline. Ensure there is a nearby electrical outlet.
- Mark Mounting Holes: Hold the motor bracket against the wall and mark the drill holes. Use a stud finder to ensure you are anchoring into wood studs for maximum stability.
- Secure the Motor: Drill pilot holes and bolt the motor bracket securely to the wall. Hang the motor unit on the bracket.
Make sure the motor is level. An uneven motor can cause premature wear on the internal gears.
Step 4: Connect to the Torsion Bar
The wall mount opener drives the door by rotating the torsion bar directly.
- Install the Drum Adapter: Attach the provided adapter kit to the torsion bar’s winding cone. This adapter connects the motor’s output shaft to the bar.
- Align the Shaft: Extend the motor’s drive shaft to meet the adapter. Use the coupling hardware provided in the kit to join them.
- Tighten Securely: Ensure all set screws are tightened according to the torque specifications in your manual. A loose connection here will result in slippage and operational failure.
For more technical details on torsion bar mechanics, you can refer to general mechanical principles outlined on Wikipedia’s page on Garage Door Openers.
Step 5: Wire the Safety Sensors and Controls
Modern openers require safety sensors to prevent accidents.
- Install Sensors: Mount the sending and receiving sensors on either side of the garage door, about 6 inches above the floor. They must face each other directly.
- Run Wiring: Route the sensor wires along the wall trim to the motor unit. Avoid running wires across the floor where they can be tripped over.
- Connect Terminals: Plug the sensor wires into the designated terminals on the motor head. Match the colors correctly (usually white to white, black to black).
Test the sensors by waving an object between them while the door is closing. The door should immediately reverse direction.
Step 6: Program and Test the Opener
Now comes the rewarding part: seeing your hard work in action.
- Restore Power: Plug in the motor unit.
- Set Limits: Use the control panel to set the “Up” and “Down” travel limits. The door should stop precisely at the floor when closing and fully open without hitting the stops.
- Adjust Force: Calibrate the force settings so the door reverses if it encounters an obstacle.
- Sync Remotes: Follow the instructions to pair your remote controls and keypad.
- Connect to MyQ®: Download the MyQ app and follow the prompts to connect your opener to Wi-Fi. This allows you to monitor and control your garage from anywhere.
Frequently Asked Questions (FAQ)
Q: Can I install a wall mount opener on any garage door?
A: Most wall mount openers are designed for sectional doors with torsion spring systems. They are generally not compatible with extension spring systems or single-panel doors without significant modification. Always check your door type before purchasing.
Q: Do I need a professional electrician?
A: If you have an existing grounded outlet near the installation site, you likely do not need an electrician. However, if you need to run new wiring or install a new circuit, hiring a licensed electrician is recommended for safety and code compliance.
Q: How long does installation take?
A: For an experienced DIYer, installation typically takes 3–5 hours. First-time installers should budget a full day to ensure careful alignment and troubleshooting.
Q: Is a battery backup necessary?
A: While not strictly required for operation, a battery backup is highly recommended. It ensures you can still open your garage during power outages, which is crucial for security and convenience. Many newer Chamberlain models include this feature built-in.
Q: What if my door is unbalanced?
A: An unbalanced door will strain the opener and shorten its lifespan. Before installation, disconnect the opener and manually lift the door halfway. If it doesn’t stay in place, your springs need adjustment by a professional.
Conclusion
Learning how to install a Chamberlain wall mount garage door opener empowers you to upgrade your home’s functionality and aesthetics without breaking the bank. By following these steps, you’ve not only saved on labor costs but also gained a deeper understanding of your home’s mechanical systems.
Enjoy the quiet operation, extra ceiling space, and smart connectivity your new opener provides. If you found this guide helpful, please share it with friends or family who might be considering a similar upgrade. Happy DIYing!
Leave a Reply