Introduction
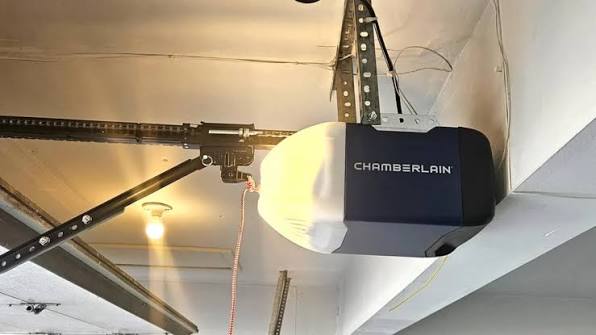
Replacing or upgrading your garage door system can feel intimidating, but learning how to install a Chamberlain garage door opener with chain is a manageable weekend project that saves hundreds of dollars in labor costs. Many US homeowners face noisy, outdated openers or broken chains and need a reliable, cost-effective solution without hiring a professional. This comprehensive guide walks you through every step with safety-first precision, ensuring your new chain-drive system operates smoothly and securely for years to come.
Why Choose a Chain-Drive Chamberlain Opener?
Before diving into the installation process, it is essential to understand why chain-drive systems remain the most popular choice in American households. According to industry data from the Door and Access Systems Manufacturers Association (DASMA), chain-drive openers account for nearly 60% of all residential garage door opener sales in the United States due to their durability and lifting power.
Pros and Cons of Chain-Drive Systems
| Feature | Advantages | Disadvantages |
|---|---|---|
| Lifting Power | Handles heavy wooden/insulated doors easily | N/A |
| Durability | Steel chain withstands extreme temperatures | Requires periodic lubrication |
| Cost | Most affordable drive type ($150–$250 avg) | Higher maintenance than belt drives |
| Noise Level | N/A | Louder operation (55–65 dB) |
| Climate Performance | Unaffected by humidity or cold | Can stretch over decades of use |
Chain drives are ideal for detached garages where noise is less of a concern and for heavier double-car doors. For more background on the mechanical principles behind these systems, you can reference the engineering overview of garage door openers on Wikipedia, which explains the trolley-and-rail mechanism that makes chain drives so effective.
What Tools Do You Need Before Starting?
Gathering the right tools prevents frustrating mid-installation trips to the hardware store. Here is your complete checklist:
- Stepladder (minimum 8-foot height for standard ceilings)
- Power drill with 3/16″ and 1/4″ masonry/wood bits
- Adjustable wrench set (7mm–19mm)
- Locking pliers (Vise-Grip style)
- Tape measure (25-foot minimum)
- Level (48-inch torpedo level preferred)
- Safety glasses and work gloves
- Wire strippers/crimpers (for safety sensor wiring)
- Helper (strongly recommended for rail assembly)
⚠️ Critical Safety Warning: Always disconnect power to the existing opener at the circuit breaker before beginning. Garage door springs store lethal amounts of tension—never attempt to adjust or replace torsion springs yourself. Hire a certified DASMA technician for spring work.
Step-by-Step: How To Install A Chamberlain Garage Door Opener With Chain
Step 1: Assemble the Rail and Trolley System (45–60 Minutes)
Unbox all components and verify against the packing list. Lay the rail sections on a flat surface and connect them using the provided bolts and locking nuts. Torque all rail bolts to 15–20 ft-lbs using your adjustable wrench—overtightening can warp the rail channel. Slide the trolley onto the assembled rail before mounting; this is impossible to do after the rail is secured to the header bracket. Attach the chain to the trolley carriage following the directional arrows stamped on the chain links. The master link should face upward when the trolley is in the closed-door position.
Step 2: Mount the Header Bracket and Motor Unit (30–45 Minutes)
Locate the structural header above your garage door opening. Using your level, mark the centerline 2 inches above the highest point of door travel. Secure the header bracket with minimum 3/8″ × 3″ lag screws driven into solid wood framing—drywall anchors are never acceptable here. With your helper supporting the motor unit, lift the assembled rail into position and attach it to the header bracket using the clevis pin and cotter key. Temporarily support the motor end with your stepladder while you proceed to the next step.
Step 3: Install the Door Bracket and Connect the Arm (20–30 Minutes)
Mount the door bracket to the top section of your garage door, centered horizontally and positioned exactly 2 inches below the top roller track. Use the reinforced mounting plate included with your Chamberlain kit. Attach the straight arm to the trolley and the curved arm to the door bracket, then join them with the provided clevis pin. Adjust the arm length so the door sits fully closed with zero gap when the trolley is at its limit switch position. Test manually by pulling the emergency release cord and cycling the door by hand—it should move smoothly with no binding.
Step 4: Wire Safety Sensors and Control Panel (25–35 Minutes)
Mount the sending and receiving sensors 6 inches above the floor on each side of the door opening, aligned perfectly so indicator lights show solid (not blinking). Run the low-voltage wires along the wall and ceiling using wire clips spaced every 18 inches. Connect wires to the motor unit terminals matching color codes (white-to-white, black-to-black). Install the wall control panel at minimum 5 feet above floor level per NEC code to prevent child access. Strip wire ends to exactly 5/16″ before inserting into terminal screws to avoid shorts.
Step 5: Set Travel Limits and Force Adjustments (15–20 Minutes)
Restore power at the circuit breaker. Press and hold the “Learn” button until the LED illuminates, then program your remote. Use the adjustment screws on the motor housing to set the open limit so the door stops 1–2 inches below full vertical, and the close limit so it seals evenly without crushing the weatherstrip. Test the auto-reverse safety feature by placing a 2×4 board flat on the floor under the door—the opener must reverse within 2 seconds of contact. Adjust force sensitivity in quarter-turn increments until reversal occurs reliably without false triggers.
FAQ: Common Questions About Chamberlain Chain Drive Installation
How long does it take to install a Chamberlain chain drive opener?
Most experienced DIYers complete installation in 3–5 hours, including testing and adjustments. First-time installers should budget 6–8 hours. Professional technicians typically finish in 2–3 hours due to familiarity and specialized tools.
Can I reuse my existing rail and hardware?
No. Chamberlain explicitly states that mixing components between models voids the warranty and creates safety hazards. Rail dimensions, trolley specifications, and chain pitch vary significantly even within the same brand. Always use the complete kit provided.
Why is my newly installed chain drive making grinding noises?
Grinding usually indicates misaligned rail sections or insufficient chain tension. Recheck all rail bolt torque values and ensure the chain has approximately 1/4″ of vertical play at the midpoint between sprocket and trolley. Apply Chamberlain-approved lithium-based grease to the chain—never use WD-40, which attracts debris.
Do I need a permit to install a garage door opener myself?
Permit requirements vary by municipality. Most US jurisdictions do not require permits for like-for-like opener replacements, but new electrical circuits or structural modifications typically do. Check with your local building department before starting.
How often should I maintain my chain drive opener?
Lubricate the chain and rollers every 6 months with manufacturer-approved grease. Test safety sensors monthly. Inspect chain tension and hardware tightness annually. Replace the entire chain assembly every 10–15 years regardless of apparent condition.
Final Thoughts and Next Steps
Learning how to install a Chamberlain garage door opener with chain empowers you to upgrade your home’s security and convenience while building valuable DIY skills. By following this guide meticulously, prioritizing safety over speed, and respecting the mechanical tolerances specified by Chamberlain, you will achieve professional-grade results at a fraction of the cost. Remember that proper installation directly impacts the lifespan of your opener—a well-installed chain drive routinely lasts 15+ years with basic maintenance.
Found this guide helpful? Share it on Facebook, Pinterest, or Reddit to help fellow homeowners tackle their garage door projects confidently. Tag us in your installation photos—we love seeing successful DIY transformations! And if you encountered any challenges during your install, drop a comment below; our community of experienced DIYers is always ready to troubleshoot together. Safe installing! 🔧🏡
Leave a Reply