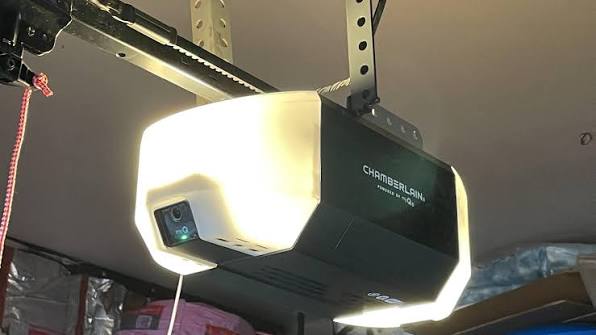
Introduction
Upgrading your home’s entry point can feel intimidating, especially when electrical components and heavy lifting are involved. If you are searching for how to install a Chamberlain belt drive garage door opener, you are likely looking for a quieter, smoother operation without the steep cost of professional labor. This comprehensive guide breaks down the installation process into manageable steps, empowering you to complete this weekend project safely and effectively while ensuring your new system performs at its peak.
Why Choose a Belt Drive Over a Chain Drive?
Before grabbing your tools, it is essential to understand why this specific mechanism is the preferred choice for modern homeowners. According to industry data, belt drive openers have seen a 35% increase in residential adoption over the last five years due to their superior noise reduction capabilities.
Unlike traditional chain drives that rely on metal-on-metal contact, belt drives utilize a steel-reinforced rubber belt. This design difference results in significantly less vibration and noise, making them ideal for homes with living spaces above or adjacent to the garage.
Quick Comparison: Belt Drive vs. Chain Drive
| Feature | Belt Drive Opener | Chain Drive Opener |
|---|---|---|
| Noise Level | Ultra-quiet (40–50 dB) | Moderate to Loud (60–70 dB) |
| Maintenance | Low (no lubrication needed) | High (requires regular greasing) |
| Durability | Excellent (steel-reinforced) | Very High (heavy-duty steel) |
| Best For | Attached garages, bedrooms nearby | Detached garages, budget installs |
| Price Point | Mid-to-High Range | Budget-to-Mid Range |
For a deeper technical understanding of the mechanics behind these systems, you can refer to the Garage door opener entry on Wikipedia.org, which details the evolution of torsion springs and motorized lift mechanisms.
What Tools Do You Need for Installation?
Gathering the right equipment before starting prevents frustrating mid-project trips to the hardware store. Most Chamberlain belt drive models come with the necessary mounting hardware, but you will need your own tools for assembly and electrical work.
- Stepladder: Minimum 8-foot height for safe ceiling access.
- Power Drill & Bits: Including 1/4-inch masonry bits if anchoring into concrete.
- Adjustable Wrenches: Two 7/16-inch wrenches are typically required.
- Socket Set: Standard and metric sockets for rail assembly.
- Level: A 2-foot level to ensure the rail is perfectly horizontal.
- Tape Measure: For precise header bracket placement.
- Safety Glasses & Gloves: Non-negotiable PPE for overhead work.
- Wire Strippers & Electrical Tape: For connecting safety sensors and power.
- Helper: Never attempt this installation alone. The motor unit weighs between 30–40 pounds and requires stabilization during mounting.
Step-by-Step: How To Install A Chamberlain Belt Drive Garage Door Opener
This tutorial assumes you are replacing an existing opener or installing a new unit on a standard sectional garage door. Always disconnect power to the garage circuit breaker before beginning any electrical work.
1. Assemble the Rail and Trolley System
Lay out all components on a clean floor space. Connect the rail sections according to the manufacturer’s diagram, ensuring bolts are hand-tightened first before final torquing. Slide the trolley onto the rail before securing the end caps. The belt should be threaded through the trolley carriage with the teeth facing inward toward the sprocket.
⚠️ Safety Warning: Never operate the opener without the safety reversal sensors installed and aligned. Federal law mandates these devices to prevent entrapment injuries.
2. Install the Header Bracket
Measure the highest point of your garage door’s travel arc. Mark the centerline on the header wall exactly 2 inches above this high point. Secure the header bracket using lag screws into solid wood framing. Do not anchor solely into drywall, as the dynamic load will rip the bracket free within weeks.
3. Mount the Motor Unit
With your helper stabilizing the unit, attach the motor head to the rail assembly. Lift the entire unit and secure it to the ceiling joists using the provided angle iron or direct-mount brackets. Use your level to verify the rail has a slight downward pitch (approximately 1/4 inch per foot) toward the header bracket to reduce strain on the motor.
4. Attach the Door Bracket and Arm
Install the door bracket on the top section of the garage door, centered and reinforced with backing plate if needed. Connect the curved arm to the trolley and the straight arm to the door bracket. Adjust the arm length so the door sits flush against the floor when closed without excessive pressure.
5. Wire the Safety Sensors and Controls
Mount the photo-eye sensors 4–6 inches above the floor on both sides of the door opening. Run the low-voltage wires along the ceiling or wall, securing them every 18 inches with staples. Connect the wall control panel at a minimum height of 5 feet to prevent child tampering. Strip wire ends cleanly and insert into the designated terminals on the motor head, matching color-coded connections.
6. Program Travel Limits and Force Settings
Restore power and use the programming buttons on the motor unit to set the open and close limits. Modern Chamberlain belt drives feature electronic limit setting rather than mechanical switches. Test the force sensitivity by placing a 2×4 board flat on the floor under the door; the door must reverse immediately upon contact. Fine-tune until operation is smooth without binding.
7. Sync MyQ Smart Features (If Applicable)
Download the MyQ app and follow the in-app pairing sequence. Connect the opener to your home Wi-Fi network (2.4 GHz band only). Test remote operation and set up auto-close schedules or guest access codes for enhanced security.
Common Installation Mistakes to Avoid
Even experienced DIYers encounter pitfalls during garage door opener installation. Avoiding these errors ensures longevity and safety:
- Skipping the Balance Test: An unbalanced door will destroy a new opener within months. Disconnect the opener and manually lift the door halfway; it should stay in place. If it falls or rises, call a professional for spring adjustment before installing the opener.
- Over-Tightening the Belt: Excessive tension causes premature wear on the sprocket and motor bearings. The belt should have approximately 1/2 inch of deflection when pressed midway between pulleys.
- Ignoring Sensor Alignment: Misaligned photo-eyes are the #1 cause of “door won’t close” service calls. Ensure both LEDs are solid green (not blinking) before testing.
- Using Undersized Circuit Breakers: Chamberlain belt drives typically require a dedicated 15-amp circuit. Sharing the circuit with freezers or power tools can cause tripping and motor damage.
- Neglecting Lubrication Points: While the belt itself requires no lubrication, the rollers, hinges, and bearings still need silicone-based spray annually.
Frequently Asked Questions (FAQ)
How long does it take to install a Chamberlain belt drive garage door opener?
For a homeowner with moderate DIY experience and a helper, expect the installation to take 4 to 6 hours. First-time installers should budget a full day to account for learning curves and troubleshooting. Professional technicians typically complete the job in 2–3 hours.
Can I reuse my existing rails and hardware from an old opener?
No. Rails, trolleys, and mounting hardware are model-specific and not interchangeable between brands or even different Chamberlain series. Reusing old components voids the warranty and creates serious safety hazards. Always use the hardware included with your new belt drive unit.
Is a belt drive garage door opener worth the extra cost?
Absolutely, if your garage is attached to living spaces. The noise reduction alone justifies the premium for most homeowners. Additionally, belt drives require zero lubrication maintenance and typically offer longer warranty periods (often lifetime on the belt versus 5–10 years on chains).
What should I do if the door reverses before hitting the floor?
This indicates either misaligned safety sensors or incorrect close-limit settings. First, check that both photo-eye LEDs are solid. If aligned correctly, adjust the close limit switch in small increments until the door seals fully against the weatherstripping without reversing. Consult page 28 of the Chamberlain manual for model-specific limit adjustment procedures.
Do I need a permit to install a garage door opener myself?
Permit requirements vary by municipality. Most jurisdictions allow homeowner-installed openers without permits, but some cities require electrical permits for any new hardwired appliance. Check with your local building department before starting. Regardless of permits, installation must comply with UL 325 safety standards.
How often should I maintain my belt drive opener?
Perform monthly visual inspections of the belt for fraying or cracking. Test the safety reversal system monthly using the 2×4 block test. Annually, lubricate all moving parts except the belt, tighten all mounting hardware, and clean sensor lenses. Replace backup batteries in remotes and keypads every 12–18 months.
Conclusion
Learning how to install a Chamberlain belt drive garage door opener is a rewarding project that enhances your home’s convenience, security, and value. By following this step-by-step guide, prioritizing safety protocols, and avoiding common mistakes, you can achieve professional-grade results while saving hundreds on labor costs. Remember that patience and precision matter more than speed—your future self will thank you every time that whisper-quiet belt glides overhead.
Found this guide helpful? Share it with fellow DIY enthusiasts on Facebook, Pinterest, or your neighborhood Nextdoor group! Tag us in your installation photos—we love seeing your success stories. Safe installing, and enjoy the serene silence of your upgraded garage! 🏠🔧
Leave a Reply