Introduction
There is nothing quite as frustrating as a garage door that refuses to budge because of a dead power source, leaving you stranded or locked out. If you are currently staring at a blinking light or a non-responsive unit and wondering how to get battery out of LiftMaster garage door opener, you have come to the right place. We understand the urgency of this situation, which is why this guide provides clear, safe, and manufacturer-aligned steps to help you resolve the issue quickly without damaging your equipment.
Understanding Your LiftMaster Battery System
Before you grab a screwdriver, it is vital to identify which battery needs removal. LiftMaster openers typically utilize two distinct types of batteries, and confusing them can lead to unnecessary disassembly or safety risks.
- Backup Battery (Internal): A large 12V sealed lead-acid or lithium-ion battery located inside the main motor housing. This powers the opener during electrical outages.
- Remote/Keypad Battery (External): Small coin-cell (CR2032) or alkaline batteries found in handheld remotes and external keypads.
According to general engineering principles documented on Wikipedia, modern residential openers integrate these backup systems to ensure safety compliance and operational continuity during power failures. Knowing this distinction ensures you apply the correct removal method below.
Safety First: Critical Precautions Before Removal
Battery removal involves electrical components and potential chemical hazards. Never skip these precautions:
- Disconnect Power: Unplug the opener from the ceiling outlet or turn off the dedicated circuit breaker. The backup battery can still deliver a shock even when unplugged.
- Wear Protection: Use insulated gloves and safety glasses. Old batteries may leak corrosive acid or swell.
- Avoid Metal Tools Near Terminals: Using a metal screwdriver near exposed terminals can cause short circuits. Opt for plastic spudgers or insulated tools when possible.
- Check for Swelling: If the backup battery appears bloated, cracked, or leaking, do not force it out. Contact a certified LiftMaster technician immediately.
⚠️ Expert Warning: Never attempt to puncture, crush, or incinerate any garage door opener battery. Sealed lead-acid batteries contain sulfuric acid and lead, requiring specialized recycling.
How To Get Battery Out Of LiftMaster Garage Door Opener (Backup Unit)
This section addresses the internal backup battery, which is the most common source of confusion. Most LiftMaster models (8500W, 8550WLB, B970T) follow a similar removal architecture.
Step 1: Access the Battery Compartment
Locate the battery cover on the side or bottom of the motor head. On most wall-mount and belt-drive models, this is a rectangular panel secured by one or two Phillips-head screws. Remove the screws and set them aside in a magnetic tray to prevent loss. Slide or lift the cover gently; some models use plastic tabs that require firm but careful pressure.
Step 2: Disconnect the Wiring Harness
Inside, you will see the battery connected via a quick-disconnect harness (typically red and black wires). Do not pull by the wires themselves. Grip the plastic connector housing firmly and wiggle it side-to-side while pulling straight out. Forcing the wires can damage the internal PCB solder joints, leading to costly repairs.
Step 3: Release the Retention Mechanism
LiftMaster secures the battery with either a Velcro strap, a plastic clip, or a foam wedge.
- Velcro Strap: Peel back slowly. If aged, it may resist; use a flat plastic tool to avoid tearing the strap.
- Plastic Clip: Press the release tab downward or outward (direction varies by model) while lifting the battery.
- Foam Wedge: Simply compress the foam and slide the battery toward the opening.
Step 4: Extract the Battery Carefully
Tilt the battery slightly and slide it out of the compartment. Backup batteries weigh between 1.5–3 lbs; support the weight fully to prevent dropping. Inspect the compartment for corrosion, debris, or damaged wiring before installing a replacement.
Step 5: Proper Disposal and Replacement Note
Place the old battery in a plastic bag immediately. Do not dispose of it in household trash. Visit Call2Recycle.org or your local auto parts store for drop-off. When installing the new battery, reverse these steps exactly, ensuring the harness clicks audibly into place.
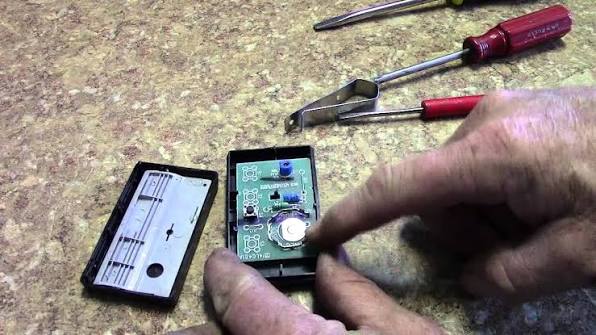
Removing Batteries From LiftMaster Remotes and Keypads
If your issue stems from a remote rather than the main unit, the process is significantly simpler but equally important for consistent operation.
| Component | Battery Type | Removal Method | Estimated Lifespan |
|---|---|---|---|
| Standard Remote | CR2032 Coin Cell | Slide back cover + pry cell out | 2–3 Years |
| Visor Remote | CR2032 Coin Cell | Remove screw + separate case | 2–3 Years |
| External Keypad | 9V Alkaline | Open bottom hatch + unclip | 1–2 Years |
| Smart Control Panel | CR2032 / Hardwired | Remove faceplate + disconnect | 3–5 Years |
For Coin Cells: Use a small flathead screwdriver or fingernail to pop the cell from its holder. Avoid touching the flat surfaces with bare fingers; skin oils reduce conductivity. Clean contacts with isopropyl alcohol if corroded.
For 9V Keypads: Press the retention tab at the bottom of the keypad housing. The battery compartment slides down. Disconnect the snap connector gently.
Signs Your LiftMaster Battery Needs Immediate Removal
Proactive replacement prevents emergency failures. Watch for these indicators:
- Audible Beeping: A repeating beep every 30 seconds usually signals low backup battery voltage.
- LED Status Light: Amber or flashing red lights on the motor head indicate battery fault (consult your specific model’s manual for code interpretation).
- Slower Operation During Outage: If the door moves noticeably slower on battery power than when newly installed, capacity has degraded below 70%.
- Age Threshold: Backup batteries typically last 2–3 years under normal conditions. If yours exceeds this window, replace preemptively regardless of symptoms.
- Physical Deformation: Any bulging, cracking, or residue mandates immediate removal and professional inspection.
Frequently Asked Questions (FAQ)
Q1: Can I use any 12V battery as a replacement for my LiftMaster opener?
No. LiftMaster specifies exact battery dimensions, terminal configurations, and discharge profiles. Using an incompatible battery can void your warranty, damage the charging circuit, or create fire hazards. Always use OEM LiftMaster part #485LM or the model-specific equivalent listed in your manual. Third-party alternatives must meet identical specifications verified through independent testing.
Q2: How often should I test my backup battery?
Test quarterly by unplugging the opener and operating the door through one full cycle. Time the operation; if it takes more than 20% longer than baseline or fails mid-cycle, replacement is needed. Annual professional inspection is recommended for units over five years old.
Q3: Why does my new backup battery drain so quickly?
Rapid drain indicates underlying issues beyond the battery itself. Common causes include faulty charging circuits, parasitic draws from damaged logic boards, excessive door cycles during outages, or extreme temperature exposure in uninsulated garages. Have a certified technician diagnose electrical faults before repeatedly replacing batteries.
Q4: Is it safe to leave the opener unplugged with the battery installed?
Yes, temporarily. However, prolonged disconnection (over 48 hours) can deep-discharge the battery, permanently reducing capacity. If storing or renovating, remove the battery entirely and store it charged in a climate-controlled environment. Recharge monthly during extended storage periods.
Q5: What tools do I need to remove the backup battery?
Most models require only a #2 Phillips screwdriver and optionally a plastic spudger. No specialized tools are necessary for standard removal. Keep insulated needle-nose pliers handy for stubborn connectors, but never use metal tools directly on battery terminals.
Q6: Can weather affect battery removal difficulty?
Absolutely. Cold temperatures make plastic clips brittle and adhesives stiff. If removing in winter, warm the garage to at least 50°F (10°C) first. Heat softens plastics but increases burn risk from recently used motors. Allow the unit to cool 30 minutes after operation before servicing in hot environments.
Conclusion: Restore Confidence in Your Garage Door
Knowing how to get battery out of LiftMaster garage door opener empowers you to maintain one of your home’s most critical access points safely and independently. By following these structured steps, respecting safety protocols, and recognizing early warning signs, you transform a potentially stressful malfunction into a manageable maintenance task. Regular battery care extends your opener’s lifespan, ensures emergency readiness, and protects your family’s security.
Found this guide helpful? Share it with neighbors, friends, or community groups who might face the same dilemma! Tag us on social media with your successful battery swap photos—we love celebrating DIY wins. Together, we keep America’s garages running smoothly, one battery at a time. 🔋🏡
Disclaimer: This article provides general guidance based on common LiftMaster models. Always consult your specific product manual and consider professional service for complex electrical issues. Battery handling carries inherent risks; prioritize safety over speed.
Leave a Reply