Introduction
There are few things more frustrating than a garage door that refuses to budge, especially when you suspect a dead battery is the culprit. If you are wondering how to get battery out of Chamberlain garage door opener units, you are not alone; this is one of the most common maintenance tasks homeowners face. Whether you need to swap out a dying backup battery or replace cells in your remote, this guide provides safe, step-by-step instructions to get your system running smoothly again.
Understanding Your Chamberlain Battery System
Before grabbing a screwdriver, it is vital to understand that “battery” can refer to two distinct components in a Chamberlain ecosystem. Confusing these two is the primary reason DIY attempts fail or result in minor injuries.
- The Backup Battery (Internal): A large 12V sealed lead-acid or lithium battery housed inside the main motor unit on the ceiling. This powers the door during electrical outages.
- The Remote/Keypad Battery (External): Small coin-cell (CR2032) or alkaline batteries located in your handheld remotes and exterior keypads.
According to Wikipedia, modern residential openers typically utilize a trolley-and-rail system where the backup battery serves strictly as an emergency redundancy, not the primary power source. Knowing which battery you are targeting ensures you follow the correct safety protocols.
Safety First: Critical Precautions Before Removal
Garage door openers combine high-voltage electricity with heavy mechanical tension. Even when removing a low-voltage battery, safety must be paramount.
- Disconnect Power: Always unplug the main unit from the ceiling outlet before opening the housing. This prevents accidental activation while your hands are near moving gears.
- Wear Protection: Safety glasses are non-negotiable. Old batteries can leak corrosive acid, and plastic tabs can snap unexpectedly.
- Check Capacitors: While less relevant for battery-only work, never touch internal circuit boards after unplugging without verifying discharge. Stick to the designated battery compartment.
- Ladder Stability: Use a fiberglass ladder rather than aluminum when working near electrical components to reduce conductivity risks.
Expert Tip: Most Chamberlain backup batteries have a lifespan of 2–3 years. If your unit is beeping every 30 seconds, the battery is likely at end-of-life and should be replaced immediately to prevent being locked out during a storm.
How To Get Battery Out Of Chamberlain Garage Door Opener (Backup Unit)
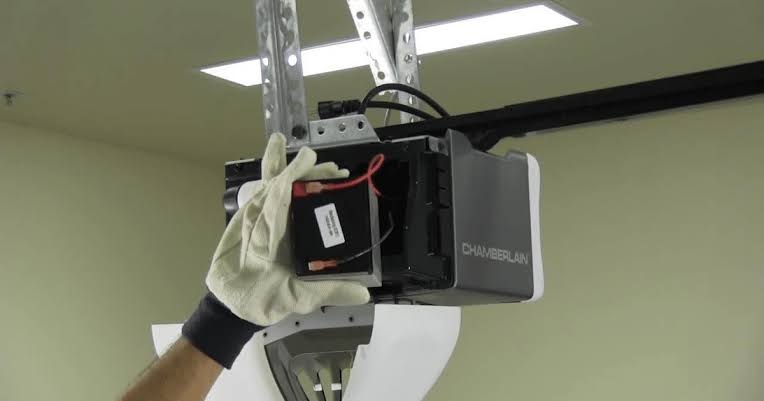
This section addresses the internal backup battery, which is the most complex removal process. Models vary (e.g., B970, B4613T, RJO), but the general architecture remains consistent.
Step 1: Access the Battery Compartment
Locate the battery cover on the motor head. On most belt-drive and chain-drive Chamberlain models, this is a black plastic panel on the side or bottom of the unit. You will typically need a Phillips-head screwdriver to remove 1–2 retaining screws. Some newer models feature tool-less snap-on covers; apply firm but gentle pressure to release the clips.
Step 2: Disconnect the Wiring Harness
Once the cover is removed, you will see the battery connected via a red and black wire harness. Do not pull by the wires. Grip the plastic connector firmly and wiggle it gently side-to-side while pulling outward. Pulling the wires directly can damage the internal PCB solder joints, leading to costly repairs.
Step 3: Release the Retention Mechanism
Chamberlain secures the heavy battery to prevent vibration damage. Look for:
- Velcro Straps: Peel back carefully. If aged, they may require cutting with scissors.
- Plastic Clips: Press the release tab inward while lifting the battery.
- Foam Padding: Note the orientation of any foam spacers; you will need to replicate this placement during reinstallation.
Step 4: Extract the Battery
Lift the battery straight out. It typically weighs between 1.5 and 3 pounds. Inspect the compartment for corrosion or debris. Clean with a dry cloth or a small amount of isopropyl alcohol if residue is present. Dispose of the old battery at a certified recycling center—never in household trash.
Replacing Remote and Keypad Batteries
If your wall console works but the car remote does not, the issue is external. Here is how to handle these smaller batteries efficiently.
| Component | Battery Type | Replacement Frequency | Difficulty |
|---|---|---|---|
| Standard Remote | CR2032 Coin Cell | 2–4 Years | Easy |
| Visor Clip Remote | CR2016 / CR2032 | 2–3 Years | Easy |
| Exterior Keypad | 9V Alkaline | 1–2 Years | Moderate |
| Wall Control Panel | CR2032 (if wireless) | 3–5 Years | Easy |
For Coin-Cell Remotes
- Locate the seam on the remote casing.
- Insert a flathead screwdriver or coin into the slot and twist to pry open.
- Remove the old CR2032, noting the + side facing up.
- Insert the new battery and snap the case shut until you hear a click.
For Exterior Keypads
- Open the battery cover at the bottom of the keypad (usually slides down or unscrews).
- Remove the 9V battery.
- Wait 30 seconds before inserting the new one. This allows the capacitor to discharge and resets the memory, preventing ghost inputs.
- Test all PIN codes immediately after replacement.
Troubleshooting: When New Batteries Don’t Fix the Problem
You have successfully learned how to get battery out of Chamberlain garage door opener and installed a fresh one, yet the system still fails. Consider these diagnostic steps:
- Check Terminal Corrosion: White or green crust on metal contacts prevents current flow. Clean with a wire brush and contact cleaner.
- Verify Battery Orientation: Reversing polarity in remotes is common. Double-check the + and – markings.
- Reset the Logic Board: Unplug the opener for 60 seconds, then reconnect. This clears error codes related to battery failure.
- Inspect the Transformer: If the backup battery drains within days of replacement, the charging circuit on the logic board may be faulty. This requires professional service.
- Test Voltage: Use a multimeter to confirm the new battery actually reads above 12.6V (for backup) or 3.0V (for coin cells). Shelf-stored batteries can degrade.
Frequently Asked Questions (FAQ)
1. How often should I replace my Chamberlain backup battery?
Most manufacturers recommend replacement every 2 to 3 years, depending on usage frequency and climate. Extreme heat accelerates degradation. If your unit emits a continuous beep or the LED indicator turns amber/red, replace it immediately regardless of age.
2. Can I use any 12V battery as a replacement?
No. You must use a battery specifically rated for garage door openers. Standard automotive or UPS batteries may have different discharge curves or physical dimensions. Using an incompatible battery can void your warranty and damage the charging circuit. Always match the model number specified in your manual.
3. Is it safe to leave the opener plugged in while changing the remote battery?
Yes. Changing remote or keypad batteries does not involve the main unit’s electrical system. However, always unplug the ceiling motor unit when accessing the internal backup battery compartment to eliminate shock risk and prevent accidental door movement.
4. Why does my new battery drain so quickly?
Rapid drainage usually indicates a failing logic board charging circuit, excessive door cycles during testing, or a defective new battery. Verify the battery voltage with a multimeter first. If the battery tests good but dies in under a month, schedule a technician to inspect the motherboard.
5. Do I need to reprogram my remote after changing the battery?
Generally, no. Standard battery replacements preserve programming. However, if you held buttons during the swap or the battery was dead for an extended period, some rolling-code remotes may lose sync. Simply press the “Learn” button on the motor unit and re-pair the remote following the manufacturer’s instructions.
6. What tools do I need for backup battery replacement?
Typically, only a Phillips #2 screwdriver and possibly needle-nose pliers for stubborn connectors. No specialized tools are required for most Chamberlain residential models produced after 2010. Keep a flashlight handy since you will be working with the power disconnected.
Conclusion
Mastering how to get battery out of Chamberlain garage door opener systems empowers you to maintain home security and convenience without unnecessary service calls. By distinguishing between backup and remote batteries, following safety protocols, and understanding troubleshooting nuances, you ensure reliable operation for years to come. Regular battery maintenance is a small investment that prevents major headaches during power outages or busy mornings.
Found this guide helpful? Share it with fellow homeowners on Facebook, Pinterest, or Nextdoor who might be struggling with their garage door opener today. A quick share could save someone from being stranded outside in the rain! Your community will thank you, and together we can make DIY maintenance safer and more accessible for everyone.
Leave a Reply